We are a collection of Minneapolis folks cooking, preserving, and harvesting local, seasonal foods. This blog-share is meant to inspire greater culinary genius, as well as continued local food invention. What are YOU concocting in that kitchen of yours?

12.21.2014

Paleo Mu Shu


Happy Solstice! I have not posted in a long while - definitely not since the days were much longer and the garden was still in full swing. A couple of months ago I began an experiment and moved up to the northside homestead full time. Now I am by the garden all the time, but it's got a layer of snow covering the whole thing. Snow that looks pretty mushy today! The harvest continued so late that I am only now finishing off the last of the tomatoes that have covered the kitchen table since November. Otherwise there are about a dozen carrots left, and 3 squash. I had to start buying vegetables at the store last week for the first time since summer!

The final carrot harvest! So pretty!

Tonight's dinner was an attempt at Mu Shu, but rather than wrapping it in the traditional "Chinese pancake" I used steamed cabbage leaves. Mu Shu was the only thing I ever ordered at Evergreen restaurant, a really delicious, home-style Chinese place, and really all for the pancakes. I haven't eaten there in years because of my gluten allergy, but I trust they still make great Mu Shu. Other than the pancake, the only other thing to "paleo-ize" was the Hoisin sauce, which is a critical component to the whole thing since it is what gives the flavor.


The verdict: it was delicious, and the cabbage leaf made a perfect stand-in for the pancake. The Hoisin sauce was definitely different - instead of bean paste, I used nut butter (per various online recipes). It tasted really good, just more like hoisin-sauce-meets-thai-peanut-sauce. Which makes it sound weirder than it was, because really, it was great.

I adapted an online mu shu recipe and paleo hoisin recipe to get what is below. Because I was trying to be authentic, especially for the first go of this, I wanted to get bamboo shoots. You could substitute carrots if you wanted, but, My Charming Companion says part of what makes Mu Shu is the blandness of color - everything is white-ish/yellow except the green onions. Carrots would sort of ruin it. So, I went to Sun Foods up here in Brooklyn Center for bamboo shoots - I had never seen them fresh before, and was originally expecting to get them canned. But as I walked into Sun Foods, which is basically an international Cub foods that feels like a different world - I started seeing all kinds of produce that made me think, huh - is that a bamboo shoot? I walked by enormous yams and tubers that seemed of African origin, and then a bunch of cactus and plantains and yucca before getting to these long yellow things that were the bamboo shoots. Which then were sold in 4 different varieties! So, uh, no need for the canned ones. I was in a time crunch, so the only other thing I got was friend plantain chips (YUM!) but I am pretty curious to go back there and see what strange new fruit or vegetable I come home with.

Paleo Mu Shu, serves 2-4
3/4 lb. pork loin, cut into strips
2-3 T tamari (or slightly more coconut aminos)
1-2 T sesame oil
1/2 small head cabbage, cored and thinly sliced*
1 1/2 cups bean sprouts
3-4 eggs, beaten
3-4 stalks green onion, julienned on the diagonal
3 cloves garlic, chopped
1/2 cup chinese mushrooms, stemmed and cut into strips**
1 cup bamboo shoots, cut into strips
5 T coconut oil/lard
Steamed cabbage leaves*
hoisin sauce
*Note: the taste will be superior if you have two separate cabbage heads - 1 for steaming and 1 for slicing for the insides. You will have leftovers from both cabbages, but one will be pre-steamed and won't be as crunchy in the mu shu!
**I just used regular mushrooms - we had some dried ones in the cupboard from a friend, so I re-hydrated those.

1. Steam cabbage leaves, aka mu shu wrapper: cut the core from one medium cabbage head. Steam the cabbage head in whatever steamer system you've got - it takes about 15 minutes before you can peel the outer 4-6 leaves, and another 10 minutes to get the next 4. The cabbage is hot when it comes out of the steamer, but use tongs to help you peel each of the leaves. It's easy so long as it steamed long enough. 8-10 leaves should do it. I set them aside in a cake pan, then 5 minutes before dinner, pop them into a 200 degree oven so they will be warm.
2. Prep your veggies and pork. Cut everything up because things go fast as soon as you get started. Put sliced pork in a bowl with tamari and sesame oil.


3. In a large cast iron skillet, heat 1 T fat on med-high heat. When pan and oil are hot, pour in the beaten eggs. You are basically making one big flat egg sheet. Let the egg set until firm enough to flip in one sheet; flip it over for another 10 seconds or so, then flip the whole think out onto a cutting board. Slice the egg sheet into thin strips and set aside.
4. In the same skillet, heat 2 T fat over high heat. Add half of the green onions and stir for about a minute, until onions are sizzling. Add bean sprouts and cabbage. Saute until cabbage is wilted, but still crunchy (this took just a few minutes). Remove from heat and set aside in a bowl.
5. Heat the remaining 2 T fat in the same skillet over high heat. Add the rest of the green onions and garlic and saute for a minute, until fragrant. Add pork and stir fry until just done. Add the mushrooms, bamboo shoots, cabbage, sprouts, and egg sheet. Stir fry for another few minutes.


6. Serve each mu shu cabbage leaf with a smear of hoisin sauce down the middle. Place several spoonfuls of mu shu inside and fold the sides in! (Really, we ended up cutting each cabbage leaf in half because they were so big - these do get a little messy, so be prepared!)

Paleo Hoisin Sauce, makes about 2/3 cup
3 T tamari  (or more coconut aminos)
3-4 T nut butter (I used part almond butter/part peanut butter)
1 T honey (or use part stevia)
2 tsp cider vinegar
2 tsp toasted sesame oil
1/4 tsp crushed red pepper
freshly ground black pepper

Stir everything together until combined - make sure to work nut butter well!

10.03.2014

Paleo Sushi

Last weekend I bought some wild coho salmon from the Seward because it was on sale, and in deciding how to prepare it, My Charming Companion was urging sashimi. Which then created a desire for some sushi rolls to go with. The amazing thing was I had all my fave sushi ingredients in the cupboard and fridge - even some pickled ginger - so impromptu sushi dinner it was. In my pre-paleo days I ate homemade sushi pretty often. I had looked at various paleo sushi options online over the last few years, never seeing anything I was excited about. But Studio Snacks had a version recently that included a one-egg omelette-like layer in lieu of rice that I found intriguing. So that is what I tried - it turned out amazing! And was actually much easier than traditional rice sushi because the egg is way less fussier than the rice. This would work for all kinds of sushi rolls, but here are the two I made.

Paleo California Roll
Nori sheets
cucumber, sliced lengthwise
carrots, sliced lengthwise
homemade mayo (opt)
1 egg per sushi roll
coconut aminos
avocado, sliced
sesame seeds (opt)

Paleo Salmon Roll
Thin slice of quality raw salmon
1 egg per sushi roll
coconut aminos
homemade mayo (opt)
cucumber, sliced lengthwise
sesame oil
toasted sesame seeds (opt)


1. Prep all veggies/fish - slice them and have them ready to lay in roll.
2. Make egg "sheets":To prepare them you will need one egg per roll. Ideally you want a pan that is 8-9" wide that is either a well oiled cast iron, or a non-stick pan. Heat the pan on med, with just a bit of coconut oil on the bottom (I replenished the coconut oil for each egg sheet). While pan is heating, mix one egg with a splash of coconut aminos. When pan is hot, pour egg into pan and swish around so that the egg layer covers the entire pan. You want the heat setting so that it cooks the egg pretty quickly, but not immediately. I tried two techniques next: either flip the egg to cook the other side (this takes about 10 seconds since it will be mostly cooked through), or just cook it all the way on side one. Either method works - just be somewhat careful because the egg sheet is quite thin, and you want it mostly intact to lay on the nori paper.
3. Assemble rolls: Lay one sheet of nori down. Spread a thin layer of mayo (if using) along bottom half of the nori. Lay your egg "sheet" on top - it should cover much of the nori. Then make one layer of your veggies/fish. Experiment with how much to fill. Roll up, using a bit of water to "seal" the nori to itself. (Studio Snacks has some photos about how this looks step by step.)
*One note is that because the egg sheets are round they will inherently have a less tight roll at the ends. You could cut the sheets into squares, or just trim one part of the circle and place it on the edges of the roll to make this more even. I just used the egg as is and had slightly uneven ends!
4. Slice sushi rolls. If you made the raw salmon ones, drizzle some toasted sesame oil over the top. Sprinkle rolls with toasted sesame seeds if you want, and serve with coconut aminos, wasabi, and pickled ginger.

The photo shows the full spread, including the sashimi of salmon with ginger (beautifully cut and arranged by My Charming Companion). Another endeavor I hope to try is to pickle my own ginger, maybe with a little honey. I found a couple of fermented versions, so I'll post that when I get around to trying it.


10.01.2014

Sicilian Dried Zucchini

I stumbled upon this dried zucchini recipe at Hunter, Angler, Gardener, Cook recently, and decided it would be worth testing out since I am always on the hunt for new ways to consume zucchini. (My fave way of eating zucchini lately is actually the Zucchini Noodle Bowl I posted a month or two ago - it's become a staple breakfast for me. Zucchini makes fantastic Asian soup noodles - I can eat this several mornings a week it is so good!)

I actually made this Zucchini recipe a couple of weeks ago, and am finally posting now as the weather is turning and the zucchini is waning. If you have any left, this is a nice way to use up a lot. It tastes delicious, and is texturally really different than you would expect. It's really dense and almost meaty - like vegetarian pepperoni (they are a bit salty too from the salt sweating). The recipe takes a bit of time...salting slices and dehydrating, but is somewhat novel - I wished I had dinner guests to share the dish with!

Post dehydrator zucchini - see how they are a little pepperoni like?!
I'm just going to send this recipe directly to his blog post because he includes lots of helpful tips. He gives an option for drying the zucchini in the hot summer air (he's in Northern California), but here in MN we are blessed with humidity, and that means air drying would definitely not be an option. You have to use a dehydrator here. I followed his directions and sliced my zucchini, then laid it out on trays with salt; I waited 30 minutes then patted the slices dry. I actually think you can easily just salt slices and put them in a colander for 30 minutes, swirl them around a bit, and pat dry. I've done this to "sweat" zucchini before and it works fine - using less space and salt. It also took closer to 4 hours in my dehydrator - though that may have been because I had a couple of trays of cherry tomatoes in there too.

The final cooking with mint, lemon, and chili pepper was delicious. Worth a summer day's experiment for sure!

9.29.2014

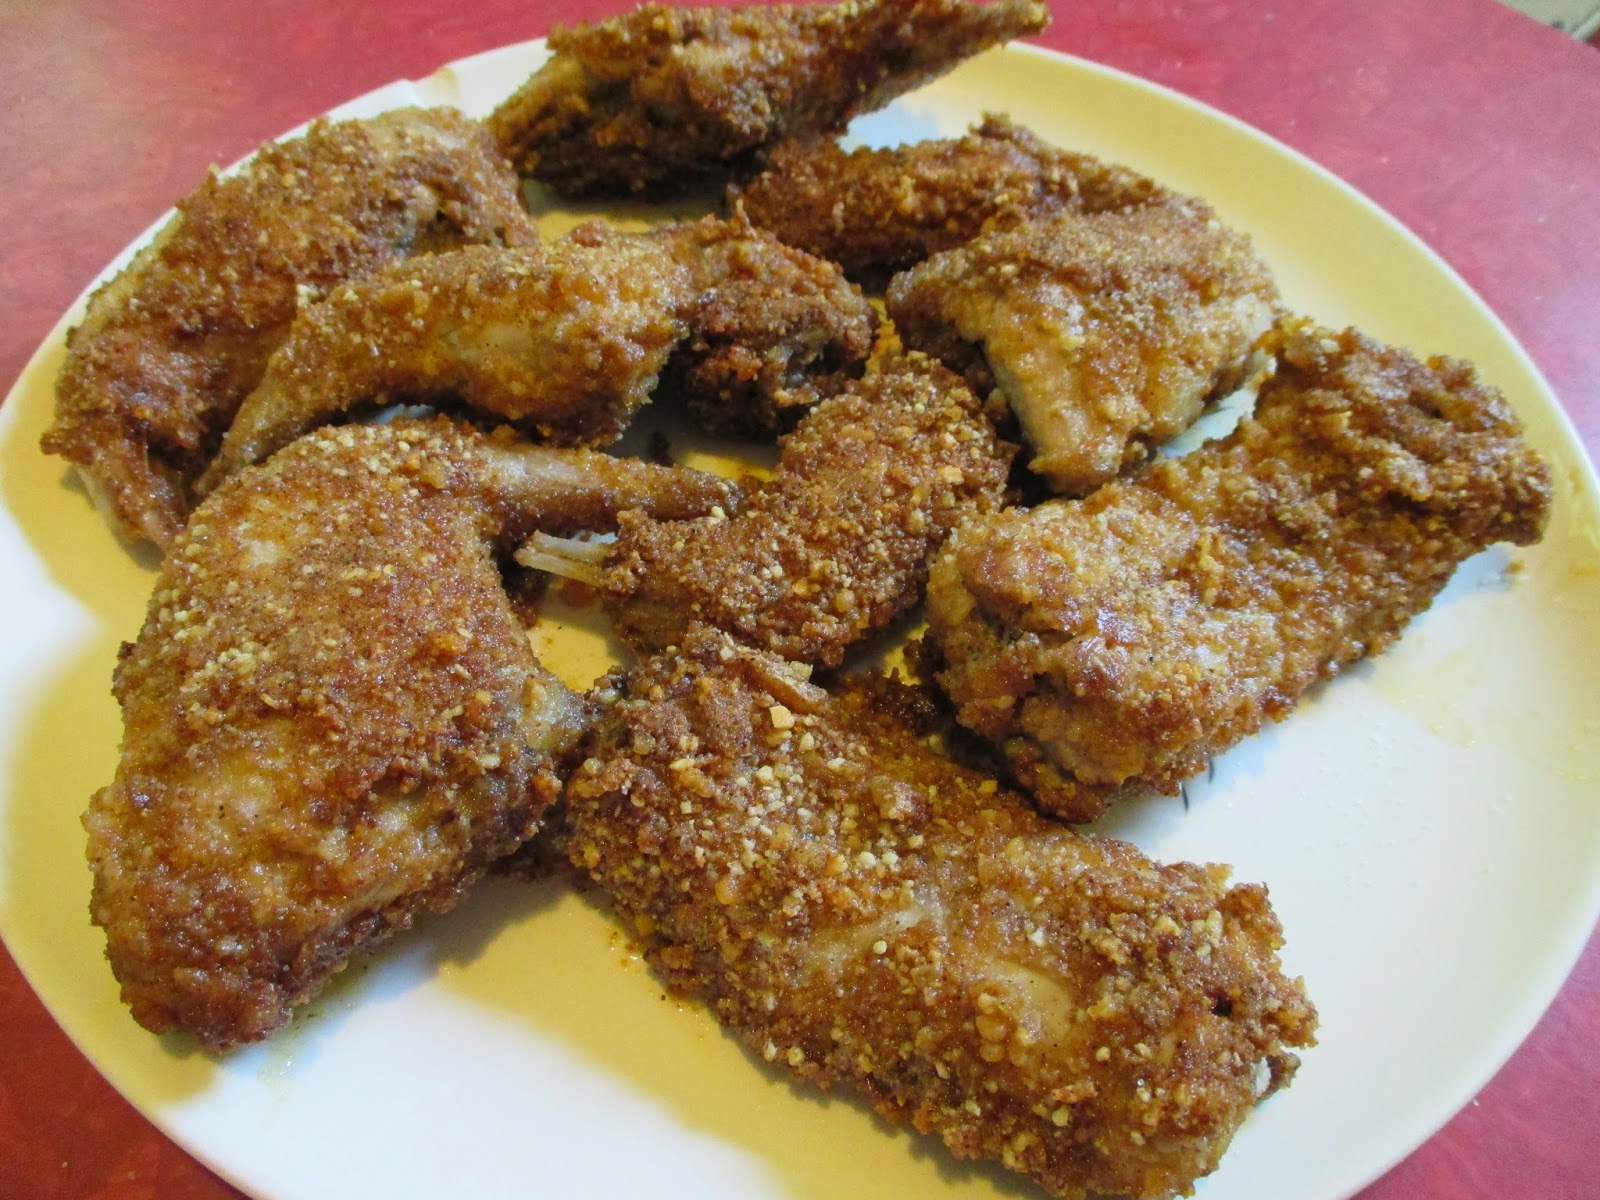
Minnesota Fried Squirrel - Grain free


I have not eaten much fried chicken in my life, and I was joking that this meal is the closest thing I have ever had to KFC. (I did once eat KFC mashed potatoes at the end of a cross country bike trip - my sister and I had just arrived to the coast in Oregon, and were hungry for mashed potatoes. We got some from KFC and were sorely disappointed!) So My Charming Companion names these "MFS" instead. I don't know that it will become the next big restaurant chain - but these WERE super tasty. If you don't have squirrel handy (perhaps you do not have a road-kill acquiring charming companion like I do) - chicken will also work. Squirrel is tougher than chicken though, so it needs to be poached for a good 30-60 minutes first. If you haven't eaten squirrel, it's a darker meat. I have eaten goose only once, and I thought it was a bit goose like. But really it is just like chicken, but smaller.

This MFS also utilizes the new frying technique that My Charming Companion has been working on (initially for fish frying). Guess what works great? Parmesan cheese (the kind from a can at Cub foods) and ground up pork rinds. They turn out crisp, crunchy, and delicious. Also - there are actually no weird products in either the parmesan or the pork rinds. Who knew? The pork rinds are fried in their own pork fat (double check that in the ingredients, this may vary by brand) so you aren't getting some weird oils, and salt is the only other ingredient. It isn't a pastured or grass fed animal, but I guess I am not willing to make my own pork rinds just yet.

Minnesota Fried Squirrel (MFS)
1 squirrel per person (or chicken breasts or thighs)
Equal parts Parmesan cheese and ground pork rinds
1 egg, whisked
Bacon or pork belly fat for frying

1. If using squirrel, you'll need to poach it first to make it tender. Put squirrel pieces into pot and cover with water by about an inch. Depending on the size (age), you will need to boil for 30-60 minutes. You can test this by poking the meat with a fork. you want it to feel tender.

Cooked squirrel pieces
2. Prepare your parm/pork rind mix in a bowl. You'll need to grind the pork rinds in a coffee grinder or food processor to get a flour-like consistency. For two squirrels you will need about 1/4 c each of parm cheese and the powdered pork rinds.
3. Heat your pork fat in a cast iron - you'll need the pan to be filled about an inch on the bottom. You want this to be hot when you put in the meat - the fat should be smoking a bit.
4. Dip your pre-cooked squirrel or raw chicken pieces in the whisked egg, then coat with the fry mixture (turn it in the mix and make sure all sides are coated). Carefully lay in frying pan so as not to splatter yourself. Cook until crispy and browned on one side (about 4-6 minutes) and flip. If using pre-cooked squirrel, you do the same for side two, and then serve. If using raw chicken (or tender, aka young squirrel) then cover the pan with a lid, turn the heat to medium-low, and cook for 30-40 minutes. Once the chicken is done (you can  check with a thermometer), turn the heat up again and flip the meat over to re-crisp the top side.
5. Let meat rest for a couple of minutes to cool down enough to touch, then serve. We had these with some cauliflower mashed potatoes to complete the MFS meal. Yum!

Here is a fried sardine salad using the fry technique - yum!

9.26.2014

Lobster Mushroom Chowder

I just returned from a week long Boundary Waters trip - one of the highlights of which included eating lots of wild mushrooms! On last year's fall trip, My Charming Companion and I regretted not bringing a mushroom guide with us because there were so many mushrooms everywhere in the north woods. This year My Charming Companion did a bunch of research and made a handy cheat sheet.

Definitely not a beanie baby
Boletes lined most of the portages we crossed, and though I didn't get any photos, they are a delicious, buttery mushroom. The lobsters were the most spectacular though. I had only just heard of their existence on a portage; a young guy doing some wolf research with the forest service was seeming quite depressed because after 2 weeks they had yet to find any wolves, and his group was down to the lackluster meal options. My Charming Companion was showing him boletes, because the only mushroom the wolfer knew of prior to that were lobster mushrooms. I had never heard of them, and didn't ask any more. Later that afternoon upon arriving at our campsite, I was visiting the latrine when I looked over and saw what appeared to be a bright red beanie baby lying in the woods. If something is called a lobster mushroom, I thought - than this must be it!

One lobster lead to several more - the easiest mushroom hunt ever because nothing else is that color in the woods. We didn't see any more of these anywhere else on the trip, so somehow this site on clearwater lake was a lobster mushroom hotbed. They were delicious! Apparently these mushrooms are actually a mold that grows over the mushroom. It's the prettiest mold I've ever seen, but is why the shapes vary A LOT. Some are like shells, others are more bulbous. And they have a slight seafood scent when raw and cooking. They taste really nice, and are quite firm. They hold their shape well. We ate them once sauteed in some ghee with eggs, and again in a chowder (while Clearwater lake was bountiful in lobster mushrooms, it was bereft of fish - so what would otherwise have been a fish chowder, was a "lobster" chowder instead - ha).


If you ever come across these, a simple butter/ghee saute would be great. They can cook awhile, and they will turn the butter an orangey color. To prep: trim away any dirt areas, and slice in nice large slices. Some of them had brown spots - or lines really - I'm guessing it was the inner mushroom, or that they were older. I cut those parts out because we had so many and I wasn't sure about it, but upon some research at home, it seems fine to eat that too.


For our chowder, we started sauteing the mushrooms (in ghee) first since we had to do it in two batches (due to limited cooking vessels). Meanwhile we chopped up a few slices of bacon and cooked them, than added dehydrated onions, peppers, celery, and a few potatoes along with a bunch of water to hydrate everything. The hydration takes a good 15 minutes or so, and we added the mushrooms once they had softened and been sauteed a bit - there were too many mushrooms to fit in our largest pot, so we had a bit of overflow! Then we added some salt, pepper, and cajun seasoning and simmered everything another 10-15 minutes. We stirred up a bit of cream powder, and mixed that in at the end. It was delicious!


9.10.2014

Chinese Dumplings (Sui Mai) Paleo-style

I'm pretty picky about what blogs I follow...I want them to be paleo, I want them to feature mostly food for meals (not desserts), and I don't really like when there is lots of promotional material. I also like when they feature foods from various cultural cuisines. Really, I have only a few staples that I check out regularly (i'm on the hunt for more). Studio Snacks is my recent find - I've mentioned the blog before, but this is my first mostly-true-to-recipe post. She seems to be on a quest to create some paleo dim sum options, this one being Sui Mai (stuffed zucchini). I haven't ever had dim sum, which will be my fate unless a gluten free dim sum place appears. But really, I found these delicious, so who needs it?!

I actually think I can do some more playing around with them. I made these twice - both times using zucchini instead of yellow squash because, well, the zucchini just keep growing. The first time I steamed the dumplings as directed, but found they were too watery for my taste. The second time I baked them in the oven, but then the meat texture wasn't as nice. I am not sure if this is a) due to baking, b) because I used a spoon to mix the pork/shrimp mixture and not my hands (maybe the fat from the pork didn't set well enough with the rest of the ingredients?), c) because I let the meat mixture sit out longer before stuffing the zucchini, or d) because the zucchini were larger and maybe too big, hence needing a longer cooking time and possibly over-cooking them.

Ultimately either cooking method worked, but the steaming meant watery dumplings, and the baking version had meat was a bit soft. Take 2 also included a trial of stuffing the meat mixture into mushrooms, but I didn't find that as tasty. The mushrooms were too strongly flavored, whereas the zucchini is more neutral. My Charming Companion (who was really excited about these because, unlike me, he has a long history of dim sum eating and was missing dumplings) also suggested trying to wrap these in steamed cabbage leaves, which I find intriguing and want to try.

Anyway - you can also just make this meat mixture, fry it up in mini patties, and eat dipped in some sauce. I did that with part of batch one and it was delicious.The meat gets a nice sear on it that way too!

Stuffed Zucchini "Dumplings"
3-4 medium zucchini
1/2 pound ground pork
5 large shrimp
6 shiitake mushrooms
1/2 inch of ginger
1/2 teaspoon fish sauce
1/2 teaspoon sea salt
1 teaspoon roasted sesame oil
1/2 teaspoon white pepper powder
1/4 teaspoon 5-spice powder (optional)

1. Shell/devein the shrimp; mince it, along with ginger and muchrooms. Mix together with the pork.
2. Add remaining ingredients and mix into pork mixture. Use your hands (just in case this contributed to better meat texture) to really blend the flavors. Put mixture in fridge while you prep the zucchini.
3. Cut zucchini into 1/2" thick slices. Using a spoon, score around each slice in a circle, then dig into the circle and scoop out the center. Imagine you are using a melon ball scoop - but it's a spoon.
4. Fill each ball with meat mixture (it will be super sticky - wetting your hands will help). If you are steaming, start the water boiling in your steamer; to bake, heat oven to 350. To steam: put sui mai into steamer and steam for 15 minutes, or until pork is cooked. To bake: bake for 15-20 minutes until pork is done.
5. Serve with dipping sauce below!

I first used a simple coconut aminos/fish sauce/sriracha to dip these in, but My Charming Companion was not having that. The recipe he devised is a bit more traditional, and was delicious.

Dipping Sauce
2 T coconut aminos
2 T rice wine vinegar (or white wine vinegar)
1 tsp grated fresh ginger
sprinkle of sesame seeds
splash of sesame oil

9.08.2014

Paleo Tabbouleh

This photo is with hemp seeds - but pepitas are just as good!
I was never a big tabbouleh fan - I'm not sure why really, except that it just seemed to be too much parsley and too grain-y. (Traditionally the salad is largely bulgher.) But this recipe is not that way it all - this version is all fresh veggies with just a bit of grain crunch - though in this case the "grain" is some chopped up pepitas.

The recipe I modeled this version from is actually a nutiva recipe - I order my coconut oil from them because it is super cheap to get in a 1 gallon bucket. Their original recipe uses hemp seeds (no pepitas), but hempseeds are expensive. I did try the recipe with hempseeds initially (see photo) only to realize that I could really use any number of chopped nuts/seeds. And it turns out I LOVE tabbouleh! At least this version. You could certainly add more pepitas - but I like them as a small part of the overall salad.

Garlic chive blossoms
I also used some garlic chive blossoms instead of onion. These are all over the garden at the Northside homestead - and they are not actually related to the garlic plant (good for my garlic allergy) - and are more like chives. The blossoms taste like mild green onion, but with fun texture. I've been putting them in just about any fresh salad thing because they are so plentiful and pretty. Also they grow like crazy - I am going to bring some down to my house so they can be there for late in the season fresh onion-ness.

Paleo Tabbouleh
Huge bunch parsley (I used flat leaf cuz that's whats in my garden)
1/2 c chopped pepitas (or hemp seeds)
2 c cucumber, diced
1 c tomato, diced (use a nice sweet variety)
1/4 c red onion or garlic chive blossoms, diced
1/4 c fresh lemon juice
6 T olive oil
1 tsp sea salt

1. Mix parsley, pepitas, cucumbers, tomatoes and onion/chives in a bowl.
2. In a small bowl mix lemon juice, salt, and olive oil. Pour over tabbouleh. Serve!

8.27.2014

Grain-free Carrot Muffins

I don't eat a lot of paleo baked goods - but for whatever reason this one has made it into my repeat repertoire. This is a recipe from my neighbor that I adapted just slightly - these muffins are just plain delicious; they are moist and dense, and are perfect with some morning tea.


Grain-Free Carrot Muffins makes 12
2 eggs, separated
1 more egg
1/4 c softened butter or ghee
1/4 cup thick coconut milk/cream
1/4 c honey (or less, or sub stevia)
2 1/2 c almond meal
1 tsp cinnamon
1 tsp baking soda
pinch salt
2 tsp lemon zest
1-2 c grated carrots
1/4 c raisins
1/4+ c walnuts
1/4 c unsweetened shredded coconut

1. Preheat oven to 300 degrees.
2. Beat egg whites until stiff. Add egg and yolks, ghee, honey, almond meal, cinnamon, baking soda, salt and lemon zest. Mix together. Add carrots, nuts, raisins and coconut.
3. Bake for 30-40 minutes. These are good warm out of the oven, or chilled. I kept the extras in the fridge in a covered container, and they easily last 1-2 weeks.

8.26.2014

Carrot-Sweet Potato Cakes (and hollandaise)


All the rain this spring created some beautiful, large carrots. I've been sort of holding back on picking them since the zucchini and green beans are first in order, but I picked a few this weekend to make these. I've made these latke-like cakes a few times over the past several months - but this was my first time making them with garden carrots. Yum! I decided to go all out and make hollandaise sauce too for a proper paleo eggs benedict. It turns out hollandaise isn't as hard to make as I imagined. I also didn't really realize that hollandaise is really just like a butter or ghee mayo, but with egg yolks instead of egg.


The original recipe for these fritters is spiced more sweet than savory, with cinnamon and ginger and nutmeg. I go more savory and just use salt and pepper for flavor because I find they make really good burger buns, or as a platform for an egg - they are sort of bread-like with the sweetness from the carrot/sweet potato. These cakes are similar to the root veggie latkes I posted some while back, but these don't include onions and are a little egg-ier. I find these ones simpler, and the extra eggs lend to a more bun/bread-like experience.

Carrot-Sweet Potato Cakes (makes 8 cakes)
1 cup sweet potato, shredded
2 cup carrots, shredded
4 teaspoons coconut flour
4 eggs
coconut oil for cooking
salt to taste at end

1. Mix shredded carrots and sweet potatoes in a large bowl. Add coconut flour and stir to coat the shreds evenly.
2. Beat eggs together and pour over carrot/sweet potatoes. Mix thoroughly. The mixture will be quite wet and shrink a bit.
3. Heat coconut oil in cast iron skillet or griddle on medium heat. When the oil is hot, spoon out (or use your fingers like I do), a heaping 1/4 cup's worth of "batter." Cook for 3-4 minutes on each side until browned and a bit crispy. As the cakes are cooking, sprinkle some salt on each one. (You could add salt to the mix too, but I find this causes the cakes to get more wet - better to salt at the end.)
4. These are ready to eat right off the griddle, or you can keep them in a warm oven if you are using them for burger buns or eggs benedict. I've had them at room temp too and they are still good.

For paleo eggs benedict top these cakes with some bacon, egg, and hollandaise sauce (see below). Yum.

Hollandaise (makes about 1 1/2 cups)
*This is how I made mine and it was delicious. There are lots of recipes out there with varying amounts of butter and egg yolk, but this one worked for me. It helps to have a cooking companion to help pour while you whisk.
2 sticks butter (lightly salted or unsalted)
3 T water
3 egg yolks
2 T fresh lemon juice
Warm water

1. Melt butter (or ghee) in a small saucepan. Simmer on low heat.
2. Create a double boiler using a small pot with water in it, and a larger metal mixing bowl on top. You want rounded edges in the metal mixing bowl since you are going to be whisking and you don't want egg caught somewhere. Heat water in the pot to boiling. When it is near boiling, put your egg yolks and water in the large mixing bowl (off of the steaming pot) and whisk together for 30 seconds until frothy.
3. When water in pot is boiling, put mixing bowl on top (this is your double boiler) and continue whisking. It will take a minute or two for the bowl to heat, and what you are going for is a very subtle cooking of the egg and water. This will take another minute or two (so 3-4 minutes total), and you are looking for the egg yolks to become pale and creamy. They will leave a trail, or tracks, behind them that hold for a few seconds. As soon as this happens, remove the eggs from the double boiler and turn the heat off under the pot. Whisk the eggs another 30 seconds or so to cool them a bit.
4. Slowly pour in the warm butter as you continue whisking (still off the double boiler). This will take several minutes - you are adding the butter slowly because you don't want to "break" the emulsification. Once the butter is added, add your lemon juice. I like a lemony hollandaise, so kept adding it until it tasted right to me. 1-3 T should be good. Also add salt to taste if you used unsalted butter.
5. You can rest your sauce on the double boiler pot until you are ready to serve - don't turn the heat on, it will be warm enough there to hold it. Mine sat at least 15 minutes - I'm sure it can sit longer if you whisk it occasionally.
6. If your hollandaise is too thick: I like a slightly thinner sauce. If yours is thicker than you like, whisk in warm water (again a little at a time) before serving (I just used the warm water from the double boiler pot). I added 2-3 T worth until it was the consistency I like.

This recipe makes plenty to serve 4 (8 carrot-sweet potato cakes and 8 eggs); I had extra left over. And I have been eating it up! It was delicious spread on left over chicken breast and to dip my carrot sticks in. You can also gently reheat this - again in a double boiler - to bring back to the warm, pourable texture. Cold it is more like a thick mayo, or a very soft and creamy butter.

Carrot-Sweet Potato cake as a burger "bun" with mayo.

8.22.2014

Fennel Meatball Zucchini Pasta

Travel lunch: zoodles, sauce, and meatballs!
The zucchini is taking over! I've been rotating zucchini, green beans, and cucumbers among the three meals of the day all week - they are prolifically abundant in my garden. Mostly I've been eating the very basic sauteed zucchini (with onions, or bacon, or plain), but I am also eating a fair amount of "zoodles." This recipe also utilizes some garden tomatoes (those are slower in my garden, so I used up some of last year's frozen ones) in the sauce. The fennel in the meatballs was nice with the fresh basil. I actually ate these meatballs with both pesto sauce, and this simple tomato-basil one. Both were delicious.

Fennel meatballs
1 lb beef or venison
1/2 small onion, minced
1/2 tsp salt
1 tsp fennel seeds
1/4 tsp red pepper flakes
freshly ground pepper
1 egg
1 T coconut flour

1. Preheat oven to 400 degrees.
2. Mix ingredients together and form into 1" balls. Place on a rimmed cookie sheet or cake pan in a single layer and bake for 20-25 minutes, until golden brown.
3. Serve over zucchini noodles with pesto or tomato basil sauce.

Tomato-Basil Sauce
1/2 small onion, diced
1 T fat (lard, ghee, coconut oil)
2 cups chopped tomatoes
2 T tomato paste
1/2 tsp salt, more to taste
1 tsp oregano
1/2 tsp red pepper flakes
big handful fresh basil, chopped

1.  Heat fat in a heavy saucepan. Saute onions until translucent, then add tomatoes. Simmer for 5-10 minutes to cook down.
2. Add remaining sauce ingredients, and adjust seasonings to taste. Continue to simmer another 5-10 minutes until desired thickness. 

8.19.2014

Lemon chia seed pudding

My Charming Companion has been doing lots of blood sugar experimentation of late - he is being vigilant about keeping his blood sugar in check to prevent any possible blood sugar-related health issues. I read one of the books he has about diabetes - it's by this guy who has type 1 diabetes who was an engineer, and later become a doctor just so he could share what he has learned about diabetes and be taken seriously. His information is counter to general diabetic practice - but basically he has found a way for diabetics to live healthy lives. He also purports that diabetes (or what western medicine calls "pre-diabetic") is actually the cause of death for many people, not heart disease or whatever comes after. He says blood sugar issues are the reason, and he has basically found a way to keep blood sugar spikes from happening in diabetics. And it is of course all diet, and self awareness about what particular foods spike a person's particular blood sugar. Which means lots and lots of checking on a glucometer.

Anyway - all this digression to say that My Charming Companion has discovered that he can't really eat many carbs in the afternoons and evenings. So there was some weekend experimentation about what to fry fish in for next month's boundary waters trip (it had been rice flour). Turns out ground up pork rinds mixed with Kraft parmesan cheese works great. (Neither product typically being in the cupboard - but both actually being free of weird added products?!) There was also some pudding experimentation to try to find something sweet to eat (and maybe sans chocolate for night-time caffeine sensitivities).

Which leads me to this post. This recipe does have some honey in it - so if you have blood sugar issues, increase the stevia and eliminate the honey, or if you don't want stevia, increase the honey. It turned out really nice and lemony and creamy. And as chia seeds are - it was super easy.

Lemon Chia Pudding
5 tablespoons chia seeds (I used white)
1 can coconut milk
1/4 c coconut water or water
2 teaspoons honey, plus 4-6 drops stevia
1 teaspoon vanilla extract
Zest and juice of 1 lemon
pinch salt

Stir all ingredients together in a bowl. Leave out on counter for another 5-10 minutes, stirring two more times and making sure chia seeds are not clumped up. Put in the fridge overnight, or for a couple of hours. The final product will be a little bit soupy and not totally firm. I ate mine with some toasted coconut flakes and some toasted pepitas - yum!

8.17.2014

Paleo Granola

Peaches, granola, and coconut milk!
This summer brought my first attempt at paleo granola - I just love fresh berries or fruit with granola on top, and I hadn't had anything like in a couple of years. So when I got a bounty of juneberries from my neighbor's tree this year (she went out of town right at peak juneberry time), it inspired some granola making. I tried a few recipes, including one from the 21 Day Sugar Detox lady that was sweetened only with a not-yet-ripe banana. I liked that one, but found I preferred a moderately (as in not-very-sweet) honey-sweetened version better. The "banola" recipe was also a little chewy, and I wanted crunchier granola.

The basic concept of paleo granola is pretty simple: combine nuts, seeds, coconut flakes, some fat and sweetener and bake. Some folks use an egg or egg white to help with the crunch, and I preferred that in my two comparison recipes. The one with egg white was a little drier and more crisp in the end product, but also a little bit less clumpy. The nuts are also interchangable for whatever you have handy.

Paleo Granola
1 c. almonds
1 c. cashews
1 c. pecans
1 c. unsweetened coconut flakes
1 c. pepitas
1/2 c. sunflower seeds
1 egg white
1 T water
1/4 - 1/3 c. honey*
1/4 c. coconut oil
2 tsp vanilla
1 tsp cinnamon (opt)
1/2 tsp salt
1/2 - 1 c. raisins or dried fruit

*I use 1/4 c plus 6 drops stevia

1. Put nuts and coconut flakes in food processor and pulse/process until chopped up so there are still some good size pieces - some of it will be pretty chopped, just stop before the whole thing turns to a nut flour consistency.
2. Empty nuts and coconut into large bowl, and add pepitas and sunflower seeds.
3. In smaller bowl, whisk egg white and water. Add honey/stevia, coconut oil, vanilla, cinnamon and salt. I needed to heat my honey/coconut oil so they would be liquid.
4. Stir wet ingredients into nut and seed mix and coat. It will look fairly wet and be a bit clumpy.
5. Spread granola onto a cookie sheet or baking pan. Bake at 300 degrees for about 40 minutes, stirring every 10 minutes or so. Take the granola out when the mix is nicely browned. Add your raisins and and let sit for another 15-20 minutes to cool and harden.
6. Spoon into a bowl, top with some fruit and/or coconut milk, and eat! This stores well in a sealed jar (wait til it's all the way cooled first). I had no problem storing it for a couple of weeks, and it could likely go longer.

This is the 21DSD "banola" for comparison: more clumpy, less crisp. Still delicious though.

8.15.2014

Thai/Hmong Larb Salad

I have made this dish twice in the last few weeks because it is so great to eat with garden cucumbers and makes a really good work lunch. I used to make this salad back in my vegetarian days with mock duck (after discovering it at Chang Mai Thai restaurant), but that was years and years ago, and I had sort of forgotten about it. Then I went to the World Street Kitchen a few weeks ago and had the lemongrass meatballs wrapped in lettuce.* They triggered my memory of larb salad, which gets wrapped in lettuce or eaten with cucumbers (and rice, traditionally). I realized they are a perfect paleo food item - especially at this time of year.
*The meatballs and pickled cucumbers at WSKwere delicious, btw. I recommend them for some easy paleo eating out.)

I created a recipe based on a few I found online, and then "paleo-izing" them, which really just meant not using any rice flour. This recipe is also set up for what is currently in my garden...if it were green onion season, those would be in there instead of regular onions - so modify accordingly. Garlic would also be good, and is traditional - but I can't eat it so it is not in this version.

Larb Salad
1 T lard or coconut oil
1 lb ground or minced beef
1/2 onion, finely diced
2 tsp chili pepper flakes (or sliced/minced hot chili pepper)
1-2 Tbsp fish sauce, to taste
lime juice to taste (I use the juice of 1/2 a lime)
salt and pepper to taste
1-2 tsp coconut aminos/tamari
1 big handful chopped cilantro
2 big handfuls chopped mint
(some minced lemongrass or kafir lime leaves are also good if you have them)

1. Heat fat in pan and add onions. Saute until beginning to become translucent, then add chili pepper and beef. Cook until meat is browned.
2. Transfer beef/onion mix to a bowl, and stir in remaining ingredients. It should be well-seasoned and richly flavored since you eat it with crisp veggies. Adjust the lime juice/fish sauce/aminos to your liking.
3. Serve with lettuce and cucumbers - you can scoop the larb up on cucumber planks, or wrap the larb in lettuce. It's delicious! And translates well at room temp for a work lunch.

8.14.2014

Easy Zucchini Noodle Bowl


It's been 4 months since I last posted, and for some reason after breakfast today, I thought - I think I'll post this one?! So here I am.

Mayday!
Since the last posting, Mayday happened, I went to the boundary waters, attended several lovely wedding/love festivities, visited Colorado, and watched a lot of Lynx basketball! And did garden tending and cooking in there too...some of which I may post about if I get back into the swing of things on the blog.

Boulder mountains

My gardening got a late start due to the late spring and being up north, but things are looking alright as we head into fall. The cucumbers and green beans are bountiful, with zucchini and eggplant not far behind. I'm hoping the fall lasts long enough for at least a few good winter squash, but we'll see!


I made a pork roast in the crockpot yesterday, and had some leftover broth from all the juices in there. I inevitably freeze that cup of pork broth and it gets lost in my freezer, so this morning I decided to just use it right away in an easy breakfast soup: zucchini noodles (or "zoodles"), some arugula, eggs and a bit of left over pork belly. It was super delicious, and in aftermath I realized it was partly inspired by a zucchini noodle bowl recipe I saw on a blog called Studio Snacks. All of the recipes are free of major allergins (wheat, dairy, soy and grains) and Cherry (the blogger) calls them "vegatable-forward" meals, which I find charming. Many are also Cantonese recipes since she grew up in Hong Kong. It's a new fave recipe checkout spot. My version is way simplified though.

Easy zucchini noodle bowl (for one!)
1 small zucchini
handful arugula (or spinach or swiss chard)
1/2 -1c. pork or chicken bone broth
fish sauce
coconut aminos
salt
slice of pork belly (opt)
egg or two
basil, chopped (opt)

1. Make zucchini noodles via mandoline and set aside.
2. Heat broth in a pot and keep on a low simmer. Add a dash of fish sauce, aminos, and salt if your broth is unsalted.
3. Cook pork and egg! I had pork belly left overs in the fridge, so I just cut a slice and re-heated it. If yours is raw, cook your slice/s longer. I fried my egg in the same pan as the pork belly.
4. While everything is cooking, get your bowl and fill it with the raw zucchini noodles and arugula. Pour the hot broth over the top (that will wilt the veggies to a nice texture) and top with fried egg and pork belly.
5. Serve with sriracha and chopped fresh basil on top! Cut green onions or garlic scapes would also be delicious here if you've got them.

4.18.2014

Daft Punk and Soul Train

Well. I have not felt like posting lately. Instead I'm braiding rugs and going on walks. I am not sure when I'll post again. Who knows? Instead, I'm just loving this video and dancing in my living room!


3.23.2014

Paleo Lemon Poppyseed Muffins

I am not sure what came over me, but I really wanted to make some lemon tasting muffins this weekend. I've been on a bit of a splurge of gluten free goodies the past week, mostly facilitated by going out to various places for my birthday.

Muffins! Yum! These turned out great - they were light and fluffy - and were simple, with stuff I happened to have around. I want to experiment a bit with this recipe to make grain free lemon pancakes, and top them with blueberries or raspberries.

I followed the original recipe very closely, just reducing the honey and adding a few drops of stevia. I also just made a half batch (with 2 large eggs). My half made 4 muffins, not 6, but I filled the muffin cups fairly full.

Paleo Lemon Poppyseed Muffins (makes 9-12 muffins)
1/2 cup + 1 tbs of coconut flour
5 eggs
1 tbs of vanilla
1/4 cup of melted coconut oil
2 medium sized lemons juiced
1/3 cup honey (or 1/4 c honey plus some stevia)
1/2 tsp of baking soda
Zest from 2 lemons
2 tbs of poppyseeds (you could also use chia seeds if you can not find poppyseeds)
  1. In a large bowl mix together the eggs, vanilla, and lemon juice. Melt the coconut oil and honey together and pour into the egg mixture.  Mix everything together.
  2. In a separate bowl mix together all the dry ingredients.  Slowly stir them into the wet ingredients. The batter will thicken after a minute or two, and will get sort of puffy looking. This is good!
  3. Fill each (greased) muffin tin (or lined muffin pan) with about 1/4 cup of batter
  4. Bake for 22 minutes. Let cool a couple of minutes, and eat!

3.20.2014

Citrus Salad with Fennel Vinaigrette

I saw this salad on the Bon Appetit website and decided I wanted to try it for these sesame clusters that topped the salad. But then when I made the sesame clusters, I opted to use stevia instead of sugar, and that was kind of a disaster. BUT, the dressing was AMAZING. I did use some honey in there - so that was partly it, but the fennel, shallots and ginger tasted brilliant together, especially with some fresh mandarin oranges in the salad too. I just skipped the sesame clusters after attempt one, but you can see them in the photo. If you want to make them, follow Bon appetit's recipe and just use the sugar!

As we slog through the last days of winter, I just want some fresh stuff! I've made a variation on this salad several times in the past month - and my favorite is to stick pretty true to the original recipe. It's a bit fancier than what I would ever make on my own, and though it is simple, the flavors are pretty bold.

Citrus Salad with Fennel Dressing (from Bon Appetit)
cup olive oil 
¼ small fennel bulb, finely chopped, plus ½ cup chopped fronds  
1 small shallot, finely chopped  
2 tablespoons finely chopped peeled ginger 
1 teaspoon fennel seeds, crushed  
¼ cup white wine vinegar  
2 tablespoons honey (or honey/stevia combo)
Kosher salt and freshly ground black pepper  
4 navel oranges, blood oranges, tangerines, and/or grapefruit  
10 cups mixed hardy salad greens (radicchio, frisée, endive, etc; about 1 lb) 
1 cup fresh flat-leaf parsley leaves

This one had less citrus and more dressing!
1. Heat oil in a medium skillet over medium heat. Add chopped fennel, shallot, ginger, and fennel seeds and cook, stirring often, until tender (do not let brown), 8–10 minutes. Mix in vinegar and honey. Let cool; season with salt and pepper.
2. Finely grate 1 tsp. zest from 1 orange; set aside. Using a sharp knife, cut all peel and white pith from all oranges; discard. Cut between membranes to release segments into a medium bowl; discard membranes. (This was far too fussy for me. I just peeled the mandarins and put the sections in the salad. I sliced my blood orange and cut off the peel...way easier, but less gorgeous I spose.)
3. Toss greens, parsley, fennel fronds, oranges, and dressing in a large bowl. Serve topped with reserved orange zest.