I've been reading (and photo gazing) The Taste of Persia
- a cookbook that is subtitled as an introduction to Persian cooking. I
pulled it out originally to look at the kebab recipes, but got
sidetracked by some of the khoresh dishes. Khoresh is basically a stew - though more delicate than a beef and potato kind of thing - with lots of butter or ghee, and often spiced with cinnamon or fruit,
saffron and lime. The one I tried first is this green bean and tomato
recipe, largely due to recently finding a bag of garden green beans from
two years ago in my freezer. I also had a bunch of garden tomatoes that
I stuck in the freezer last summer, so I used those in lieu of tomato
puree. The flavor turned out really nice - sort of citrus-y and warm,
and sweet from the tomatoes.
The recipe is for one
pound of meat, but if you are not going to eat this with rice, I would
add in extra to bulk it out a bit more. I used venison, and let the meat
stew a bit longer to tenderize the meat and bring out more flavor.
(If you use chicken, go for just the 30 minute simmer so the chicken does not overcook and get tough.) Because I was simmering it longer, I also kept the green beans out until
the last 20 minutes - just so they wouldn't get too soft. I wished I had made a double batch for more leftovers because it made a great meal to bring to work.
Green Bean and Tomato Khoresh
5 T butter or ghee
1 lb fresh/frozen green beans, cut into 2" pieces
2 small onions, thinly sliced
2 cloves garlic, peeled and crushed
1 lb skinless, boneless chicken leg or meat (beef, venison, lamb) cut into thin strips
1 t salt
1 t freshly ground black pepper
1 t cinnamon
1/2 t turmeric
1 T tomato paste
3 1/2 c fresh/canned pureed tomatoes
2 T fresh lime juice
1/2 t ground saffron threads, dissolved in 2 T hot water (opt)
1.
In large skillet heat 2 T butter/ghee over medium heat. Add the green
beans and stir fry 5 minutes. Remove from heat and set aside.
2.
In medium pot, heat 3 T butter/ghee over medium heat. Add the onion and
stir fry 5 minutes until translucent. Add teh garlic and chicken/meat
and stir fry 15 minutes, stirring occasionally. Add the salt, pepper,
cinnamon, and turmeric and stir fry another minute.
3. Add green
beans, tomatoes/puree and paste, lime juice, and saffron water to the
pot. Bring to a boil, reduce the heat to low, cover, and simmer for 30
minutes or until beans are tender, stirring occasionally.
4. Taste the khoresh and adjust seasonings for salt and lime juice. Cover and keep warm until ready to serve.
We are a collection of Minneapolis folks cooking, preserving, and harvesting local, seasonal foods. This blog-share is meant to inspire greater culinary genius, as well as continued local food invention. What are YOU concocting in that kitchen of yours?
1.30.2013
1.25.2013
Roasted Carrot "porridge"
There are some really amazing carrots in the co-ops right now from Featherstone Farms. These carrots are local, big and fat, and really sweet and flavorful. I have not done a blind taste test comparison - but the flavor to other carrots is profound. It's like the difference between garden carrots and ones from the (generic) store. They are also $9 for 5 pounds - more than for the California carrots - but oh so worth it. While looking at the farm's website, I perused their farm blog. I found it interesting - particularly the recent entry about the ongoing MN drought and what local farmer's are seeing in their fields with the lack of snow and moisture.
My current favorite way to eat these carrots (other than as is, right out of the bag) is to roast them and make a breakfast porridge of sorts. I've made similar renditions of this recipe before, but this is the most simple. All you need are carrots, ghee or butter, and some toppings - including cinnamon. Which, did you know that there are a couple of kinds of cinnamon? The one with increased health benefits is called Ceylon. Most likely in the US, any cinnamon you buy is Cassia cinnamon. The Seward carries the Ceylon in bulk (it is more expensive) - and the taste (to me) is richer and sweeter than the other stuff.
Roasted Carrots (serves 2)
4 LARGE carrots
2 T ghee or butter
salt
cinnamon
almonds
coconut flakes
1. Preheat your oven to 400 degrees. Chop your carrots up into a small dice. These will shrink in the oven, so prepare a bit more than you think - 4 of the largest Featherstone carrots would easily serve two. (This also makes a nice leftover snack - so I hedge on the extra side.)
2. Melt 1-2 Tablespoons ghee in a baking pan - I just stick the pan in the preheating oven for a few minutes. Once the ghee is melted, add the carrots and stir/toss to coat.
3. Bake for 20-25 minutes, stirring once or twice int he middle. Some of the carrots will get a nice glaze from the pan - but each piece should be soft and tender.
4. While carrots are cooking, heat a case iron pan and roast a handful of almonds. Stir frequently - when they are partway done, add in a handful of coconut flakes to brown just a bit too. The coconut flakes take only a minute, so keep your eye on them. Set nuts and coconut aside.
5. When carrots are done, top with nuts and coconut. Sprinkle on a pinch or two of salt, and a good dose of cinnamon. Serve with coconut milk or cream.
1.23.2013
English "Bangers" Sausage
This week what is for dinner (and lunch) = hamburger and sausage. It is just one of those weeks where I have not had a chance to make anything, so I get home from work and make a burger with homemade mayo. Or sausage patties which I have with sauerkraut. And then I eat some raw carrots to get a little veg in there. All I gotta say is, thank goodness for freezer supplies of burger and sausage!
Speaking of sausage - the recipe below is a relatively new one to me, but immediately gained favor as my "top fave"- it is a little spicy, with lots of lemon and sage. The first time I tried this one, My Charming Companion and I made only 5 lbs - not knowing if it would be any good. This time, with lots of venison bits marked for sausage, we made 29 pounds. That is a LOT of bangers. Note that this is a pretty large recipe ratio - I grind up the meat in a meat grinder, but you could also use a food processor if you don't mind doing it in several batches.
English Bangers (makes 8 pounds)
5 lbs venison
3 lbs bacon
1 1/2 tsp minced fresh thyme or 1/8 tsp dried thyme
1 1/2 tsp minced fresh marjoram or 1/8 tsp dried marjoram
1/4 c. minced fresh sage or 2 T dried sage
1 T salt
1 1/2 tsp freshly ground black pepper
3-4 T loosely packed finely grated lemon peel
1.5 tsp cayenne pepper
3/4 tsp grated nutmeg
3/4 tsp mace
3-4 large eggs
Grind the venison and bacon in a grinder or food processor. You want the meat to stay cold, so it works best if they are still a bit frozen when you grind them. It should be thawed enough to cut through with a good knife, but frozen in the middle. If the meat does get warm, chill it again after grinding it (either outside or in the fridge).
In a big bucket, bowl, or some kind of vessel, put in all recipe ingredients and mix together. I find it works best to put on some latex gloves and really mix everything together well - your fingers will get really cold, but it is fastest. At this point it is a good time to make a little test patty - just a mini little one that you can fry up to see if you prefer more salt or some such. This is not necessary if you follow the recipe exactly, but usually I add in more sage or lemon or something, and then I get to wondering about the taste. *Note: it will not be very spicy. YET. Freezing the sausage will set the cayenne in, so it gets spicy after freezing.
Once you are happy with the taste, package up your sausage and freeze it for later. I don't bother with casing because I am a fan of patties, but I am confident these are great either way. Eat it for breakfast, with sauerkraut, squash, or all alone. It is delicious!
Speaking of sausage - the recipe below is a relatively new one to me, but immediately gained favor as my "top fave"- it is a little spicy, with lots of lemon and sage. The first time I tried this one, My Charming Companion and I made only 5 lbs - not knowing if it would be any good. This time, with lots of venison bits marked for sausage, we made 29 pounds. That is a LOT of bangers. Note that this is a pretty large recipe ratio - I grind up the meat in a meat grinder, but you could also use a food processor if you don't mind doing it in several batches.
Not my actual sausage - these ones are really thin! Yum. |
5 lbs venison
3 lbs bacon
1 1/2 tsp minced fresh thyme or 1/8 tsp dried thyme
1 1/2 tsp minced fresh marjoram or 1/8 tsp dried marjoram
1/4 c. minced fresh sage or 2 T dried sage
1 T salt
1 1/2 tsp freshly ground black pepper
3-4 T loosely packed finely grated lemon peel
1.5 tsp cayenne pepper
3/4 tsp grated nutmeg
3/4 tsp mace
3-4 large eggs
Grind the venison and bacon in a grinder or food processor. You want the meat to stay cold, so it works best if they are still a bit frozen when you grind them. It should be thawed enough to cut through with a good knife, but frozen in the middle. If the meat does get warm, chill it again after grinding it (either outside or in the fridge).
In a big bucket, bowl, or some kind of vessel, put in all recipe ingredients and mix together. I find it works best to put on some latex gloves and really mix everything together well - your fingers will get really cold, but it is fastest. At this point it is a good time to make a little test patty - just a mini little one that you can fry up to see if you prefer more salt or some such. This is not necessary if you follow the recipe exactly, but usually I add in more sage or lemon or something, and then I get to wondering about the taste. *Note: it will not be very spicy. YET. Freezing the sausage will set the cayenne in, so it gets spicy after freezing.
Once you are happy with the taste, package up your sausage and freeze it for later. I don't bother with casing because I am a fan of patties, but I am confident these are great either way. Eat it for breakfast, with sauerkraut, squash, or all alone. It is delicious!
1.21.2013
Paleo Coconut Curry
I am a huge fan of curry and was so excited to put together my own version of a coconut curry. I have been making my own coconut milk recently and it is tasty, but has a very thin consistency and not very good for cooking as a result. The canned version is much thicker but always contains guar gum, a no-no on my particular eating plan. Then, Megan let me know that Seward started carrying Natural Value Organic Coconut Milk that doesn't have any guar gum or other additives. It also happens to be in a BPA-free can. So exciting! Thanks for the tip, Meg! I was finally able to make a creamy and delicious curry- yum.
I kept the recipe really simple since I don't have very many of the traditional curry spices on hand. I basically just used sea salt, pepper, and a bunch of turmeric.
Ingredients:
2 Chicken thighs- diced
1/4 yellow onion- diced
1 garlic clove- minced
1/2 can coconut milk
handful of parsley- chopped (cilantro would probably be better)
3 big pieces of bok choy- chopped
large bunch of spinach
sea salt- to taste
pepper- to taste
turmeric- to taste (I used 2-3 tsps)
1 Tbsp coconut oil
Directions:
in cast iron pan on stove top melt coconut oil and saute the onion until soft. Add garlic and gently saute for a minute before adding the diced chicken. Saute the chicken for a few minutes, turning to cook on all sides. Add salt, pepper, turmeric, coconut milk and cook on medium heat for a couple minutes before adding the bok choy, spinach and parsley (zucchini or cauliflower would be good as well). Once the veggies are in, cook for 5-10 minutes, until the veggies are soft and the chicken is cooked through.
Makes 2 servings. I ate one serving and used the rest for leftovers the next day. Just as good, if not better, the second time around. Very satisfying meal for a cold winter evening.
1.16.2013
5 Ingredient French Onion Soup (paleo)
The local onions have been very nice at the co-op lately - most notably that they are very LARGE! One of my staples of late is French Onion soup. I posted a GF version about two years ago (my first FO soup ever) and I have since simplified things down to this very basic, but delicious recipe. I do think that part of why this soup tastes so good is due to the venison Bone Broth. I have not done a post about bone broth, but fellow Minneapolitan blogger at Sustainable Paleo has, and really, bone broth tastes about 10 times better than anything you can buy (and is really good for you and your bod). So, I cannot vouch for this soup if you are having it with store bought broth, but with bone broth, it is super good and very easy and you don't need any other herbs/spicing.
5 Ingredient French Onion Soup (serves 4)
4 T. butter or ghee
3 large onions
2-3 pints Venison/Beef Bone Broth
3/4 c. dry wine (either white or red seems to work fine - but dryer is better)
celtic sea salt (in my experience this salt makes soup more flavorful than any other)
1. Slice onions as thinly as you feel motivated to go for - the thinner the better to carmelize and be silky in your soup.
2. In a heavy pot, turn heat on medium heat and melt the butter. Add onions. Stir every so often and keep your eye on the onions. This is the carmelizing stage, and it takes a bit of time. You want the onions to turn nice and brown, so keep plodding along until they get there.
3. Pour in wine and stir/scrape the bottom of the pan to deglaze any buttery-onion bits that might have stuck there. Add broth (2 pints will be a thicker soup, 3 will be more broth-y! Both are good). Bring to a boil and let simmer for a few-10 minutes.
4. Salt to taste - it generally takes more than I think - a Tablespoon or two. Serve!
(Sometimes, depending on the wine, I do want a little acid in there, in which case it becomes 6 ingredients and I add a splash of cider vinegar...)
1.14.2013
Creamed Lamb's Quarters with Eggs
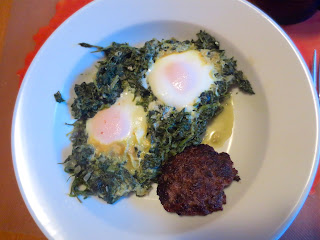
Remember last spring when I posted about the really prolific and delicious weed Lamb's Quarters? Well, it keeps very well in the freezer if you blanch it/steam it for a few minutes, squeeze out any excess water, and freeze the greens in a baggie. And the lamb's quarters are DELICIOUS in the creamed spinach recipe I posted in November. Actually, they are better than the spinach I think because they are a bit heartier. Really, I will never go back to spinach. Lamb's quarters are so much better and I don't even need to plant them.
I recommend making a double batch for dinner one night: Eat one batch's worth for dinner (I ate some with steak and bacon) and then eat batch 2 for breakfast a la eggs florentine. Just reheat the creamed lamb's quarters/spinach in a saucepan or cast iron and then either poach your eggs right in the greens, or make a couple of eggs to put on top. This would be excellent on some ham with hollandaise sauce if you want to go for the whole shebang. *Note: I used a little less coconut milk/cream than the original creamed spinach recipe, and I think it turned out nicely. I also played with the ratios and used a little more coconut cream than dairy cream. I suspect this recipe would be good with all coconut milk/cream if you want to go that route.
1.10.2013
Venison Kebabs (grilled on the wood stove)
I am a person who is a bit too lazy to get the grill going in the summer. Or maybe who has too little patience. In any case, I seem to have sort of missed the memo on the deliciousness of wood fired/grilled meat. So, note to self: Meat roasted on coals is delectable. It is especially so when you have a wood stove, or can go to someone else's house with a wood stove who will let you lay some skewers over some coals. This method aids in dealing with any lack of ambition issues to start a grill or some such, because likely the wood stove is already going!
The main thing to be mindful about is to make sure that you put some logs on the fire a few hours before dinner time. You want a bed of red coals - so adjust the flue as necessary to get the right amount of air to speed up or slow down the burning. You'll also want a metal narrow pan, or fireproof something, to go inside the stove to rest the skewer tips on (it's in the back of the photo below). The handles will stick out of the stove and can rest on a spare log of wood. This will hold the meat just over the coals (1/2"-1" above), and it seems a smart idea to try the set up before hot coals are going just to make sure it works.
My kebab meat was a nice bit of rear quarter cut up into 2" pieces that were coated in olive oil and a bit of salt. The roasting goes really fast, and it is best if you pay close attention, so it's a good idea to make your dipping sauce and any other veggies in advance. I love the roasted meat with a tahini sauce. Once your meat is skewered and your coals are ready, set the kebabs on your pan/log set-up and roast each side of the kebab for 2-3 minutes, for a total roast time of about 8-11 minutes, depending on your coals, how close the meat is to them, etc. Watch them closely so they don't burn, you could jsut continually turn them too like a spit roast. Once they are a bit charred, but not too dark, remove them from the coals and let them rest for a couple of minutes. The sear is SO delicious! Serve with tahini sauce and veggies.
Tahini Sauce = tahini, lemon juice, water, olive oil and salt. I start with a good scoop of tahini and a glug of each of the liquids, then stir. It will become thinner and smooth. Taste and adjust with more water and olive oil to thin it out.
1.08.2013
Paleo Snack Mix
I got inspired by a post from The Clothes Make the Girl blog to make
her snack
mix for my mini-vacation up north last week. And, wow. It is very
delicious, and like no taste combo I would have ever come up with (it's based
on an Indonesian condiment). I had to restrain myself from consuming the entire
batch while it was cooling. My Charming Companion and I made bets as to how
long the snack mix would last once we got in the car: 20 minutes, an hour...?
Anyway - I pasted her recipe below. I will note that I have been consuming more nuts than usual over the recent holiday time (as nuts themselves, but also as almond flour in baking). I primarily eat macadamia nuts due to their 1:1 balance of omega 3 and 6 and generally regard other nuts/flours as more occasional things. I am doing some "cold training" right now (cold baths) though, and one of the effects is that you get hives if you have too much omega 6. I recently had some hive-like spots, which made me want to lay off the nut feast of late. And have some fish oil. I don't notice any other physical effects of this - but as someone who gets intense inflammation from a crumb of gluten, I feel extra cautious. So. Moderation for me with the nuts. (The mini hives appeared right before departing for said trip, which I think contributed to the snack mix making it all the way til day 3 - far longer than the earlier estimated consumption time!)
Savory Paleo Granola - makes 1 1/2 cups
1/2 tablespoon coconut oil
1/2 medium onion, very finely diced
1 clove garlic, crushed
1/2 teaspoon powdered ginger
1/2 teaspoon cumin
1/2 teaspoon coriander
1/2 teaspoon salt
1/2 teaspoon turmeric
1/2 tablespoon lemon juice
3/4 cup coconut flakes
1/2 cup dry-roasted almonds
1/3 cup dry-roasted cashews
1. Preheat oven to 300F and cover a large baking sheet/cake pan with parchment paper.
2. Heat coconut oil in a large skillet over medium heat until melted, then add onion, garlic, and ginger. Cook 2-3 minutes until the onions begin to soften and are fragrant.
3. In a small bowl, mix the cumin, coriander, salt, and turmeric. Add to the onions, stir to combine, and cook an additional 5-7 minutes until the onions are very soft. Add the lemon juice and cook until the mixture forms a paste, about 2 minutes.
4. Add the coconut chips to the pan and stir until they’re coated with the onions and spices. Transfer to the baking sheet and bake for 30 minutes. Stir with a wooden spoon and add the nuts to the baking pan (the mixture will already be fairly dark here - that is good!) Roast an additional 10-15 minutes until the coconut/onion flakes are very brown and the nuts are toasted.
5. Allow to cool completely, then mix together and store in an air-tight container. Eat as-is or chop in a food processor until it’s the texture of coarse sand and use as a flavoring condiment on cooked vegetables, meats, soups, and salads.
1.04.2013
Paleo Pasta with Sardines
I have had a can of sardines in the pantry for a couple months and finally figured out a way to use them. It was so good that I am kicking myself for not trying it sooner. The recipe was inspired by An Everlasting Meal by Tamar Adler. Reading the book was inspired by Megan, so thank you for the good recommendation. I learned so much about stretching food into multiple meals, which is an art in itself. I do so much cooking these days and it is so great to learn how to stretch the food and not let anything go to waste.
I love using sardines because they are wonderfully healthy little fish, and inexpensive. They have omega 3s and are low in mercury, which is always a concern these days when eating fish.
Ingredients:
2 Tbsp olive oil
1/2 onion, sliced
1 clove garlic, sliced
1 can good olive oil packed sardines
1 pound spaghetti (I substituted zucchini noodles)
sea salt
1 bunch parsley, leaves picked and roughly chopped
optional: dried chili flakes
Heat olive oil in a deep frying pan big enough to hold the noodles. Once the oil is warm, add the onion and garlic and cook until it's soft but not completely tender, 5 to 10 minutes. Add the sardines and their olive oil and let them fry in the pan, breaking them up with your spoon. Add the zucchini noodles and cook another minute until the noodles have softened. Toss in the parsley and chili flakes, if you are using them, at the last minute.
Enjoy!
Leftover Turkey Stew
I made another turkey for Christmas. This time it was a huge 15 pounder. I used the roasting bag again and it turned out just as good as the one I made at Thanksgiving. Now I have a huge amount of leftover turkey and I am on the hunt for lots of ways to use it. Tonight I made turkey stew, which was really just a little bit of this and that, and it turned out really well. It had a lot to do with the lovely turkey broth I was able to make from the turkey carcass. The broth was really flavorful and that helped to make my stew good as well. Since I had just made a big turkey dinner I had quite a few leftovers to add to my pot. Here is a list of what went it.
Ingredients:
TurkeyCarrots
Celery
Onion
Turkey Stock
Fresh Parsley
Fresh Rosemary
Sea Salt
Pepper
Butter
Instructions:
I let the carrots simmer in the broth until they were almost tender before adding the onion and celery to the pot. I let all the veggies simmer for 5-10 minutes and then added the turkey and, parsley, and rosemary. Salt and pepper was added as I went. After ladling it into a bowl I put a pad of butter on top, which gave the meal some much needed fat and a little extra hit of flavor.
Soup making is one of my favorite past times these days. I don't usually follow a recipe. It is much more fun to just get the pot on the stove and add things. I make a lot of pureed soups, which will be even easier thanks to the hand immersion blender my Mom got me for Christmas- Thanks Mom! Now I can blend the soup right there in the pan- amazing!
1.01.2013
Paleo Venison-Braised Burritos
Last year my friend Conrad made me a fajita dinner where he used Cabbage leaves as the taco shell. Up until that time, I had tried to use lettuce leaves as the "tortilla" - or I just made a big taco salad of sorts. Cabbage leaf as tortilla = Fantastic.
I also wanted to try a recipe from Nom Nom Palo for Oven-Braised Mexican Beef - which is a slow-cooked (3 hours) recipe that includes some salsa, chicken broth, chili powder, onions, etc. The meat turned out very tasty, though I wanted even more spice. I'll make this again, but will really amp up the spices - I found that I wanted more of a mole sauce with chocolate and chipotle. (I ended up sprinkling unsweetened chocolate powder on there, which added a nice touch.) I wondered if people make beef mole sauce, and it turns out they do, though of course chicken is most common. Until I get to my own beef mole, here is her recipe that I used (which is very easy) with slight modifications:
2½ pounds boneless beef short ribs, brisket, or stew
meat cut into 1½-inch cubes
1 tablespoon chili powder
1 teaspoon chipotle
1½ teaspoons kosher salt
1 tablespoon coconut oil or fat of choice
1 medium onion, thinly sliced
1 tablespoon tomato paste
6 garlic cloves, peeled and smashed (optional)
2 T unsweetened chocolate powder, or 2 oz. 80% chocolate
½ cup roasted salsa (I used my homemade salsa and then added some liquid smoke)
½ cup chicken stock
½ teaspoon gf fish sauce (I used some anchovy paste)
1. Preheat oven to 300 degrees; position oven rack in bottom 1/3 of oven.
2. In a large bowl blend beef, spices, and salt. Stir to cover meat evenly.
3. In a large casserole dish, melt fat and add onions. When translucent, add tomato paste, garlic, and chocolate. Stir and cook for 30 seconds to coat onions. Add beef, salsa, stock and fish sauce/anchovy paste. Bring to a boil.
4. Cover and place in oven for 3 hours or until beef is tender. Taste for seasoning and adjust in needed.
I served mine with some sauteed peppers, more salsa, and lettuce, all wrapped in steamed red cabbage leaves. To steam the cabbage leaves, it works best to put the whole cabbage head in a large steamer pot. Cut out the core first, and then set the cabbage core side down in the steamer. After 15 minutes, the outer layers should easily peel off. Continue steaming to get more layers, and stop whenever you have enough. You can lay the fixings inside and wrap it up, or you can do a tight roll. Photo here is the looser variety (with a different filling, but you get the idea!) *You can do this with raw cabbage too, it just tears as it comes off of the cabbage.
I also wanted to try a recipe from Nom Nom Palo for Oven-Braised Mexican Beef - which is a slow-cooked (3 hours) recipe that includes some salsa, chicken broth, chili powder, onions, etc. The meat turned out very tasty, though I wanted even more spice. I'll make this again, but will really amp up the spices - I found that I wanted more of a mole sauce with chocolate and chipotle. (I ended up sprinkling unsweetened chocolate powder on there, which added a nice touch.) I wondered if people make beef mole sauce, and it turns out they do, though of course chicken is most common. Until I get to my own beef mole, here is her recipe that I used (which is very easy) with slight modifications:
Oven-Braised Mexican Beef (or Venison):
Nom Nom Paleo's lovely photo |
1 tablespoon chili powder
1 teaspoon chipotle
1½ teaspoons kosher salt
1 tablespoon coconut oil or fat of choice
1 medium onion, thinly sliced
1 tablespoon tomato paste
6 garlic cloves, peeled and smashed (optional)
2 T unsweetened chocolate powder, or 2 oz. 80% chocolate
½ cup roasted salsa (I used my homemade salsa and then added some liquid smoke)
½ cup chicken stock
½ teaspoon gf fish sauce (I used some anchovy paste)
1. Preheat oven to 300 degrees; position oven rack in bottom 1/3 of oven.
2. In a large bowl blend beef, spices, and salt. Stir to cover meat evenly.
3. In a large casserole dish, melt fat and add onions. When translucent, add tomato paste, garlic, and chocolate. Stir and cook for 30 seconds to coat onions. Add beef, salsa, stock and fish sauce/anchovy paste. Bring to a boil.
4. Cover and place in oven for 3 hours or until beef is tender. Taste for seasoning and adjust in needed.
I served mine with some sauteed peppers, more salsa, and lettuce, all wrapped in steamed red cabbage leaves. To steam the cabbage leaves, it works best to put the whole cabbage head in a large steamer pot. Cut out the core first, and then set the cabbage core side down in the steamer. After 15 minutes, the outer layers should easily peel off. Continue steaming to get more layers, and stop whenever you have enough. You can lay the fixings inside and wrap it up, or you can do a tight roll. Photo here is the looser variety (with a different filling, but you get the idea!) *You can do this with raw cabbage too, it just tears as it comes off of the cabbage.
Subscribe to:
Posts (Atom)