I made some super delicious rumaki last weekend. Yum. This is an amazing appetizer/pre-dinner - or even straight up dinner if you want to go for that much bacon and liver! Plus, it is very 1950's should you be going to some kind of theme party...throw in some deviled eggs and you are all set.
I have had rumaki without marinading the liver and I think it tastes just fine. I don't know if the marinade made it extra good this time, but it definitely tasted better. This is also the first time I used water chestnuts, so do what you will. I keep trying to think up something a bit more local and tasty in place of the water chestnuts...radish slices are my best thought so far. I'll let you know how that goes. I also wanted a little more ginger. Next time I will put a little fresh ginger in each rumaki (in addition to the marinade).
Rumaki
5 pieces bacon, halved cross-wise
10 water chestnuts
just under 1/2 lb chicken livers, cut in half (you want about 10 pieces total)
2 T coconut aminos
1 tsp freshly grated ginger
1. Marinate livers in coconut aminos and ginger for 30 minutes-2 hours.
2. Pre-cook bacon in a 400 degree oven. Lay bacon slices in a cookie sheet or cake pan with an edge. Cook for about 10 minutes, until cooked but not crisp. Pour bacon fat off of pan and let bacon sit until cool enough to touch.
3. Lay the chicken liver and a water chestnut in the center of a bacon slice. Add a little fresh ginger if you want, and wrap bacon around filling and secure with a toothpick before placing back on bacon pan. Continue with remaining ingredients until you have 10 bacon wrapped livers.
4. Bake in oven until bacon is crisp and golden, about 7-9 minutes. Serve!
We are a collection of Minneapolis folks cooking, preserving, and harvesting local, seasonal foods. This blog-share is meant to inspire greater culinary genius, as well as continued local food invention. What are YOU concocting in that kitchen of yours?
4.29.2013
4.24.2013
Breakfast Veggies & Eggs with Tahini
I started doing kettle bells this month. I am not sure what got me inspired to do it, except I had a little extra time and a desire for some more msucle. And I found a nice kettle bell place right by my house. I tried lifting weights one time last year (ha!) - the way where you do very few reps with as much weight as you can do and still actually lift it. I burst into tears each time. Not because it was impossible, but it was like my mind thought I couldn't do it and my mental state just collapsed. So. Kettle bells seemed like a nice way to build up some muscle without the tears. I've gone to 4 classes and already I feel stronger and could do way more than the first couple of times. Holy cow!
My breakfast this morning is based on Modern Times' "Good Morning Healing Earth" breakfast, which is a lovely medly of lots of sauteed veggies topped with scrambled eggs and drizzled with tahini. It seems like an excellent pre-kettle bell breakfast. It's really good, and the version I made at home turned out equally as tasty, if a little simpler. The original dish at Modern Times actually uses onions, beets, carrots, green peppers, mushrooms, kale, zucchini and broccoli. So go for it all if you happen to have all those veggies - but I thought the ones I selected were a good combo that still gave a similar taste. Sub any veggies in for something else, though I do think the kale, beets, and carrots are key. Modern Times uses roasted beets instead of my pan sauteed ones, so if you happen to make a big batch of roasted beets, keep a few out to use in this for breakfast!
Good Morning Breakfast (serves 1 large serving)
1-2 T butter, ghee, coconut oil, bacon fat, etc
1/4 small beet, diced small
1 small carrot, diced small
3 kale leaves, de-stemmed and chopped
1/2 small onion, diced
handful of broccoli florets, trimmed small
salt
1 T. parsley, chopped
2 eggs
tahini (mixed with water - and lemon juice if you have it - to thin it out, plus a pinch of salt)
1. Put a cast iron pan on medium heat. Add fat, and then beets. Cook covered for 3-5 minutes. Add onions and remove lid. After another few minutes, add broccoli and carrots. Cover the pan again for 3-5 minutes. Add kale. Cook a final 5 minutes, until greens are wilted but still bright, and beets are just tender. Stir often to keep things from sticking and add a little more fat if needed.
2. Meanwhile, scramble eggs in another pan so that they finish about the time of the veggies. Mix up some tahini with water to make it drizzle-able (a little less water than tahini ratio).
3. To serve: dish out veggies in a pile on a plate and top with scrambled eggs. Sprinkle parsley and drizzle tahini over everything. Serve!
4.22.2013
Liver! (of a lamb in this case)
Well, another 4-8 inches of snow tonight and I think that puts us very solidly in the "most snow in April ever" category. I was super happy to come from work tonight to meatloaf in the crockpot (all ready to eat!) and some mashed cauliflower (had to make that, but it was worth it for the total comfort food extravaganza). The forecast says 60 degrees on Friday, so, I venture to say this is the last of the snow.
I got taken out to fancy dinner last night, and after laboring and laboring over the decision about where, I finally opted for Sea Change, the sustainable seafood restaurant in the Guthrie. I wanted oysters and some culinary fancy schmantz, and definitely got that. Now I am in love with raw oysters and am on a mission to learn how to shuck them myself. They have lots of omega 3s, and more zinc than any other food (zinc helps protect against UV radiation among lots of other great things). Oysters also seem to be one of the only kinds of seafood that are best to get farmed as opposed to wild; though Seafood Watch currently has both farm and wild rated as "Best Choice." So, I will be perusing some oyster shucking youtube videos in the coming weeks...hopefully to learn and master some kind of technique!
In the meantime, I am trying to eat liver every week or so to get all the amazing nutrients. Last week I saw that the Seward carries Lamb livers, and decided to give them a try. I thought they were good, though I over cooked mine a little. They actually don't need much time - so it might be worthwhile to actually set a timer so that they stay tender.
Lamb (or beef or venison) Liver
1/2 pound liver
2 T coconut flour
3 T coconut oil/lard/bacon fat
onions
bacon
You want your liver about 1/2" - 3/4" thick, so depending on how it comes to you, you may need to slice the liver lengthwise down the center so it isn't too thick. Mine was on the thicker side, but in 4 easy slices, so I just kept them that way.
I like to eat the liver with some onions and bacon, so prepare those however you want: I prefer cooking bacon in the oven, and caramelizing onion slices, but you could also chop up the bacon and cook it and the onions all together.
For the liver: heat the fat in a cast iron skillet on medium heat. While it is heating, coat your liver pieces in coconut flour. This is easiest done by shaking the liver in a baggie with the flour to get everything nicely coated. When the oil in the pan is hot, lay liver pieces flat (or flat-ish). Cook for about 90 seconds - 2 minutes a side, and sprinkle with salt and pepper while on the 2nd side. *This is worth setting a timer for! It will taste way better when not over-cooked, I promise.
Serve liver with onions and bacon, or just one or the other. Depending on how much liver you can eat, this will serve one or two!
I got taken out to fancy dinner last night, and after laboring and laboring over the decision about where, I finally opted for Sea Change, the sustainable seafood restaurant in the Guthrie. I wanted oysters and some culinary fancy schmantz, and definitely got that. Now I am in love with raw oysters and am on a mission to learn how to shuck them myself. They have lots of omega 3s, and more zinc than any other food (zinc helps protect against UV radiation among lots of other great things). Oysters also seem to be one of the only kinds of seafood that are best to get farmed as opposed to wild; though Seafood Watch currently has both farm and wild rated as "Best Choice." So, I will be perusing some oyster shucking youtube videos in the coming weeks...hopefully to learn and master some kind of technique!
In the meantime, I am trying to eat liver every week or so to get all the amazing nutrients. Last week I saw that the Seward carries Lamb livers, and decided to give them a try. I thought they were good, though I over cooked mine a little. They actually don't need much time - so it might be worthwhile to actually set a timer so that they stay tender.
Lamb (or beef or venison) Liver
1/2 pound liver
2 T coconut flour
3 T coconut oil/lard/bacon fat
onions
bacon
You want your liver about 1/2" - 3/4" thick, so depending on how it comes to you, you may need to slice the liver lengthwise down the center so it isn't too thick. Mine was on the thicker side, but in 4 easy slices, so I just kept them that way.
I like to eat the liver with some onions and bacon, so prepare those however you want: I prefer cooking bacon in the oven, and caramelizing onion slices, but you could also chop up the bacon and cook it and the onions all together.
Liver is not so photogenic as it is good for you. Alas. |
Serve liver with onions and bacon, or just one or the other. Depending on how much liver you can eat, this will serve one or two!
4.18.2013
Ginger Lemon Tea
I started drinking this tea a couple of months ago and now I have it first thing most mornings. I love the spicy heat of the ginger, and the nice tartness of the lemon. It's invigorating, and also warming - which I suppose is nice for these ongoing snowy days! Originally I started making the tea for one individual cup, but that quickly gave way to the easier method of making one large batch that lasts several days. I think the larger batch utilizes the ginger best - it gets extra firey. (You can dilute as needed!) I do only add the lemon fresh though - I just squeeze about 1/3 to 1/2 a lemon each morning and add it to my mug.
Makes 4 cups/1 quart:
4 1/2 cups water
3" piece of ginger, peeled and micro-planed
2 lemons
Add water and micro-planed ginger to a pot on medium heat. (I encourage micro-planing because it seems to pull the most from the ginger. You can also make this by chopping or grating the ginger finely.) Bring to a boil, than cover and turn to low for 20-25 minutes.
Pour the tea through a strainer to remove all the ginger bits, and store in a quart jar in the fridge. For a cup of hot tea, heat up a mug's worth of the ginger-infused water (diluted with more water if you prefer). Once it is hot, add the fresh juice of 1/2 lemon (or a bit less if that is too tart) and drink!
4.14.2013
Ghee!
I am planning a 2 week BWCA trip in early May - although with the weather going the way it is, I am not sure that the lakes will be iced out yet. You can actually check the DNR for ice out dates for lakes in the state (and for median ice out dates too) from past years. My Charming Companion and I are planning to go to Saganaga on May 12th, which is one of the last lakes in the state to ice out because it is large and pretty far north. In the past 25 years, it looks like the ice has always been gone by then except for three times: '89, '96, and '08. I wonder what will happen?!
I am going forth as though some kind of trip will happen, and am doing some of the pre-trip food prep. This week I made a big batch of ghee. I use ghee a lot of the time at home, but it is perfect for camping because it is stable without refrigeration and tastes so good. It's very simple too (and WAY cheaper than buying pre-made stuff) - it just takes some time where you need to be fairly attentive. Though actually, I got sucked in to my new Nalo Hopkinson novel, and forgot about it for an hour, but it was okay due to the low heat. Whew.
One pound of butter will yield just under 2 cups of ghee. I was making 4 pounds all at one time, and it took about an hour and a half on very low heat. If you only make a pound at a time, it will only take 20-25 minutes. I like to use pastured butter, which comes lightly salted. I would prefer to use non salted butter - but alas. The salt all condenses into the milk solids that are the bi-product of the ghee. They are actually super tasty if you can digest milk, so I like to cook with those or put them on roasted veggies. But they are salty with the salted butter!
Making Ghee:
1. Unwrap the butter sticks and put them in a heavy pot on medium heat to melt. Stay nearby for this part because it goes pretty quickly. The butter will melt and will start to foam at the top. As soon as that happens, turn the heat down to low. I always stick a wooden spoon in the pot too - it breaks up the surface so that bubbles can get out and not be trapped by the foamy layer (otherwise it can bubble up in one big bubble that can get over-excited and leave the pan - messy and dangerous).
2. Now you are just watching and waiting for the water to cook off and the butter to clarify. There will be some crackling sounds, and the liquid under the foam will gradually become clear and golden. There will be milk solids that start to settle on the bottom and sides of the pot. At first they will be light in color, and they will gradually darken. The foam at the top will also start to disappear. You can stop cooking the ghee at any point after the liquid is clear and the milk solids at the bottom are brown. Be careful not to go too long or your ghee will have a bit of a burnt taste from the very browned/burned milk solids.
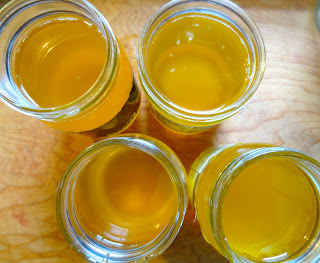
3. Let the ghee cool for a bit in the pot, then pour it through a strainer and/or cheesecloth into jars. This will capture any bits of milk solids so that the ghee can be shelf stable. At this point, I stir in a little salt (2 pinches per pint jar) because I like it that way, but you can also leave it plain.
The ghee is now sit out on the counter as you make your way through it - or you can store it in the freezer or fridge. I will transfer two of these to a plastic, non-leaking nalgene bottle for the camping trip. Mmmm.
I am going forth as though some kind of trip will happen, and am doing some of the pre-trip food prep. This week I made a big batch of ghee. I use ghee a lot of the time at home, but it is perfect for camping because it is stable without refrigeration and tastes so good. It's very simple too (and WAY cheaper than buying pre-made stuff) - it just takes some time where you need to be fairly attentive. Though actually, I got sucked in to my new Nalo Hopkinson novel, and forgot about it for an hour, but it was okay due to the low heat. Whew.
One pound of butter will yield just under 2 cups of ghee. I was making 4 pounds all at one time, and it took about an hour and a half on very low heat. If you only make a pound at a time, it will only take 20-25 minutes. I like to use pastured butter, which comes lightly salted. I would prefer to use non salted butter - but alas. The salt all condenses into the milk solids that are the bi-product of the ghee. They are actually super tasty if you can digest milk, so I like to cook with those or put them on roasted veggies. But they are salty with the salted butter!
Making Ghee:
1. Unwrap the butter sticks and put them in a heavy pot on medium heat to melt. Stay nearby for this part because it goes pretty quickly. The butter will melt and will start to foam at the top. As soon as that happens, turn the heat down to low. I always stick a wooden spoon in the pot too - it breaks up the surface so that bubbles can get out and not be trapped by the foamy layer (otherwise it can bubble up in one big bubble that can get over-excited and leave the pan - messy and dangerous).
Foamy! This is shortly after all the butter has melted. |
You can see the browned milk solids on the bottom, and a little foam left. Almost done! |
The ghee is now sit out on the counter as you make your way through it - or you can store it in the freezer or fridge. I will transfer two of these to a plastic, non-leaking nalgene bottle for the camping trip. Mmmm.
4.12.2013
Fried Taro
My Charming Companion got some Taro (at the Cub foods in Brooklyn Center) to try making a fancy fried breakfast-y thing. I am not aware of eating taro before (other than the fermented poi version - or maybe some taro chips). They have a nice nutty flavor, and were really good fried up in some lard! Yum. Later I looked up the carb count of taro in relation to other starchy and non-starchy veggies. And, um, no wonder they were so tasty - they have lots of starch to get all caramelized. I got into checking all the various veggies - so here is what I found:
My general eating style these days is to be a bit conscientious about my carb intake - so the taro turns out to have been a splurge!
Taro root
Lard or coconut oil for frying
Salt
1. Boil taro (with peel on) in a roiling boil for a good 20-30 minutes, using enough water to cover the taro. You want to cook these all the way through. After boiling, rinse them with cool water to cool. (This is a good step to do the night before, and then just stick the taro in the fridge until you are ready to fry them.)
2. When taro are cool enough to handle, peel them with a peeler or paring knife. Cut taro in half lengthwise, and then into slices.
3. Heat a good inch of lard/coconut oil in a cast iron (may be 1/2 cup's worth depending on your pan - the oil stays very clean so you can cook with it again). You will need to lay the taro in a single layer, so cook the taro in batches, or in one larger pan. Lay the taro pieces carefully in the oil, and fry each side in the oil for several minutes, until it turns a crispy golden brown. Remove from oil and serve!
I ate them with just a little salt and they were divine - but here is a recipe to use some turmeric and chili powder (add after frying) that sounds good too.
My general eating style these days is to be a bit conscientious about my carb intake - so the taro turns out to have been a splurge!
Lard or coconut oil for frying
Salt
1. Boil taro (with peel on) in a roiling boil for a good 20-30 minutes, using enough water to cover the taro. You want to cook these all the way through. After boiling, rinse them with cool water to cool. (This is a good step to do the night before, and then just stick the taro in the fridge until you are ready to fry them.)
2. When taro are cool enough to handle, peel them with a peeler or paring knife. Cut taro in half lengthwise, and then into slices.
3. Heat a good inch of lard/coconut oil in a cast iron (may be 1/2 cup's worth depending on your pan - the oil stays very clean so you can cook with it again). You will need to lay the taro in a single layer, so cook the taro in batches, or in one larger pan. Lay the taro pieces carefully in the oil, and fry each side in the oil for several minutes, until it turns a crispy golden brown. Remove from oil and serve!
I ate them with just a little salt and they were divine - but here is a recipe to use some turmeric and chili powder (add after frying) that sounds good too.
4.10.2013
Roasted Radishes
Well, the spring seems to be slow in coming - although my green onions are just starting to shoot up and are nearly an inch tall! (They are 3" tall in the sunny side yard at the northside homestead.)
So, while I wait patiently, or not so patiently depending on the day, for asparagus, green onions, and snap peas, I tried Bon Appetit's Roasted Radish recipe with some of the remaining local watermelon radishes from the Seward. I love these radishes, though they are quite large and nothing like the original recipe's call for a more spring like "2 bunches of medium radishes" with greens. The watermelon variety grows in the fall, and they get quite large. I ordered seeds to try growing them this year, so we'll see how that goes. Some other new gardening trials (to me) this year will include a kabocha-type-squash (which I am so hopeful to turn out because I loved eating them so much last year), eggplant, and I think I got some brussel sprouts seeds too. Mmmm!
I ate these radishes with the first pork chop from my half hog order, and they tasted delicious. I used fresh parsley in lieu of the radish greens - but I think radish tops would be great as a spicy addition, or arugula when that is growing for more of a salad sort of dish. The radishes melt in your mouth!
Roasted Radishes with Lemon Butter
2 bunches medium radishes (such as red, pink, and purple; about 20 - cut lengthwise in half, reserving greens) OR 6 large watermelon radishes (cut in half lengthwise and then cut again in 6 or 8 pieces)
1 1/2
tablespoons
olive oil
Coarse kosher salt
2
tablespoons
(1/4 stick) unsalted butter
1
teaspoon
fresh lemon juice
1. Preheat oven to 450°F. Add 11/2
tablespoons olive oil to cut radishes and toss thoroughly to coat in a rimmed baking sheet or cake pan. Place radishes, cut
side down; sprinkle lightly with coarse salt.
Roast until radishes are crisp-tender, stirring occasionally, about 18
minutes. Season to taste with more coarse kosher salt, if desired.
2. Melt butter in heavy small
skillet over medium-high heat. Add pinch of coarse kosher salt to
skillet and cook until butter browns, swirling skillet frequently to
keep butter solids from burning, about 3 minutes. Remove skillet from
heat and stir in fresh lemon juice.
3. Transfer roasted radishes to
warmed shallow serving bowl and drizzle brown butter over. Sprinkle with
chopped radish tops (or parsley or arugula if using the watermelon radishes) and serve.
4.05.2013
Quick Stiry-Fry (of whatever's in the fridge!)
I made an easy, tasty stir-fry the other night - primarily due to copious amounts of Red Boat fish sauce. I don't know what it is about that sauce, but it is SO good! This is all done in one pot - no fuss.
I was pretty low on groceries and needing to get some veggies. What went in this was 1/3 of a red pepper, a handful of mushrooms, sliced carrots, sliced venison and onions. Plus a bunch of thinly sliced ginger - which, in addition to the fish sauce, was key. Originally I thought about serving this all on a bed of wakame seaweed. I don't know if that would be good or not, because in the end I had plenty to eat.
For 1 serving:
1/2 lb beef/venison, sliced thin (flank works well)
1 tsp coconut aminos
1 tsp cider vinegar
splash of sesame oil
Slice beef thinly and let sit in marinade for however long you've got (10 min - 2 hours, but the whole thing about this dish is that it is fast and last minute, so don't worry)
Veggies: (whatever you have on hand)
Red/Green pepper, sliced
Mushrooms, sliced
Carrots, sliced thin
Scallions, 2" pieces
Broccoli, cut into small florets
Onions, sliced
Sauce:
1 T coconut oil
sliced fresh ginger (a lot!)
1+ tsp crushed red pepper flakes
2 tsp sesame oil
1 T fish sauce (Red Boat)
1 T coconut aminos
1 tsp cider vinegar
1. In a big skillet/cast iron pan, heat coconut oil. Add onions and ginger and saute a couple of minutes. Add veggies in order of how fast they cook: carrots/broccoli will take longest, so toss them in next and cook another few minutes. Add mushrooms, peppers and/or scallions.
2. Once all the veggies are in, add in red pepper flakes, sesame oil, fish sauce, coconut aminos and vinegar. Stir occasionally.
3. When veggies are just about done (about 10 minutes total from onions going in), add the meat and any marinade drippings. Stir often to brown the meat - it will only take a few minutes.
Heap everything in a bowl, and serve!
4.01.2013
Roasted Fennel, Turnip, Leek Salad with Horseradish
Pre-dressed roasted veggies |
I was browsing the magazines at My Charming Companion's parent's house yesterday at Easter dinner, most particularly Bon Appetit (which includes aforementioned roasted radish ideas). So tonight I came home in search of something I could do with these random veggies in my fridge - and thought of Bon Appetit's recipe collection online. There I came across the inspiration for this AMAZING salad (that they pair with trout). Their recipe uses fingerling potatoes and shallots, mine uses turnips and leeks, but is otherwise the same. Turnips, incidentally, have less carbs than beets or carrots, and I think they are delicious when roasted. I forgot about how good they are - sort of sweet and earthy at the same time.
This recipe seems pretty flexible to what you have - I tried the dressing with beets, and that was tasty, and I think carrots would be nice in here too. Play around and adjust as you want - the horseradish-mustard dressing is so nice, and the fennel and leeks are such a springy change! Yum. I ate mine with some venison steak, but I am sure fish would be nice with some of the dressing poured on top.
Fennel, Turnip, Leek Salad with Horseradish
4 medium sized turnips, unpeeled, cut into 1/2-inch wedges
1 medium fennel bulbs, cut lengthwise into 1/2-inch wedges with some core intact
2 leeks, sliced about 1-inch thick
4 tablespoons
olive oil, divided
2 teaspoons Kosher salt, freshly ground pepper
1
tablespoons
prepared horseradish
1 tablespoons
red wine vinegar
1 1/2 teaspoon
whole grain mustard
1/4
cup
coarsely chopped fresh flat-leaf parsley
Here they are before they went in the oven |
1. Preheat oven to 450°. Toss turnips, fennel, and shallots
with 2 tablespoons oil on a large rimmed baking sheet; season with salt
and pepper and arrange vegetables cut side down. Roast on low rack of
oven until beginning to brown, about 20 minutes.
2. Toss vegetables on a baking
sheet and continue to roast until vegetables are tender 5-8 minutes longer.
3. Whisk horseradish, vinegar, and
mustard in a medium bowl. Gradually whisk in remaining 2 tablespoons
oil and season vinaigrette with salt and pepper.
4. Drizzle vinaigrette
over vegetables, add parsley, and toss to combine. I also put a few fennel fronds in there. Serve warm or at room temperature.
Subscribe to:
Posts (Atom)