We are a collection of Minneapolis folks cooking, preserving, and harvesting local, seasonal foods. This blog-share is meant to inspire greater culinary genius, as well as continued local food invention. What are YOU concocting in that kitchen of yours?

6.28.2012

Pulled pork and barbecue sauce

I got 5 pounds of pork butt at the farmer's market last weekend from my favorite meat vendor, Hilltop Pastures Family Farm.  They are super friendly and the (10 year old?) daughter meticulously calculated my total, plus the meat is delicious.  I wanted to make a big batch of pulled pork to eat and freeze so that I didn't have to cook so much in this hot weather. Due to aforementioned heat, I also opted to use the slow cooker.

I used a simple dry rub recipe modified from Paleo Comfort Foods, and I also tried their barbeque sauce. I really like barbecue sauce, maybe because there is usually lots of brown sugar in there. This sauce turned out really nice: tangy and just sweet enough. I don't know that you can really go wrong here - any rub, or no rub will all still be good; barbecue sauce or no, still good. Yum!

Make sure your pork butt is thawed out (mine took almost 2 days in the fridge). Rub it all over with the following dry rub, but feel free to modify/add other spices in there.

http://www.itsfordinner.com/media/uploads/recipe/pulled-pork-oven-bbq/pulled-pork-1-spice-rub.jpg
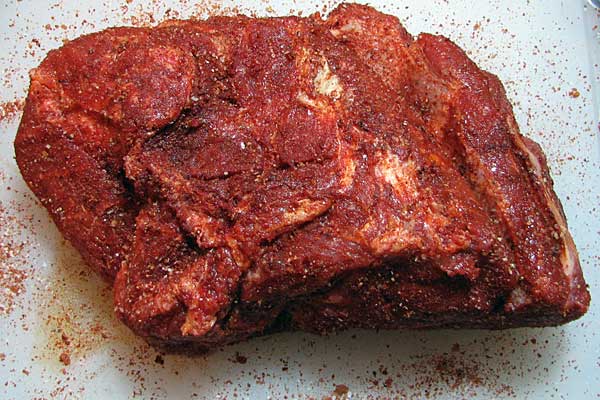
Rub that spice all up over that meat!
Quick rub:
1 tsp ground cumin 
1 tsp fennel, ground
2 tsp black peppercorns, ground
2 tsp garlic powder
1 T chili powder
1 T dried rosemary

Set the pork in the slow cooker and the low setting, and cook for 10 hours. When it is done, there will be lots of juice which you will want to remove most of, and then SAVE. This juice makes greens so incredibly delicious it is almost worth making a huge pork roast just for that (just heat up the liquid with a bunch of whatever greens you have: collards, swiss chard, or kale and cook down a bit). Use two forks to pull the pork apart, and voila!  You can eat it just like that (I add salt too.)

You can also make some bbq sauce and stir that in (and for even better results, let cook together for another hour or so to really get all the flavors simmered together).

https://blogger.googleusercontent.com/img/b/R29vZ2xl/AVvXsEgv9vzZ_tRiU4MmhGXc2s4umQ6nVshGlxd7TZGcIeGuyIEctH0nq1JnYm69sa1csoWMoenoU1jABBj4OEWxOVIm3o1Q2tvzhcwL-s88rIdYkmLg9iJV23WCPCygE0TBaEcUQgXkbh5U_43O/s1600/PULLED+PORK+2.jpgBarbecue sauce with some kick
(from Paleo Comfort Foods cookbook)
6 oz. tomato paste
1 c. beef stock
1/4 c. minced shallot
3 cloves garlic, minced
1 T. Dijon mustard
1 t. prepared horseradish
2 T. apple cider vinegar
1 T. avocado oil
1/2 t. salt
1 t. red pepper
1 t. cumin
1 t. cayenne
1 t. black pepper

1. Combine all ingredients in a saucepan and bring to a simmer on medium heat.
2. Reduce to medium low and cover for 15-20 minutes. Stir frequently so it doesn't stick.
3. The longer the better for this sauce! If you have 1/2 hour, add an extra 1/2 c. of beef stock at the beginning and simmer for 25-35 minutes/until desired consistency.

6.25.2012

Asparagus Soup

Asparagus Soup

I know this sounds more like a cozy winter recipe, but this creamy soup makes a tasty dish any time of year.  I have been eating a lot of soups lately and this is one of my favorites.  I make my own stock, which increases the flavor and over-all health benefits of the soup, but stock from the store will work just fine.

This recipe is from Recipes for the Specific Carbohydrate Diet by Raman Prasad.   SCD is a diet that restricts carbohydrates, obviously.  However, this soup doesn't have any odd substitutions that are common on the diet, such as almond flour or fermented yogurt.

I usually pair it with a grilled chicken breast or baked salmon.  However, on a hot summer day, sometimes all I am hungry for is a bowl of soup.

Ingredients
- 2 pounds asparagus
- 1 Tbsp olive oil
- 8 spring onions, finely chopped
- 5 cloves garlic
- 1 3/4 pints vegetable stock
- 1 Tbsp butter
- 1/4 tsp salt
- 1/4 tsp pepper

Clean and prepare asparagus by cutting and discarding the woody stems.  Chop the rest of the asparagus into 1 1/2 inch lengths.

Heat the oil in a large saucepan and cook the spring onions and garlic until soft but not browned.  Stir in the asparagus, cover the pot, and let it sweat for 10 minutes.  

Add the stock, butter, salt, and pepper, and bring to a boil.  Stir occasionally.  Reduce the heat and let the soup simmer for 25-30 minutes, partially uncovered.

In a blender, food processor, or using a hand-held immersion blender, blend the soup in batches until smooth.

Enjoy!

Jane

6.19.2012

Iced Coffee!

A week or two ago I read this article in the New York Times about Japanese Ice Drip Coffee versus cold press. Apparently it is a big debate in New York, though it seems that we here in the midwest are a bit behind because I have never heard of this ice drip before. But you know, I only drink decaf, and you really can't get decaf cold press (nor do I want to make such a big batch), so I was excited to try this out as an iced beverage option.
This one is super fancy - but illustrates the idea.
The whole concept is to use 1 oz of coffee beans ground to the consistency of sand with 8oz of ice and 8oz of boiling water. You want to drip the coffee right over the ice so that the coffee chills immediately, sort of sealing in all of the flavor. This is why this method is different than just chilling regular coffee pot coffee.

 My version is less fancy: this over a mug of ice
Anyway - my first attempt turned out delicious. I added some cream and coconut milk to mine, but it would be good on its own too. The video is especially helpful to get the whole idea, especially about slowly pouring the hot water over the grounds.Yum. It's steamy hot out and I am about to go up north for a few days where it will be much cooler, and this was a delightful way to start out this vacation-y morning. It's also easier than cold press, and I like that you can make individual cups. So. Ice drip! Hurray!

6.15.2012

Margarita - sugar free style

This weekend is going to be HOT again, which for me may mean some mid-afternoon scurrying to Lake Nokomis to jump in the lake and cool off, and some lounging in front of the fan while sipping cool beverages. Also, I have friends coming for the weekend, AND I have next week off. So, really, it is a festive feeling happening over here in my self.

With the heat and festivity, I am finding some yearning for a fizzy cocktail - of the alcoholic variety. If a person wants to be grain free, the only grain-free alcohol (besides wine and pure hard cider) is tequila. I haven't really been drinking much lately, but I had one of these last weekend and it definitely satisfied my need for a "cocktail" type experience. Paleo guy Robb Wolf created this recipe for the "NorCal Margarita" - it is a super simple recipe and tastes really nice and refreshing. It is a wee bit strong (I thought), so if you are after a pleasantly buzzy head, this will do it!

NorCal Margarita 
long pour of tequila (no need for top shelf stuff)
juice of 1 lime
soda water
ice

So by long pour I mean more than a shot, but less than 2 (I like el Jimador). Mix the tequila and lime juice together - in a shaker with ice, or just stir it up in your glass. Add some ice cubes, and top off with soda water to your taste bud liking. You can garnish with a lime too.

6.10.2012

Jicama chicken sliders


vietnamese chicken salad
Go to her blog for a GREAT list of paleo picnic foods
I saw these "Jicamadas" on my fave paleo blog and got inspired to try them. One because I love jicama, and two because they just looked fancy and treat-like, which I sometimes miss in the paleo food world. There  tends to be less glamour I think, and this recipe has some. Plus she suggested that these are a little like banh mi sandwiches - you know, but totally different. I agree, in a subtle kind of way. The radishes (which are SO beautiful right now at the store and farmer's market) mix with the carrot, jalepeno and mayo to conjure up some definite banh mi likeness.

My Jicamadas were super tasty - really nice flavor mix with the mint and basil. I found that the small dice of veggies was hard to keep on the jicama, and I thought that next time I'd julienne the veggies rather than dice. I think it will still look festive because of all the great colors, and it will be easier to eat. These would be perfect appetizers for some festive occasion - just make them on smaller pieces of jicama.

*Note that she recommends brining the chicken before you cook it. I did not do that, though I used thighs instead of breast meat. Also, this was my first time poaching meat. It felt strange, and did seem successful in keeping the meat moist. I think you could prepare the chicken any which way though. I sort of like the increased flavor that cooking it under the broiler produces, so I might try that next time.

6.07.2012

Strawberry Spring Salad

My strawberries are starting to get nice and red! It's me and the squirrels in a show-down, vying for each and every fruit. I think we are 60/40 and I'm in the lead.

I actually found out about this salad from Allison, fellow WFDM blogger. It's a simple fresh salad that is light and sweet - I found it a really nice way to finish off dinner. The fresh garden lettuce was so nice in there in this delicate, sweet way, and it is my first basil of the season! The big star of the salad though, is the blogger's strawberry-basil-lemon dressing. It would make excellent sorbet - this is such a tasty flavor combo (she does have a smoothie recipe for it). I doubled her olive oil just to make it a little more filling, and took out the sweetener (she uses 1-2 t maple syrup).

Spring Salad with Strawberry Lemon Basil Dressing


for the dressing (yield: 2/3 cup):
IMG_9513
From the blog Oh She Glows
  • 1 cup fresh strawberries
  • 1/4 cup packed fresh basil
  • 3 tbsp fresh lemon juice
  • 2 tbsp extra virgin olive oil
  • fine grain sea salt & black pepper, to taste

for the salad:
  • Slivered almonds, toasted
  • shredded unsweetened coconut, toasted
  • mixed greens
  • strawberries, chopped
  • fresh basi, chiffonade

1. Preheat the oven to 300F. Toast the almonds for about 7-8 minutes and then remove and add the coconut. Toast another 2-4 minutes, or until lightly golden, watching closely so the coconut doesn’t burn.
2. In a food processor, add the strawberries, basil, lemon juice, and oil. Process until smooth. Add in the salt, pepper, and maple syrup to taste and process again.
3. Assemble the salad as desired. Leftover dressing should keep for at least a few days in a sealed container.

6.06.2012

Cashew Bok Choy

Ooh, I am anxious for the next round of things to come in the garden. I am thinking green beans will be next - which I cannot wait to make some dilly beans with since those were the first pickled thing to go in the fridge last year.

I brought home bok choy this week, which I think I have written about before because I repeatedly overlook it in the store, and then I think it is so tasty when I saute it up. It isn't growing locally yet, so this is a precursor for when it is! The recipe is super simple - the toasted sesame oil is really nice with the toasted cashews, and it uses green onions (which are so good in this early springtime).  The original recipe is linked here on a blog that has grain free (usually paleo) stuff, including lots of desserts (if you are into the grain free dessert eating mayhem).  She says the recipe is also great with kale or spinach (and thus probably also spring's all abundant lamb's quarters).

Cashew Bok ChoyCashew Bok Choy
1 large head Bok Choy
1 T coconut oil
1 3/4 c chopped green onions
3 garlic cloves, minced (I omitted)
1 1/2 T toasted sesame oil
1/2 c. unsalted cashews
Salt to taste
Red pepper flakes to taste

1. Put your raw cashews in a cookie sheet and roast in a 450 degree oven for 5-7 minutes. Keep your eye on them so they don't burn!
2. Chop bok choy into 1/2 inch pieces - all of the white and green parts go in.
3. Heat oil in a large pan on med high heat and add onions. Cook for a few minutes (I put in the white part first and then toss in the greens after a minute or two).
4. Add bok choy and cover for another 5-8 minutes until wilted and/or tender to your liking.
5. Remove from heat and drizzle with sesame oil, salt, and red pepper flakes. Add toasted cashews. Serve!

6.01.2012

Egg muffins!

Happy June! I was feeling Muffin-ish this morning, so decided to make some egg muffins. Which are essentially tiny egg bakes in appetizing little muffin shapes. These would be smart for a potluck or brunch I think, because you can hold them in your hand and don't need silverware. Plus they are super easy. They would also make good road trip food - they just feel kind of snack-y.

I used the recipe listed here as a guideline (hers are veggie), but really mine were different: sausage, lamb's quarters, tomato and onion. There are actually some local heirloom tomatoes at the Seward now - some farm must have a very nice green house. I got one to try, and it tastes really fresh and sweet and is SO red. The recipe below is for a dozen egg muffins, but you can easily halve it.

Photo from NomNomPaleo. Yum!
Sausage egg muffins 
(makes 12)
9-10 eggs (depending how big they are)
1/4 c. cream or coconut milk
1 t. ground dried mustard
fresh herb/s of your choice (I used sage)
salt and pepper 
1/2 pound breakfast sausage
1/2 onion, chopped
1-2 c. uncooked lamb's quarters, chopped (or spinach)
tomato, diced

1. Preheat oven to 350.
2. Saute onion in some fat for a few minutes. Add crumbled raw sausage and cook both for 5 minutes until sausage is cooked and onions are translucent.
3. Add greens to mix and cover to steam for a few minutes. (If you use spinach, it is much wetter than lamb's quarters so you'll need to cook off the liquid. You could also cook the spinach separately and squeeze out the water, or use 1 c. of frozen cooked spinach.)
4. Grease muffin tin.
5. Mix eggs, coconut milk/cream, and mustard, herb/s, and salt and pepper in a bowl. 
6. Spoon sausage mixture into muffin cups - this should be enough to fill each cup about half way. Sprinkle tomatoes over the top. Pour egg mixture over it all filling muffin cups 3/4 to full. You may want to err on the side of less egg in each cup to make sure you get them all, and then top them off with whatever is left.
7. Bake for 15 minutes and serve!