We are a collection of Minneapolis folks cooking, preserving, and harvesting local, seasonal foods. This blog-share is meant to inspire greater culinary genius, as well as continued local food invention. What are YOU concocting in that kitchen of yours?
Showing posts with label fermented. Show all posts

10.11.2020

Fermented Salsa

To add to the ferments of the season: fermented salsa is now one of my favorites! How did I not know this before? I pretty much never do traditional canning, which means the bottom of my fridge is full of jars of things since I have to store the ferments there instead of a pantry. I seem to have enough room, and it means I get so much more good bacteria! (My freezer holds the remaining berries and tomatoes and sauces.)

I made my first batch of salsa about a month ago, and it is still tasting great in the fridge. The online recipe inspiring this one says that the salsa lasts a couple of months in the fridge. So, this is not a long-term ferment (like kraut that will last for 2 years), but more a shorter-term one (similar, in my experience, to cucumber pickles). 

You can use whatever combination of salsa ingredients you like - my version is below based on what was in my garden and following salt recommendation from the link above. It is a much more liquid-y ferment due to the tomatoes and lime juice, and it doesn't take long - a few days or so on the counter. *I used the food processor for my first batch for everything but the tomatoes, which resulted in a thinner/saucier salsa. The 2nd time I chopped by hand and I like the texture better because everything is more uniform in size and more chunky.

Finely chop the following for 1 quart plus another pint of salsa:

  • 2 pounds tomatoes
  • 2 jalapenos
  • 1 mild pepper
  • 3-6 cloves garlic (mine were really big so I just used 3)
  • juice of 2 limes
  • 1 T salt 
  • opt bunch of cilantro (I did not use because mine is mostly done in the garden)

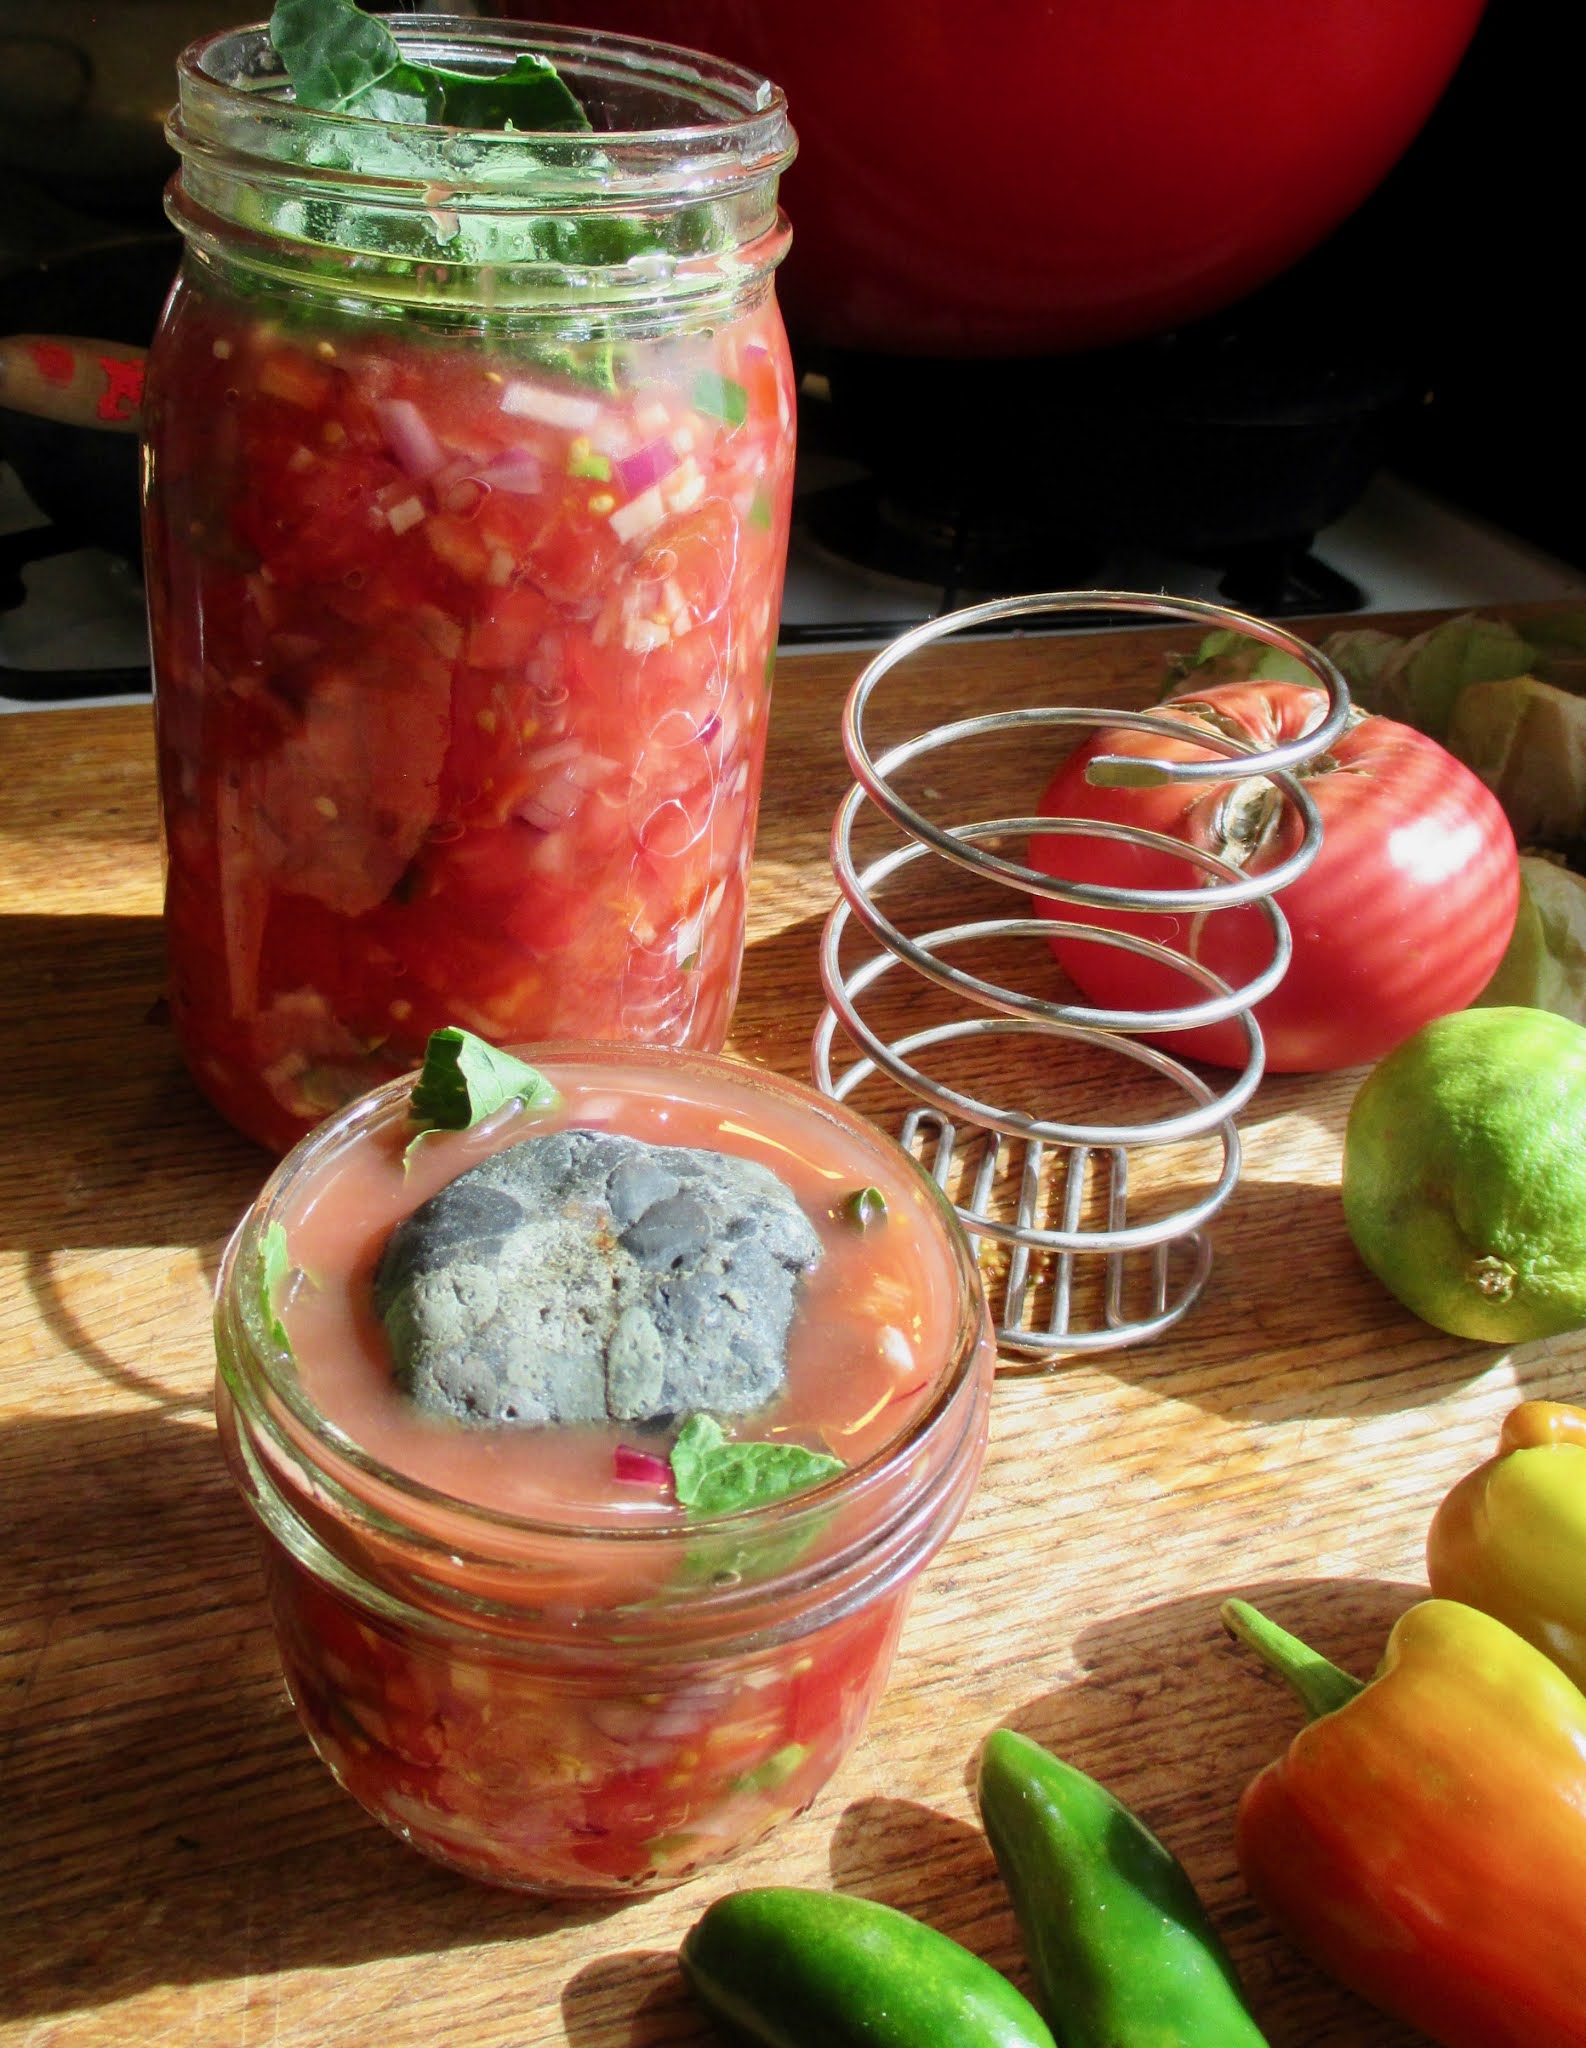
I topped mine off with a horseradish leaf (or you can use an oak leaf) to increase tanin and keep things crisper, which I then use as the top to keep the ingredients submerged under the liquid. I don't know if the tanins are helpful here, but I did it anyway (you could also use a collard leaf or half pepper or whatever). In the photo you can see that for the pint jar I use a rock on top of the leaf, and for the quart jar I used this coil spring fermentation product I got at fleet farm a month or so ago. It works, and presses the ingredients down extra firmly once the lid is on (see photo above where it is just red liquid in the top 1/4 of the jar).

Let sit out 3-4 days, until the taste is to your liking, depending on temperatures. The warmer it is, the shorter fermentation time needed. Store in the fridge for up to 2 months. 

I ate some on a taco salad, and attempted to make little kale tacos another night, which were really tasty and a total mess: young kale leafs wrapped around meat, avocado and salsa filling.

9.30.2020

Lacto Fermented Hot Pepper Relish

My friend gave me a jar of spicy fermented relish last fall, and it was the first time I realized I could make such a thing. It was so tasty I ate it within a week. I don't know what was in that one, but this one turned out nicely - medium spicy and tangy. At the moment I am also making fermented salsa, collard kimchi, pickled jalapenos (pictured) and spiced beets. Soon to come: fermented carrots and more standard kraut. So many plans, and hopefully enough jars to get me through since I hear there is a shortage all over town.

These ferments are quite forgiving and experimental. The main thing is you want to use fresh, crisp veggies to keep longer and maintain their goodness. Use whatever variety you have and like, for whatever degree of spiciness. Fit them into whatever jar will most closely hold the amount you made. For a relish recipe that has more exact amounts than I use below, check out this link. You also will want to do your best to keep vegetable matter submerged under the brine. This was tricky with this tiny chopped bits of peppers - I used a piece of kohlrabi leaf with moderate success (moderate because no mold matter formed, but I don't think that was any result of the leaf, which just stuck to the lid!) You could also use a cucumber, two crossed carrot sticks, a rock, a ziplock baggie with water, etc.

For the hot pepper relish:

I chopped jalapenos and a handful of other peppers from my garden - I had one banana pepper, and a handful of medium-spicy red peppers that look like mini bell peppers. I forget what they are called. I also chopped up some garlic cloves (I did all the chopping in the food processor) and then mixed everything together in a large bowl. I spooned it into a jar, then covered it with salt brine. (Mine was my typical brine of 1 quart of water to 3 T sea salt, though I used a little smoky salt in this batch for an extra thrill.) I left the jar out on the counter for 5 days, at which time the taste was to my liking. *My pint jar expressed A LOT of liquid over the course of 5 days. Like, a large pool was on my counter on morning 2. I also was trying out a jar lid that has an air escape thing, so maybe that encouraged more liquid expression?!

For the pickled jalapenos:

I sliced jalapenos whole, and topped them off with brine. I thought about putting a garlic clove in there, but didn't do it this first time. According to some website recipes, the pickled peppers will take several weeks - so they are still sitting, biding their time. I'll taste them after 10 days or so to see how they are faring, but so far they are looking good.

jalapenos, salsa, collard kimchi, beets...

7.17.2020

Fermented Pickles (and Warm Salad)

One of my cucumber varieties started producing (the other two are flowering now), and I have had cucumbers for about a week now. I wanted pickles, even though I didn't have many yet, so I made a small jar a few days ago that tasted ready today. I actually just made a quart of salt brine, so that I could make a jar at a time as I have some extra stuff (not that making salt brine is hard, but might as well just measure it out once and have it ready to go). So far the brine has resulted in this small jar of cucumbers, and a quart of dilly beans, which are my favorite.

My experience lacto-fermenting cucumbers is that they do not last as long as other things. The cucumbers I need to eat in a month or so, but if I leave them for the winter or spring, they are too soft and I don't eat them. The dilly beans (and kraut) always stay crisp, and I keep those in the fridge for a year and they are still good.

My method was to make a fairly salty brine, which tends to be better for hot weather: I used 3 T of salt to 1 quart water, though you could use less. Once you have the brine, you can pour that over whatever veggies you want to pickle: cucumbers, green beans, green tomatoes, garlic, peppers, etc. You can add in any herbs or spices you like. Below is what I would use in a quart of (dill) pickle.

Fermented Pickles
1 quart jar filled with veggie of choice
1 head flowering/seeded dill
1-2 garlic cloves, peeled
pinch of peppercorns
red chili pepper flakes
fresh oak/horseradish/cherry or grape leaf
*(if you have it to keep the veg crunchy)
salt brine solution (3 T salt to 1 quart water)

Put everything in a jar and stuff it full as well as you can. Be sure to use the freshest vegetables you have, and to remove the flowers from cuke ends and trim the green beans. Ideally, you want all veggies to be submerged under the brine, but they sometimes get sneaky and stick out, or the spices float. This means you may get a little white film on anything sticking out, which you can just pull off. I just loosely cover my jar with the lid, screwed on but not tight, and don't worry about it. But you can also fill a ziplock with some water and use that to press everything under the brine, or fill a smaller jar with something to weight the veggies down. Sometimes the liquid will overflow, so I set it on a plate and check them every day or two.

These take anywhere from 2-5 days, depending on the heat and how you like your pickles. Taste them and decide what you like.

I ate my pickles on a cheeseburger, and also made a warm-ish salad of seared zucchini, tomatoes, blanched green beans, cucumbers, basil, mint, and feta. It was delicious with a simple vinagrette on top.


11.24.2013

Kimchi (improved version)

I just made a batch of kimchi jjigae (a fave winter soup) with some old kimchi and it was amazing. I made it for the first time using pork belly instead of bacon, and omg! the pork belly gives it a more silky texture. It was incredible and I still have 1 more jar of last year's kimchi to make more. What glee!

There was some really beautiful napa cabbage at the co-op a couple of weeks ago, so it seemed wise to replenish the dwindling kimchi supply. I've made kimchi 5-6 times, and this time I changed up my method. I was feeling like the recipe I was using was a little fussy and inconsistent on the salting. My biggest challenge with kimchi making is to get the appropriate salty-ness in the napa so that the fermentation works right, and to get a good taste in the end. People have all different kinds of ways to salt: soak napa in salty water, do a salt rub, just add salt to the brine, etc.

My Charming Companion has made kimchi for many, many years and I think his salting method is more effective than my previous attempts and is what I include here. No matter what technique you use, the most important thing is to taste the cabbage and check how salty it is when you put it in the jar. It should taste salty! Taste several pieces of the napa because sometimes there is a range of saltiness and you want to get them pretty similar.

The recipe below uses My Charming Companions salting methods, with my own take on the ingredients. There is no need to measure things out precisely, but I am giving some estimates here. If you have more green onions, put them in, if you want more ginger, do that. I also have a hard time with raw garlic, so I use pureed onion where most people would use garlic.

2 large heads napa cabbage (4-6 lbs)
about 1/2 c sea salt (w/out iodine)
small onion, peeled
2 T ginger, peeled
1/4 c fish sauce (red boat brand is good!)
1/2 c korean red pepper flakes (gochugaru)*
1-2 T American red pepper flakes
1 daikon radish, cut into matchsticks
1 bunch scallions, coarsely chopped
2 grated carrots (opt)

*Korean red pepper flakes are a bit sweet and not as spicy as American pepper flakes. I've used either in kimchi, but I love the sweetness of gochugaru. It is sold at United Noodles in a large package with a picture of kimchi on the front (the package will last many kimchi batches!) You can buy either flakes or powder. I accidentally bought powder a couple of years ago, and it is working fine. If you use American pepper flakes instead, use less because it will be spicier.

1. Quarter the napa and cut out the really tough core pieces (it's very small at the base of the quarters). Chop the napa into 2" size pieces. You are going to let these pieces of napa sit for a several hours - so either get a really big bowl, or clean out your sink and do it in there.


2. Rinse/moisten the napa and drain any excess water. Add the salt and stir well so that all of the cabbage is coated. Let sit 3-4 hours or overnight.
3. Rinse salt from napa once or twice and taste the cabbage. Rinse salt until it is the appropriate saltiness. It should be a little less salty than sauerkraut (or a salty condiment), but more salty than you would want regular food to taste.
4. Add daikon, scallions, and carrots to the napa and mix.


5. For the pepper paste: Process onion and ginger in a food processor until minced. Remove them from processor and but in a small mixing bowl. Add fish sauce and pepper flakes and stir to make a paste.
6. I put on gloves for this next step: combine the paste with the veggies and really work it in so that all veggies are covered in the red mix - things should be a bit wet at this point. Again, taste a few bites of the napa to double check the salt, and also test the spiciness. Add more pepper if you like. If the mixture is not so salty, add a little bit to the whole thing, stir, and taste again. This will ensure really good kimchi and is worth the tasting!


7. Pack the kimchi into quart jars. The napa will have shrunk quite a bit, and you can generally fit this amount into 3 jars. Press kimchi down so that liquid covers the veggies; leave about an inch at the top for excess liquid that will come up as the fermentation occurs. Put lids on the jars and let sit out 2-6 days, depending on room temp and your fave fermentation level. I sat mine out 6 days, and made sure to set them on a plate to catch any overflow liquid. Refrigerate until ready to eat. It will last years but will continue fermenting very slowly.

8.06.2013

Fermented onions and radishes!

I had some spare onions and radishes the other week, and, inspired by my lacto-fermenting fiend of a friend, decided to pickle them via fermentation. Yum!

These are the jars before fermentation
 A few notes about lacto-fermented pickles:
1) fermenting things is so easy
2) they taste amazing
3) they are super good for you and your digestive system

No matter what you are going to ferment, you will need a brine mixture of this ratio:
2 c. water to 1 1/2 T sea salt - or - 1 quart water to 3 T sea salt.
Be sure to use the fine grained sea salt and not the rocky stuff. I heated a portion of the water so the the salt would dissolve better, and than topped it off with cool water to the appropriate ratio. (You want the brine to be room temp or cool when you add it to the veggies, not warm.)

Your big decision is what to ferment! Some things may require a quick blanching first (green beans, brussel sprouts) or cooking (beets), but many things just can be fermented in their raw state (onions, radishes, carrots, cucumbers, cauliflower). You do want to be careful to use veggies that are in good shape and not bruised. Whatever you choose, the basic idea is to put some spices in a jar (peppercorns, dill, garlic, hot peppers, mustard seeds, etc) and than fill the rest of the jar with your chosen item or blend. Pour the cooled brine over the top and make sure that all veggies/herbs/spices are submerged. Note: Keeping everything submerged can be challenging, but tuck beans under or pack radishes down and fill the jar all the way to the brim. Screw the lid on the jar tightly.

Now comes the part where you leave the jar out for several days to weeks for it to ferment. You will need to "burp" the jars each day to release the pressure - mine often end up spilling over the counter, leaking from the jar lid because of the fermenting process inside (I perhaps don't screw mine tightly enough, but just as well so the jars don't break!) This is all good and means the pickles are getting really tasty, just wipe it up and watch all the bubbles rise to the top in the jar. The best way to tell that your pickles are done is to taste them. You want to taste for nice pickle flavor - and there is no going wrong here. Some people like a mild ferment, others want it really strong. There will be a point where the active fermentation process ends - there will no longer be bubbling or overflow from the jar, so you can also use that as your done meter. Once you decide your pickles are ready, move them to cold storage (I put mine in the fridge) and eat them or store them for a long while. A year or more, so long as it is airtight and covered with the brine.

For my radishes:
I chopped them in half and had just enough to fill a pint jar. I have lots of dill going to seed in the garden, so I plucked several of the seed "heads" to stick in the jar. I also tossed in some black peppercorns, and would have put in mustard seed if I had any. Garlic and a hot pepper would have been great too, but I was out. My radishes were ready after 4 days, and they turned a nice pink color. These were great with a burger, in salad, or just plain for a snack.


For the onions:
I used red onions because that is what I had, and I thought they would look really pretty. I am a little sensitive to raw onions, so I was excited to ferment some to put in stuff without needing to cook them or soak them in vinegar first. This worked out great - they were still onion-y, but less sharp. They were perfect in salad and on burgers - really you could eat them on anything. I didn't use any spices with these, just the brine, and they also turned pink. The onions took longer and the juice kept spilling over the jar - it was about a week or 8 days when I liked the flavor best and called them done!

5.01.2013

Beet Kvass

Beet Kvass in a "juice" glass - what a color!
I had some store-bought, "Angelica's Garden" beet kvass a few weeks ago - it was served a la red wine while preparing a sort of date-night dinner, and it was REALLY good. (It costs a little more than wine, but you get some good gut flora out of the deal!) It also inspired me to try making my own. It looks like the Angelica's Garden folks add some apple cider/juice and fresh ginger juice right before bottling to give it a little sweetness, which I think would be an amazing next experiment. So far, I have only had this straight up, and I give it two thumbs up. It's just a little fizzy, rich and savory/sweet like wine, with a taste of earthy beets that is not too strong. I so far can't drink a whole glass - this is more of a 4 oz. sort of deal. But it's good. And WAY easier than kombucha, with perhaps more nutrition.

I followed Sally Fallon's beet kvass recipe. When I went to look up kvass in Salvador Katz's fermentation book, his kvass was made from bread?! Apparently both bread and beet versions are traditional - I had no idea.

Getting the whey!
I am going to try making kvass some more (maybe sometime without added whey) - but decided to go with using whey to get the culture started. I have not really had much dairy other than heavy cream for the last long while, so it was a bit of an adventure picking out which cultured dairy product to use to get my whey from. I thought about a coconut yogurt, but even the plain ones had cane sugar and weird stuff in there, so I went with some goat milk kefir. I had a swig of it too, and it was really delicious. You could also use juice from homemade/live cultured sauerkraut or any other fermented something you have around.

To get whey, use any yogurt or kefir that has live cultures in it. Put the cultured yogurt/cream/kefir in cheese cloth, or in a coffee melita thing over a cup to separate the "curds" and "whey" - though really you will be having whey and what ends up being like cream cheese. You only need 1/4 c whey, but it does last 6 months in the fridge, so you decide how much whey you want to make. (After you make beet kvass once, you can use leftover kvass as the starter culture.) I ate my "leftover" cream cheese stuff with some frozen blueberries and it was amazing.

Beet Kvass
2 large beets or 3 medium sized ones, peeled and roughly chopped
1/4 c. whey (see above)
2-3 tsp salt
filtered water
2 quart jars or a 1/2 gallon jar

Put all ingredients in jar/s and stir well (I shook them up with their lids on). Set sealed jars on counter for 2-8* days. The Kvass is ready to drink as soon as it is chilled, or right away if you don't mind it at room temp.

*My kvass took 8 days to get the full flavor, though the recipe says 2 days. It's been pretty cool in my house, so I would guess 2-3 days is great for full on August heat, whereas 8 days fits for this cool/cold springtime. I tasted mine every couple of days: early on, it was a light pink and tasted like salty water with some whey. It started to lose the salty taste after about 5 days, and finally started to get a little fizz going on right at day 7 or 8. You can certainly call yours done at any phase, but I was really happy waiting for the bit of fizziness without any sort of salt taste. By then it was a nice rich red color.

Note - reuse the beets another 1-2 times for more kvass. Instead of using whey, you can use some of the kvass you just made as the "starter culture." I have not tried it yet, but you can than eat the beets on salad or however you like. Nothing goes to waste!

11.05.2012

Kimchi Jjigae

Early this fall I got several Korean cookbooks out of the library and copied out a few tasty looking recipes. One of my favorite cookbooks is called The Kimchi Chronicles, which it turns out is also a show on PBS! I am particularly excited because I made a (double) batch of kimchi last month, and I have 4 jars to use in some new recipes.

The show and the food look amazing, as you can see in the clip below. This clip includes the kimchi jjigae, as well as another kimchi soup with seaweed in it (I happened to copy that recipe out before returning the library book too). I love PBS. There are several recipes on the site, including the Kimchi Jjigae that I modified slightly, below, as well as a Grilled Steak with Kimchi Butter that I want to make soon.


This soup tasted AMAZING, and it is super simple. The seaweed "garnish" is really good - I ended up using twice as much because it was such a nice taste combo. My soup ended up being a bit too salty due to my lack of salt calculation for bacon vs. pork belly + my extra salty kimchi, so I added in some chicken broth. That was great too and made a slightly thinner soup.


From the Kimchi Chronicles

Kimchi Jjiage:

  • 2 tablespoons toasted sesame oil
  • 1 pound bacon, cut into 1/4" pieces
  • Freshly ground black pepper
  • 1/2 large yellow onion, coarsely chopped
  • 3 cups coarsely chopped kimchi with a bit of its liquid (use the most pungent, sour kimchi available)
  • 1 t. anchovy paste due to my gluten intolerance
  • 5 scallions, thinly sliced
  • About 1/2 cup thinly sliced nori for garnish
Heat the sesame oil in a large soup pot over medium heat. Add the pork belly/bacon, season with pepper, and cook, stirring now and then, until rendered, browned, and crispy, about 10 minutes.

Add the onion and kimchi and stir to combine. Add enough water to nearly cover the pork mixture (5 or 6 cups), cover, and bring to a boil. Immediately reduce the heat and simmer until the onion and kimchi are softened and the soup is quite thick, about 20 minutes.

Stir in the anchovy paste and scallions. If it’s too thick for your liking, thin the stew with water or broth. Cover the pot and simmer for 10 minutes to combine the flavors. Serve steaming hot sprinkled with gim/nori.

8.08.2012

Kimchi

I first had kimchi in 9th or 10th grade - I would go to my friend's house after school and we would pile the kimchi on top of rice and eat it with chopsticks (me very haphazardly). I remember having to keep my mouth wide open after bites because the combo of the hot rice with the spicy kimchi made my mouth feel like it was on fire. I liked it so much that I got my mom to drive me to the korean grocery store across town so that I could buy my own, which my family then made me eat outside on the porch because they didn't like the fermented garlic smell. (This was not a familiar scent in my German/Irish/Czech/Norwegian home!)

I didn't eat kimchi again for years and years, and only in the last 5 or so did I realize I could make it myself. I've tried it a few times now, and am still working to perfect my own favorite version. There are so many recipes and ways to salt the cabbage! This time I modified a recipe from 2 places: a blog called Eating and Living - A Korean American mom's home cooking, and Anna's Korean Kitchen Diary - both had easy directions and nice photos. The kimchi turned out really good. It was also a bit saltier than I like, so I will use Anna's salting amount and method next time. Hers is what I include in the recipe below. My recipe changes include: no garlic, a food processed onion instead of rice powder, and anchovy paste instead of salted shrimp/raw shrimp/fish sauce. I have made kimchi without any fish sauce/anchovy/shrimp before and it has still turned out good, so if that sounds better for you, just take that out.

Kimchi (makes 2 quarts)
1 large napa cabbage (6 pounds)
1/2 c. course sea salt
5 c. water

1 daikon radish, cut into matchsticks
3 scallions, cut in 1-2" pieces
1/2-1 cup (korean) chili red pepper flakes*
2 T anchovy paste
1/2 onion minced in food processor
2 t. grated ginger
1/2 c. water
 *Korean red pepper flakes are recommended, but mine turned out fine with the kind sold at the co-op. I used 1/2 c. and it turned out mildly spicy. Like a 3 on a 1-5 heat scale.

See Anna's recipe for preparing the cabbage - the napa does need to sit for about 2 1/2 hours, so allow that much time. While the cabbage is pickling, you can prepare the "sauce". Cut the daikon and scallions and put in a bowl. Mix the remaining ingredients together (you could start with the onion in the food processor, and once it is well minced, add the other ingredients - or just do that in a bowl by hand).

Once your cabbage is ready, it needs to be well rinsed (several times) to get the salt off. You will then stuff the radish mixture into the cabbage leaves (as in Anna's blog post). Notice that she keeps the entire quarter of the napa together so that the radish mixture can be stuffed inside. I found that it is really hard to pull out the cabbage (once it is all finished) and eat it this way, so at this point I would chop up the stuffed napa and fill up my quart jars. However you want to do it - just get all the stuff in the jars!

Once the jars are stuffed, make sure to press the filling down so that it is submerged in water. They will continue to "juice" water as they sit out, so you can leave extra space or be prepared for them to overflow. I just covered mine with the canning lid (without the screw on part) so that they were covered, but could still breathe.  Let them sit out 24 hours or more - taste to see when it is fermented to your liking, then refrigerate the jars. They will keep a super long time - more than a year.

8.02.2012

Cucumber Kimchi

A couple of months ago I ate at a new restaurant in the Global Market called The Left Handed Cook. Though not paleo, they do label/make GF versions of stuff on the menu - which I find eases my mind to trust that the food will in fact be GF. The food was amazing, and the pair of (assumed) owners exceptionally charming. I was particularly in love with their cucumber kimchi, which I set an intention to try and make when my cucumbers came in. Which is now!

I think that part of why I loved this dish is because traditionally there is a little sugar in there and it is a wee bit sweet. I did not add it, but you could definitely do that for a sweeter taste. Without, it is a crisp, light form of kimchi that is not quite as hot or meaty as the napa cabbage version. It also (apparently) tastes best shortly after the fermentation process is done. I guess the cukes lose their crunch the longer they refrigerate. The recipe I modifed is from a blog called Aeri's Kitchen. The recipe there is for a pretty large batch, so I quartered it and changed some things (like I don't eat garlic, and didn't have fish sauce). I also did not have the traditional korean red pepper spice, which apparently has a really distinct and slightly sweeter flavor than american red pepper powder/flakes. It may also be stronger, since mine was a little mild. All of the blogs recommend that you get the actual korean variety, but I had not done that. Alas. One other post with nice photos and a slightly different recipe (with radish in it) that is worth checking out: Beyond Kimchi.

Main stuff:
6 pickling cucumbers
1/4 c. sea salt
3 c. water
1 green onion

Sauce:
1/4 c. red pepper flakes
1/2 onion, minced (I did mine in the food processor to get it more liquid-like)
1 T. anchovy paste or minced anchovies
1/2 t. minced ginger
2 T. water
(2 t. honey, optional)

1. Cut off both ends of the cucumbers. Then cut an x in the cucumbers, lengthwise, all the way down to about half an inch from the bottom; you could also cut all the cukes in half to make mini ones - but still do the same x cut.

2. Bring 3 c. water to boil with salt. Pour over cukes in a large bowl and let soak for 50 minutes. (The boiling water helps the cukes stay crunchy.)
3. Rinse cukes once and drain in colander. Pat dry if you are inclined.

4. In a bowl, mix all of the sauce ingredients.
5. Chop green onion into 1/4" pieces; add to sauce and mix well.
6. Put on some latex gloves to stuff the cucumbers: gently pull apart the four pieces of the cuke and put some of the sauce in there, and rub the cuke surface with it. Eyeball your sauce amount and try to use it evenly between the 6 cucumbers.

7. Put your cucumbers in a large mouth quart jar (or lay them down in a glass dish, whatever you have) and sit out at room temp overnight to ferment and then refrigerate. Mine actually fermented almost 24 hours til they got a taste I liked, so see what works for you. These will continue fermenting a little longer in the fridge, but very slowly. *These do not get covered with brine! Every other fermentation recipe I have made requires brine to cover the mix, but I read a few recipes and none of them covered the cukes...these do continue to fill with some liquid as they sit though, so I like to set them upright so the filling does not come out.

These will last up to a month in the fridge, so say the blogs, and are best a couple of days after refrigeration. These are great as is, or I had some this morning with some other veggies (sweated zucchini and steamed greens) and topped with eggs, and it was super tasty. I think I will make them spicier next time - and actually get the right red pepper.

10.22.2011

apple carrot kraut


Nothing revolutionary here. Just follow the basic steps in Megan's earlier post about sauerkraut and add whatever other tasty (or colorful) things you want. I chose apples and carrots for their hint of sweetness and for the colors they add, but you could try just about anything.

Being as it's a bit colder these days, this batch will probably take a few weeks to ferment to my liking ... just in time for Thanksgiving, come to think of it.

9.20.2011

Sauerkraut

A couple of years ago my mom got me a really fancy German sauerkraut crock. It is extra fancy in that there are weights to hold the kraut down under the liquid, and there is a lip around the whole thing that you pour water into to keep an air seal for the fermenting kraut inside. And it is big enough to make 7 quarts of sauerkraut! This last batch is the largest I have ever made, and with the help of friends, it went very quickly.

The recipe we used is based on the one in Wild Fermentation, but really it is just salt and cabbage. We added caraway too.

1) Chop or grate cabbage, with or without hearts, however you like.

We used a blend of green and red cabbages, and tried three different shredding techniques:
1) My food processor (which has a grater blade and shreds very small)
2) My hand-me down mandoline (an orange plastic job that you might remember from the pay per view commercials circa 1980)
3) A sharp knife

My personal fave was the mandoline because it made long thin strips, and because it was even FASTER than the food processor?! woah. who needs these new-fangled electronic gadgets when you can do better without?

2) Sprinkle salt on cabbage as you go. This is because the salt pulls water out of the cabbage, which creates the brine for the fermentation process. It also keeps it crunchy.

Katz's recipe calls for 5 pounds of cabbage to 3 T sea salt

Through some scientific hand weighing, we determined that each head of cabbage approximated about 1 T of salt (the small ones a little less, the big ones a bit more). And we just poured in the caraway seeds in between in quantities less than the salt.

3) Add other veggies if you like, or herbs and spices.

4) Mix ingredients together and pack into crock (or jar or whatever food grade bucket you use).

We established a fancy system to get the most liquid out of the cabbage: using the butt end of a wine bottle, we pounded the cabbage in a bowl before transferring it to the crock, where it was pounded some more with a fat rolling pin. This got lots of liquid out of the cabbage and allowed for a jam packed crock.

5) Cover kraut with a plate or some other lid that fits snugly. Place a clean weight (glass jug filled with water) on the cover. This will keep the cabbage submerged under the brine. Cover the whole thing with cloth to keep dust off.
*This is where the fancy German crock comes in handy...no dust via the water seal.

6) Leave the crock to ferment for 1-4 weeks. It was getting cool the last several weeks already, and ours sat out about 3 weeks. The warmer it is, the faster the fermentation goes.

7) Check the kraut every so often. Sometimes a white film (aka mold) appears on the top of the liquid. This is normal and you can just scrape it off (any remaining bits will break up and be unnoticeable). It is due to air hitting the surface, but the kraut itself is under the "anaerobic protection of the brine" (I particularly like that line).

8) Enjoy! (Taste along the way til its the tang you like)

We packed up the many quarts of kraut and stuck them in the fridge. They need to be chilled at this point or they will continue to ferment. Some people can their kraut, but heating the kraut kills all of the really really good stuff (drink the liquid as a "rare delicacy and digestive tonic" says Katz).

9.17.2011

Fermented green tomatoes


My tomatoes had a rough year. From what I hear, they weren't alone. The first fruits began to rot on the vine before they turned red. Bottom rot, a pocket of water that accumulates on the bottom of the fruit, is (according to Wikipedia) a possible consequence of erratic watering behavior. My beginning-of-the-season over-eagerness followed by a week and a half vacation might have had something to do with this.
I didn't want to throw them away, so I decided to experiment with fermentation. The tomatoes in my first jar ended up tasting a lot like green olives. I liked them so much I started wondering whether I should let the rest of my tomatoes turn red. Lucky for me, the threat of early frost came along just in time, and I decided to just call it on the tomato plants rather than tucking them into layers of blankets every other night.
This more recent batch was a bit crunchier and greener, so I'm excited to see if/how the flavor changes.

Here are some guidelines:
Put on a good record, probably something good and twangy
Pack your sliced green tomatoes into a clean jar
Add some other flavorful stuff like onions or garlic or peppers
Add some spices and keep them whole (I like mustard seeds and black peppercorns)
Add 2 T whey per pint
Add 1/2 T salt per pint (or closer to 1 T if you're not using whey)

Top off the jar with filtered water, screw on the lid (not too tight) and let it sit (covered) on your counter for awhile. In the heat of summer, I only waited a few days, but with the colder weather you'll probably want to wait a bit longer. Test the tomatoes anytime to check if they're tasty enough for you. When they are, put them in the fridge and keep for as long as you like (ok, probably not more than a year).

8.02.2011

pickles!

While Megan has been making cucumber drinks, I've been fermenting those little suckers. And they're so delicious and easy. Get yourself a quart jar and a little tray of pickling cucumbers (you know, the tiny ones with thick skin). Can you use normal, larger cukes? Meh. I tried it, slicing them thinly, but they're just not so tasty. You've been warned. I've also been using whey to kick start the fermentation process. You could just add extra salt, but "making" whey is, uhh, whey easy.


Ingredients:
enough cukes to fill your quart jar
1 T mustard seeds
2 T fresh dill
1 T sea salt (non-iodized, unrefined)
4 T whey (or an additional 1 t salt)
1 C filtered water

I've also added some whole peppercorns, cloves, cinnamon stick, garlic, celery seed, etc. to batches. Stick with whole spices, though, as the ground kind tend to turn into a slimy film at the bottom of the jar.

To get the whey:
Plop a bunch of whole milk yogurt into a clean dish towel and let it sit over a bowl for a day or so. The yellowish liquid that ends up in your bowl is your whey. You also have a bunch of really thick yogurt, which is delicious in these.

To make the pickles:
Pack your cukes into the jar along with spices, dill, etc. Add the salt, whey and filtered water. The top of the liquid should fully cover your cukes and be at least one inch below the top of the jar. Put a lid on the jar and let it sit on your counter for 2-3 days. I always cover mine with a dish towel, as I've heard that sunlight can hinder the fermentation process. If your cukes are fermenting particularly rapidly, you might want to let off some pressure by quickly unscrewing the lid and then screwing it back on. If you like a sour-er pickle, let it sit on the counter longer. When the pickles are pickled to your liking, transfer them to the fridge. They'll continue to ferment in there, but much, much slower.