We are a collection of Minneapolis folks cooking, preserving, and harvesting local, seasonal foods. This blog-share is meant to inspire greater culinary genius, as well as continued local food invention. What are YOU concocting in that kitchen of yours?
Showing posts with label paleo. Show all posts

12.20.2020

Egg Fried Cabbage-Rice

I have been assisting for a training the past few days, and last night I watched several Uncle Roger videos for some comic relief. I love Nigel Ng! My favorite is Uncle Roger watching Jamie Oliver make egg fried rice, 😂 though last night I watched Uncle Roger watch Gordon Ramsey make the dish. I was also mesmerized by this korean egg fried rice video of eggs cracked into super hot oil, bubbling and puffing up before being scrambled across the wok, and then tossed in the air with the rice and vegetables. The images clearly inspired my breakfast this morning, along with the leftover sauteed cabbage/onions on the stovetop that never made it into the fridge yesterday. Uncle Roger would definitely NOT approve of my cabbage-in-lieu-of-rice maneuver. But, I thought it turned out delicious. 

I am pasting Uncle Roger's egg fried rice recipe underneath what I made - should you want to make it and use actual rice! (Note: I had leftover onions and cabbage from the day before that I chopped up fine to use in place of rice. If you do not have this, start with the onions and cabbage and fry for a couple of minutes before you add the eggs.)

Serves 1

In the wok!

  • 2 T sesame oil
  • 1 garlic clove, minced
  • 1/2" piece of ginger, peeled and minced 
  • 2 or 3 eggs
  • small carrot, diced small
  • 1+ cups (leftover) cabbage and onion, chopped fine
  • 1 T soy sauce
  • salt to taste
  • 1-2 green onions

Heat oil in a wok on high heat. Add garlic and ginger and fry for a few seconds. Crack eggs into the oil, and stir to mix and cook. Break apart. Add carrots and cooked cabbage and onions. Stir and combine. Toss in the air to give some loft!! Add soy sauce and salt, and green onion. Toss again, and serve. 

Uncle Roger’s egg fried rice recipe

  • Heat 1tbsp sesame oil in a skillet or wok. 
  • Add two chopped garlic cloves and a piece of chopped ginger and fry for a few seconds. 
  • Add a large chopped onion and 2 chopped celery stalks and saute. 
  • Stir in a cup of corn kernels, 2 chopped carrots, 2 diced green bell peppers and a shredded cabbage and saute for a couple of minutes (Don’t overcook, leave some crunch). 
  • Move the veggies to a side of the pan and pour in three eggs. Keep scrambling the eggs until cooked. 
  • Mix it all up and add 1tbsp soy sauce and salt to taste. 
  • Toss in the meat of your choice and let it cook for a couple of minutes. 
  • Stir in three cups of day-old cooked white rice, and let it cook for a few minutes before you turn off the heat. Garnish with chopped spring onion.

6.26.2020

Coffee Pulled Pork

Less "pulled" and a bit more "chunks"
I had a large pork butt (7 pounds) that I made in the slow cooker the other day, and now I have lots of leftovers! I found this particular rub and spice blend tasty and easy, which I modified from this Paleo/Gluten Free Blog. I thought the pork was good as is, and also with the addition of some bbq sauce. It doesn't need much - I had some fancy bbq sauce in the fridge that I bought at the co-op a year ago, and I just gave a pour atop my re-heating meat. The bbq flavor was especially festive with homemade coleslaw.

Coffee Pulled Pork
2.5-3 lbs. boneless pork butt
1.5 T finely ground coffee (I used decaf!)
1 T chili powder 
2 teaspoons fine sea salt
1 teaspoon ground black pepper
1 teaspoon paprika
1 teaspoon mustard powder
2-3 cloves fresh garlic, sliced or minced
1/2 teaspoon cinnamon
1 teaspoon red pepper flakes 
1. (I have never done this step that is often recommended for cooking pork butt, but my roast was so large this time, I wish I would have!) Slice off the thick slab of fat (known as the fat cap) along one side of the pork butt. Place the whole butt into the slow cooker insert.
2. Mix together all the spices and rub all over the meat, making sure to cover both ends and get into the nooks and crannies. You might think you don't need all of the rub but keep massaging it all over the meat until it's all used.
3. Set your slow cooker to high for 5 hours or low for 9.
4. You can shred the meat one of two ways. You can shred it directly in the slow cooker with two forks. But when you transfer it to a serving bowl or container, you probably won't need all of the sauce. Leave about half behind. Stir to blend the meat with the liquid, taste, and add more liquid if you think it needs it. If you want to serve directly from the slow cooker, leave as is. The liquid will help keep it moist. Or you can transfer the meat to a bowl, shred it with two forks, and stir in about half the liquid. Taste the meat and add more liquid if it's a bit too dry, no more than 2 tablespoons at a time.
Optional step: if you want crispy bits of meat, spread the shredded pork out onto a baking sheet. Broil for 5-8 minutes, or until some parts are crisp.
Serve is as, with Tequila Pineapple Barbecue Sauce, or sauce of your choice. 
Here it is slightly more pulled, with some bbq sauce mixed in

3.25.2020

Shepherd's Pie (paleo)

I have made shepherd's pie before - I just checked, and I posted a recipe in 2012. Maybe this one is similar?! Global pandemics call for comfort food, which for me today is mashed cauliflower baked on top of meat and veggies. Is this a casserole? I think so. I made it while sipping on a whiskey ginger and listening to Mehdi Hasan and Jeremy Scahill, who feel like people of great sanity amidst some perplexing (at best) and horrifying (at worst?) responses to the changing world, capitalism, and coronavirus. I also listened to my friend's most recent recording (just released last week) of traditional choral world music, for a respite from politics. Which was very satisfying.

The highlight of this shepherd's pie recipe is the inclusion of mustard in the topping. Yum!!! This is an excellent addition that I will now implement in my mashed cauliflower going forward.

Cauliflower topping
1 large head cauliflower, cut into florets
2 tbsp ghee or butter
1 tsp spicy mustard
Salt and freshly ground black pepper, to taste
Fresh parsley, to garnish

Meat/Veggie mix
1 tbsp coconut oil
1/2 large onion, diced
2 cloves garlic, minced
3 carrots, diced
2 celery stalks, diced
1 lb. lean ground beef
2 tbsp tomato paste
1 cup chicken or beef broth
1 tsp dry mustard
1/4 tsp cinnamon
Salt and freshly ground black pepper, to taste

1. Place a couple inches of water in a large pot. Once the water is boiling, place steamer insert and then cauliflower florets into the pot and cover. Steam for 12-14 minutes, until tender. Drain and return cauliflower to the pot.
2. Add the ghee/butter, mustard, salt, and pepper to the cauliflower. Using an immersion blender or food processor, combine the ingredients until smooth.
3. Meanwhile, heat the coconut oil in a large cast iron skillet over medium heat. Add the onion, celery, and carrots and sauté for 5 minutes. Add in the ground beef and cook until browned.
4. Stir the tomato paste, chicken broth, and remaining spices into the meat mixture. Season to taste with salt and pepper. Simmer until most of the liquid has evaporated, about 8 minutes, stirring occasionally.
5. Spread the pureed cauliflower on top of the meat/veggie mix. Place under the broiler for 5-7 minutes until the top turns golden. Sprinkle with fresh parsley and serve.
(You could also, as the original recipe suggests, transfer everything to ramekins. I did not do this b/c it seemed fussy.)

1.27.2020

Cauliflower pizza crust (paleo)

I experimented with a cauliflower pizza crust, and found it really tasty. I have not made homemade pizza in many years, so it was just fun to try and make my own toppings. Yum. Most cauliflower pizza crust recipes seem to include cheese, which I don't eat much of, so I looked for a dairy-free recipe.

Up sides of this cauliflower crust: very little nut flour, mostly cauliflower, very subtle cauliflower taste.
Down sides: I could not pick up a full slice that would hold together (I could pick up a partial piece and it had enough structural integrity about it); pulsing raw cauliflower in the food processor is fussy and messy! Do-able. But fussy.

Cauliflower Pizza Crust
Post first baking

1 head cauliflower, stalk removed
2 eggs, lightly beaten
1/4 cup almond or tapioca flour
1 tsp. dried oregano
1 tsp dried basil
Sea salt and freshly ground black pepper

1. Preheat your oven to 400 F.
2. Place the cauliflower in a food processor and pulse until finely shredded (I did in 2 batches).
3. Steam the shredded cauliflower for 3 to 4 minutes. Drain well, let cool, and strain any excess water using a towel. (Quite a lot of water comes out!)
4. In a bowl, combine the cauliflower, eggs, oregano, dried basil, garlic powder, almond flour, and season with salt and pepper to taste. Mix everything thoroughly.
5. Transfer to a pizza pan or baking sheet and shape into a pizza crust shape. (You are just pressing it into a big circle. It's very strange! Next time I will maybe try putting parchment paper down first to assist in transfer of pizza to the butcher block.)
6. Bake in the preheated oven for 15 to 18 minutes.
7. Spread pizza sauce/toppings on top of the crust. Bake for another 8 to 10 minutes, or until toppings are nicely cooked.

I made my pizza with half pesto, half tomato paste sauce. Then I covered the whole thing with my mild Italian sausage, red onions, red peppers, mushrooms, and some diced tomatoes and shredded asiago. And a little magic salt. So tasty!!

12.21.2019

Keto/Paleo pumpkin pancakes

I was having early fireside musings with my friend this morning, and we started dreaming up ideas of blueberry pancakes, fried eggs and bacon. Realizing I had bacon in the freezer and some maple syrup in the fridge, and that she had blueberries and a little left over whipped cream, this breakfast idea seemed like a good start to the solstice. I went to the interwebs to seek out a recipe. Because there was some leftover pumpkin puree needing to be used up, pumpkin pancakes seemed the way to go.

A bite of this modified pumpkin pancake with bacon, syrup, a blueberry, butter and whipped cream was decadent. Totally decadent. I changed the recipe some, eliminating the nut butter, reducing the coconut flour (next time I will try it with no coconut flour at all, which I suspect would be just fine), using coconut milk, and eliminating the sweetener. The trick to these is cooking them on even heat quite slowly. Like, just hunker down to do some slow pancake cooking. I found it was better to center pancakes on 2 skillets than to cook 4 in a larger cast iron one. *I did try some with blueberries inside the pancake and it worked!

Paleo Pumpkin Pancakes (makes 10-12 pancakes)
3 large eggs 
1/3 cup pumpkin puree
1/4 cup coconut milk
1 teaspoon vanilla
1 cup super fine almond flour
2 tablespoons coconut flour
1 1/2 teaspoons baking powder
1 teaspoon pumpkin pie spice
1 teaspoon ground cinnamon
(coconut oil/bacon fat/ghee for griddle)
*opt: blueberries 

1) In a large bowl, beat the eggs then whisk in the pumpkin. Add the milk and vanilla and mix until smooth. Add remaining dry ingredients and mix. Batter will be quite thick. 
2) Heat a skillet or two to medium-low heat and melt cooking fat of choice. Spoon scant 1/4 cup batter to center of skillet/s and cook slowly: 3-5 minutes for each side. *If adding blueberries, add just before you flip. Be gentle with the flipping, and wait a little longer than you think. 
3) Keep warm in the oven, and serve with whatever toppings you like.  
*These apparently also freeze well. I'll try that with the leftovers to toast another morning.

12.04.2019

Samosa filling (Keema) and Tikel Gomen

This is the 2nd time I've made Nom Nom Paleo's beef samosa filling, Indian Spiced Keema, along with Ethiopian cabbage and carrots, or Tikel Gomen. They are delicious together.

If you want to get especially fancy, you could also make Besan Chilla, a north Indian flatbread made out of chickpea flour, that when eaten with the Keema is very samosa like. I did not make them this time around, but the combo of the three was a total trifecta. Yum.

Follow everything with a cup of turmeric-ginger tea with coconut milk, and really, it's a pretty perfect meal. (A meal in which I apparently care much more about eating than photographing. These photos are pretty atrocious!)

*My dinner companion was not eating dairy, so I used coconut oil in the keema. It was still good, just a bit less depth (in my opinion). I also didn't have cilantro. The cilantro kicks things up a notch, but perhaps like me, your cilantro is buried under some snow in the front garden!

Keema
2 tablespoons butter, ghee or coconut oil
1 large onion, finely chopped
3 large garlic cloves, minced
2 tablespoons minced ginger
2 jalapeno peppers, finely diced
2 pounds ground beef (or lamb/goat/combo)
½ teaspoon ground turmeric
2 ½ teaspoons salt
½ cup full-fat canned coconut milk
1 tablespoon garam masala
Juice from half a lemon
¼ cup minced cilantro

1) Melt butter in a large, heavy skillet over medium heat. Saute onions for about 10 minutes, until translucent and beginning to brown.
2) Add garlic, ginger, and jalapeno and saute until softened. Then add ground beef. Cook until cooked through, breaking up meat with your spoon.
3) Add turmeric, salt, and coconut milk. Bring to a simmer, and cover the pan and reduce to medium low heat. Simmer covered for 20 minutes, stirring occasionally.
4) After 20 minutes, remove lid and check that the liquid is gone. If not, continue cooking uncovered another few minutes until it evaporates. Add garam masala, lemon juice, and cilantro. Serve!

Tikel Goman
1/4 cup olive oil (or coconut oil)
4 carrots, sliced
1 onion, thinly sliced
1 tsp salt
1/2 tsp black pepper
1 tsp cumin
1 tsp turmeric
1/2 tsp ground ginger
1 head cabbage, sliced

3 red potatoes, cut into bite-sized pieces (opt)

1) Heat the olive oil in a large stockpot over medium high heat.
2) Toss in the carrots and onion and saute them in the oil for about 5 minutes.
3) Stir in the seasonings (salt, pepper, cumin, turmeric, ginger) and toast for a minute.
4) Add in the cabbage and potatoes. Stir to combine. Cover the pan. Reduce the heat to medium-low. Cook until the potatoes are soft, about 30 minutes.
*Mine got a little dry in cooking, so I added in a splash of coconut milk. 

11.24.2019

Pork & Cranberry meatballs

I make meatballs pretty regularly, often from Mel Joulwan's Well Fed site which has a whole meatball madness link page (I think I've made her Czech meatballs, Cuban meatballs, Merguez meatballs, and maybe the Moroccan ones, though if I remember right I did not like them.) I've been on a pork meatball fest lately, and recently made a Bon Appetit Vietnamese inspired meatball, where I learned that I can cook meatballs entirely in the broiler, which makes them really crispy and delicious.

This recipe is based on what was originally ground turkey to make a Thanksgiving inspired meatball. It was delicious with pork and easy ingredients I had at home (lemons yes, oranges no; baking soda yes, cream of tartar no). I ended up reheating a bunch of left-overs to go along with these, and this meal was a total star this weekend: roasted squash, pickled beats, the last greens of my wilted garden, and a bunch of saurkraut. I ate about 3x the amount of kraut pictured in the photo because it was so good with every other thing on the plate. 


Pork & Cranberry Meatballs (makes 12)
1 pound ground pork
1 T lemon juice
1 tsp lemon zest
1 tsp salt
1/4 tsp black pepper
1/4 c dried cranberries
2 cloves garlic, minced
*1/4 tsp baking soda dissolved in 1 T warm water (opt)
(Mel uses baking soda and cream of tarter to tenderize meatballs sans breadcrumbs. I never do and find them to still be delicious. This time I did do the baking soda, for whatever reason!)

1) Preheat oven to 400 degrees. Prep a cake pan with foil or parchment if you like - these do get a little broiled on, but it scrubs off with a scouring pad.
2) Mix all ingredients except baking soda/water in a bowl by hand. Add baking soda/water mixture and combine.  Form meatballs. (Mel has us chill the meatballs prior to baking. Is it necessary? I don't think so.)
3) Bake for 20 minutes. I then put mine under the broiler for a few to get them nice and caramel-y. The exposed cranberries do burn a bit (the sugars!) so keep an eye on them if you do that.

Let cool a minute or two and serve! These were delicious with saurkraut and squash.

11.07.2017

Grain Free Fruit & Nut Bread

I was in the mood for some fall baking, and this is what happened: A lovely loaf of fruit/nut bread that is just slightly sweet from bananas and the dried fruit. It has a great texture and is delicious toasted with butter. Yum. Recipe from The View From Great Island Blog.You can use any combo of dried fruit/nuts and you get this nice fruitcake looking loaf!

Fruit and Nut Bread
  • 2 ripe bananas
  • 2 large eggs
  • 1/4 cup melted unrefined coconut oil
  • 2 cups almond flour
  • 1 tsp baking powder
  • 1/4 tsp salt
  • 2 Tbsp flax seeds (whole)
  • 2 cups rough chopped nuts (I used almonds, pecans, walnuts, and macadamia nuts)
  • 2 cups rough chopped dried fruits (I used apricots, cranberries, and prunes)
  1. Set oven to 350F
  2. Oil a standard loaf pan (or line it with a sheet of parchment to lift the bread out for slicing).
  3. Mash the two bananas really well. Put them into a large mixing bowl and whisk in the eggs and coconut oil really well.
  4. Stir in the flour, baking powder, and salt and blend well.
  5. Fold in the fruits, nuts, and seeds and blend until everything is well distributed.
  6. Turn into the loaf pan and spread out the dough evenly, and into the corners.
  7. Bake for 40 minutes or until starting to turn golden and a toothpick inserted in the center comes out dry. This bread does not rise, so it will still be flat. The exact cooking time will depend somewhat on the exact dimensions of your loaf pan, as even 'standard' ones can vary.
  8. Let the bread cool completely before slicing. 

11.27.2015

Apple Pie with double (grain free) crust

This year I poted to go for a gluten free Apple Pie for Thanksgiving (I seem to flip flop between pumpkin and apple on alternate years.) I neglected to get a photo, but want to remember this recipe because it tasted great. The crust got a bit soggy by day three, but still tasted good - it was almost like it just had a crumble top.

I used a recipe from Comfy Belly, a blog whose grain free biscuits are also great. This Apple Pie recipe is a double crust with apples that you cook in a saucepan. Note to self: cut apples in large pieces so they don't get too mushy when cooking. Also, press the bottom crust into the pie plate, and use care when rolling out the top crust. Mine tore a bit, but it actually looked good that way in the end - I just layered it a bit. It was rough and homemade looking that way.

I used only a Tablespoon or so of honey in the whole recipe split between crust and filling, and about 1 1/2 Tablespoons truvia (1 T for the filling). It was not overly sweet, but was sweet enough and will not elevate blood sugar!

(We also brought squirrel organ pate and cauliflower mashed potatoes to dinner. The pate was a initially met with some doubt, but all gave it some thumb's up after trying it.)

1.18.2015

Chia-Flax Crackers (Paleo and nut-free)

Well, it turns out I have become an Intermittent Poster. Perhaps that is because I am mostly eating recipes of things I've made before, with a little less culinary creating. But My Charming Companion discovered a new cracker recipe in the last week, and after making 4 batches, I want to preserve the recipe! It doesn't have any nut flours in it (all my previous crackers have used almond flour). This is more of a seed cracker - it's great with butter, with avocado, smoked oysters, and plain. This is the cracker I want to have when I next make gravlox - it seems a bit more rye-like and I imagine the combo to be quite delicious.

Original online recipe is here, My Charming Companion's version is below. These crackers were made on one of those flat edged baking sheets (which makes spreading the mixture really easy).

Chia-Flax Crackers
1/2 c.  flaxseed meal (we grind whole flaxseeds in a coffee grinder)
1/4 c.  chia seeds 
1/4 c. whole flax seeds
1 c. water
1/4 tsp. garlic powder
1 Tbsp.  Tamari (or twice that amount of coconut aminos)
1/8 tsp. sea salt

1. In bowl, combine ingredients. Let stand for 10 minutes to thicken.

This is the blob on the parchment covered cookie sheet before spreading.
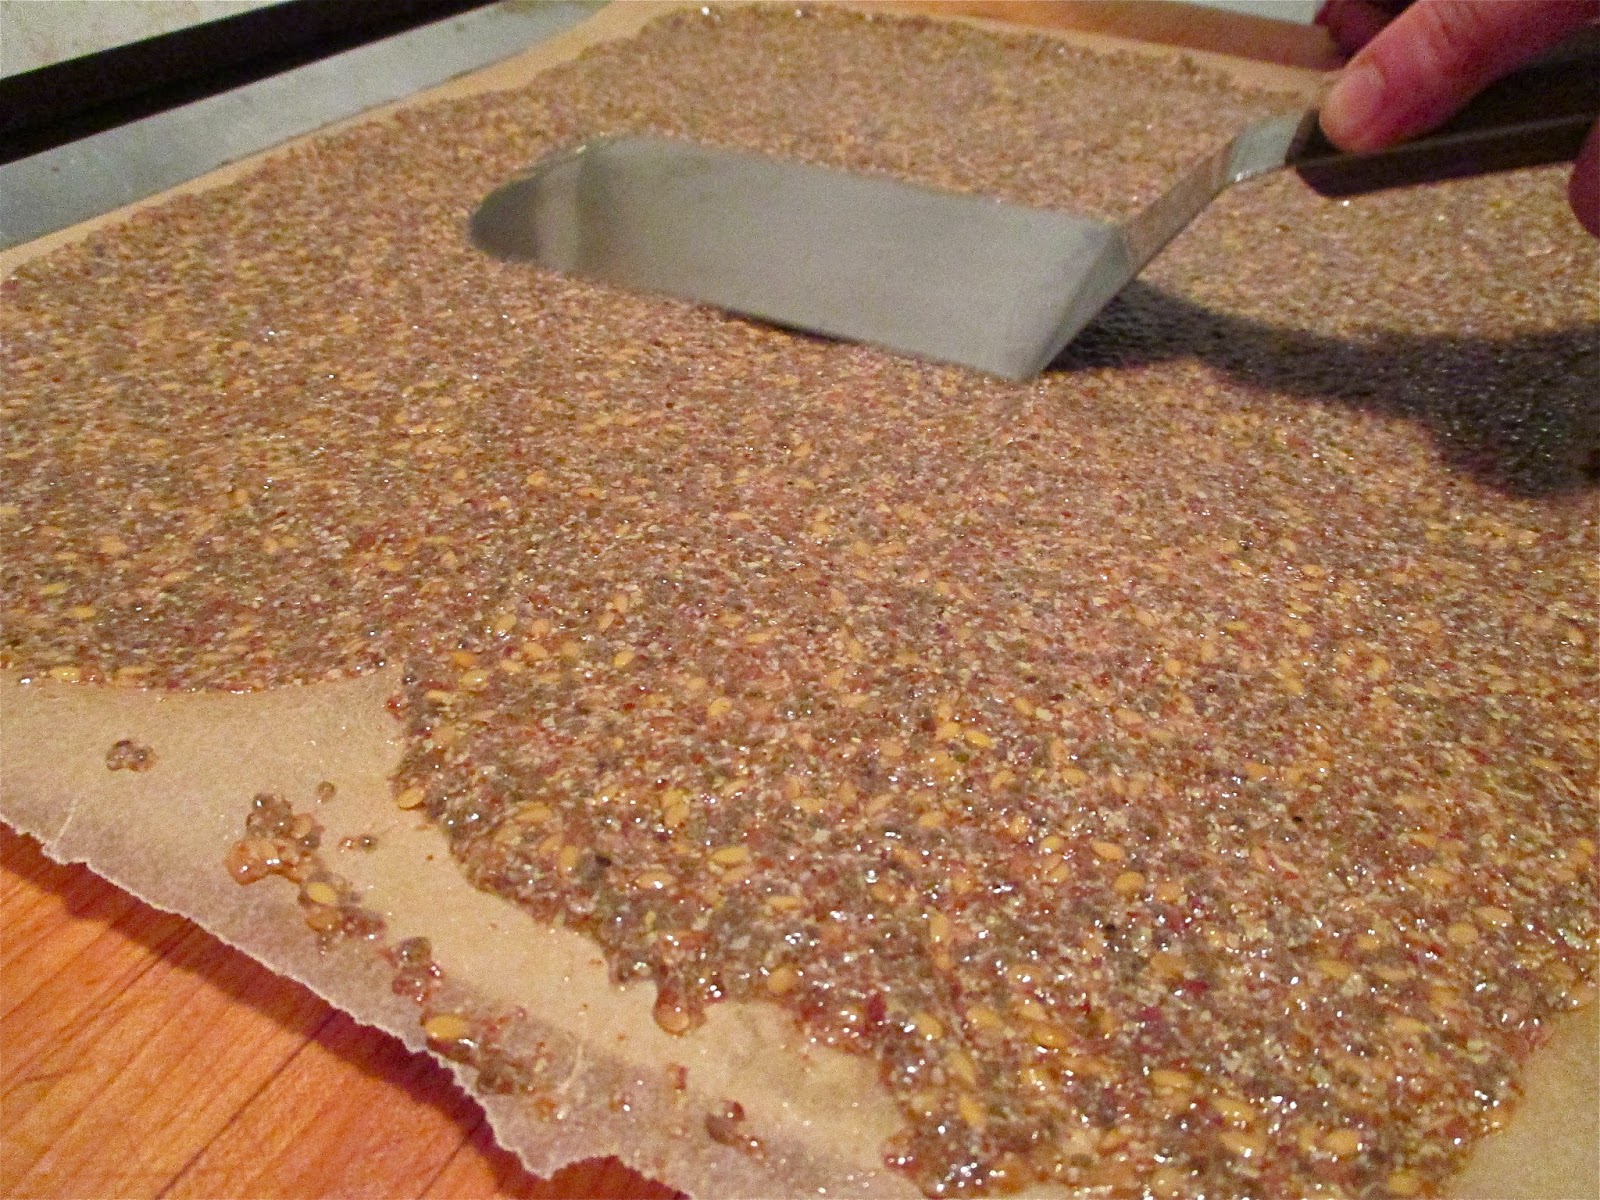
2. Evenly spread mix on parchment lined baking sheet. This takes some time - you want a thin layer that should cover your entire baking sheet.

You can see how gelatinous the mixture is!
3. Bake at 350°F  for 15 minutes, remove from oven and "cut" into squares (you are scoring more than cutting).
4. Return to oven for 15 minutes, then flip crackers over and bake for an additional 5-10 minutes (the parchment becomes necessary here as your agent to flip the crackers). You can also break them into their individual crackers now. They are done when they are crispy. If you did not have an even spread, some of the thicker crackers may need a few more minutes.


These cool almost immediately and you can eat them right away.

12.21.2014

Paleo Mu Shu


Happy Solstice! I have not posted in a long while - definitely not since the days were much longer and the garden was still in full swing. A couple of months ago I began an experiment and moved up to the northside homestead full time. Now I am by the garden all the time, but it's got a layer of snow covering the whole thing. Snow that looks pretty mushy today! The harvest continued so late that I am only now finishing off the last of the tomatoes that have covered the kitchen table since November. Otherwise there are about a dozen carrots left, and 3 squash. I had to start buying vegetables at the store last week for the first time since summer!

The final carrot harvest! So pretty!

Tonight's dinner was an attempt at Mu Shu, but rather than wrapping it in the traditional "Chinese pancake" I used steamed cabbage leaves. Mu Shu was the only thing I ever ordered at Evergreen restaurant, a really delicious, home-style Chinese place, and really all for the pancakes. I haven't eaten there in years because of my gluten allergy, but I trust they still make great Mu Shu. Other than the pancake, the only other thing to "paleo-ize" was the Hoisin sauce, which is a critical component to the whole thing since it is what gives the flavor.


The verdict: it was delicious, and the cabbage leaf made a perfect stand-in for the pancake. The Hoisin sauce was definitely different - instead of bean paste, I used nut butter (per various online recipes). It tasted really good, just more like hoisin-sauce-meets-thai-peanut-sauce. Which makes it sound weirder than it was, because really, it was great.

I adapted an online mu shu recipe and paleo hoisin recipe to get what is below. Because I was trying to be authentic, especially for the first go of this, I wanted to get bamboo shoots. You could substitute carrots if you wanted, but, My Charming Companion says part of what makes Mu Shu is the blandness of color - everything is white-ish/yellow except the green onions. Carrots would sort of ruin it. So, I went to Sun Foods up here in Brooklyn Center for bamboo shoots - I had never seen them fresh before, and was originally expecting to get them canned. But as I walked into Sun Foods, which is basically an international Cub foods that feels like a different world - I started seeing all kinds of produce that made me think, huh - is that a bamboo shoot? I walked by enormous yams and tubers that seemed of African origin, and then a bunch of cactus and plantains and yucca before getting to these long yellow things that were the bamboo shoots. Which then were sold in 4 different varieties! So, uh, no need for the canned ones. I was in a time crunch, so the only other thing I got was friend plantain chips (YUM!) but I am pretty curious to go back there and see what strange new fruit or vegetable I come home with.

Paleo Mu Shu, serves 2-4
3/4 lb. pork loin, cut into strips
2-3 T tamari (or slightly more coconut aminos)
1-2 T sesame oil
1/2 small head cabbage, cored and thinly sliced*
1 1/2 cups bean sprouts
3-4 eggs, beaten
3-4 stalks green onion, julienned on the diagonal
3 cloves garlic, chopped
1/2 cup chinese mushrooms, stemmed and cut into strips**
1 cup bamboo shoots, cut into strips
5 T coconut oil/lard
Steamed cabbage leaves*
hoisin sauce
*Note: the taste will be superior if you have two separate cabbage heads - 1 for steaming and 1 for slicing for the insides. You will have leftovers from both cabbages, but one will be pre-steamed and won't be as crunchy in the mu shu!
**I just used regular mushrooms - we had some dried ones in the cupboard from a friend, so I re-hydrated those.

1. Steam cabbage leaves, aka mu shu wrapper: cut the core from one medium cabbage head. Steam the cabbage head in whatever steamer system you've got - it takes about 15 minutes before you can peel the outer 4-6 leaves, and another 10 minutes to get the next 4. The cabbage is hot when it comes out of the steamer, but use tongs to help you peel each of the leaves. It's easy so long as it steamed long enough. 8-10 leaves should do it. I set them aside in a cake pan, then 5 minutes before dinner, pop them into a 200 degree oven so they will be warm.
2. Prep your veggies and pork. Cut everything up because things go fast as soon as you get started. Put sliced pork in a bowl with tamari and sesame oil.


3. In a large cast iron skillet, heat 1 T fat on med-high heat. When pan and oil are hot, pour in the beaten eggs. You are basically making one big flat egg sheet. Let the egg set until firm enough to flip in one sheet; flip it over for another 10 seconds or so, then flip the whole think out onto a cutting board. Slice the egg sheet into thin strips and set aside.
4. In the same skillet, heat 2 T fat over high heat. Add half of the green onions and stir for about a minute, until onions are sizzling. Add bean sprouts and cabbage. Saute until cabbage is wilted, but still crunchy (this took just a few minutes). Remove from heat and set aside in a bowl.
5. Heat the remaining 2 T fat in the same skillet over high heat. Add the rest of the green onions and garlic and saute for a minute, until fragrant. Add pork and stir fry until just done. Add the mushrooms, bamboo shoots, cabbage, sprouts, and egg sheet. Stir fry for another few minutes.


6. Serve each mu shu cabbage leaf with a smear of hoisin sauce down the middle. Place several spoonfuls of mu shu inside and fold the sides in! (Really, we ended up cutting each cabbage leaf in half because they were so big - these do get a little messy, so be prepared!)

Paleo Hoisin Sauce, makes about 2/3 cup
3 T tamari  (or more coconut aminos)
3-4 T nut butter (I used part almond butter/part peanut butter)
1 T honey (or use part stevia)
2 tsp cider vinegar
2 tsp toasted sesame oil
1/4 tsp crushed red pepper
freshly ground black pepper

Stir everything together until combined - make sure to work nut butter well!

10.03.2014

Paleo Sushi

Last weekend I bought some wild coho salmon from the Seward because it was on sale, and in deciding how to prepare it, My Charming Companion was urging sashimi. Which then created a desire for some sushi rolls to go with. The amazing thing was I had all my fave sushi ingredients in the cupboard and fridge - even some pickled ginger - so impromptu sushi dinner it was. In my pre-paleo days I ate homemade sushi pretty often. I had looked at various paleo sushi options online over the last few years, never seeing anything I was excited about. But Studio Snacks had a version recently that included a one-egg omelette-like layer in lieu of rice that I found intriguing. So that is what I tried - it turned out amazing! And was actually much easier than traditional rice sushi because the egg is way less fussier than the rice. This would work for all kinds of sushi rolls, but here are the two I made.

Paleo California Roll
Nori sheets
cucumber, sliced lengthwise
carrots, sliced lengthwise
homemade mayo (opt)
1 egg per sushi roll
coconut aminos
avocado, sliced
sesame seeds (opt)

Paleo Salmon Roll
Thin slice of quality raw salmon
1 egg per sushi roll
coconut aminos
homemade mayo (opt)
cucumber, sliced lengthwise
sesame oil
toasted sesame seeds (opt)


1. Prep all veggies/fish - slice them and have them ready to lay in roll.
2. Make egg "sheets":To prepare them you will need one egg per roll. Ideally you want a pan that is 8-9" wide that is either a well oiled cast iron, or a non-stick pan. Heat the pan on med, with just a bit of coconut oil on the bottom (I replenished the coconut oil for each egg sheet). While pan is heating, mix one egg with a splash of coconut aminos. When pan is hot, pour egg into pan and swish around so that the egg layer covers the entire pan. You want the heat setting so that it cooks the egg pretty quickly, but not immediately. I tried two techniques next: either flip the egg to cook the other side (this takes about 10 seconds since it will be mostly cooked through), or just cook it all the way on side one. Either method works - just be somewhat careful because the egg sheet is quite thin, and you want it mostly intact to lay on the nori paper.
3. Assemble rolls: Lay one sheet of nori down. Spread a thin layer of mayo (if using) along bottom half of the nori. Lay your egg "sheet" on top - it should cover much of the nori. Then make one layer of your veggies/fish. Experiment with how much to fill. Roll up, using a bit of water to "seal" the nori to itself. (Studio Snacks has some photos about how this looks step by step.)
*One note is that because the egg sheets are round they will inherently have a less tight roll at the ends. You could cut the sheets into squares, or just trim one part of the circle and place it on the edges of the roll to make this more even. I just used the egg as is and had slightly uneven ends!
4. Slice sushi rolls. If you made the raw salmon ones, drizzle some toasted sesame oil over the top. Sprinkle rolls with toasted sesame seeds if you want, and serve with coconut aminos, wasabi, and pickled ginger.

The photo shows the full spread, including the sashimi of salmon with ginger (beautifully cut and arranged by My Charming Companion). Another endeavor I hope to try is to pickle my own ginger, maybe with a little honey. I found a couple of fermented versions, so I'll post that when I get around to trying it.


9.29.2014

Minnesota Fried Squirrel - Grain free


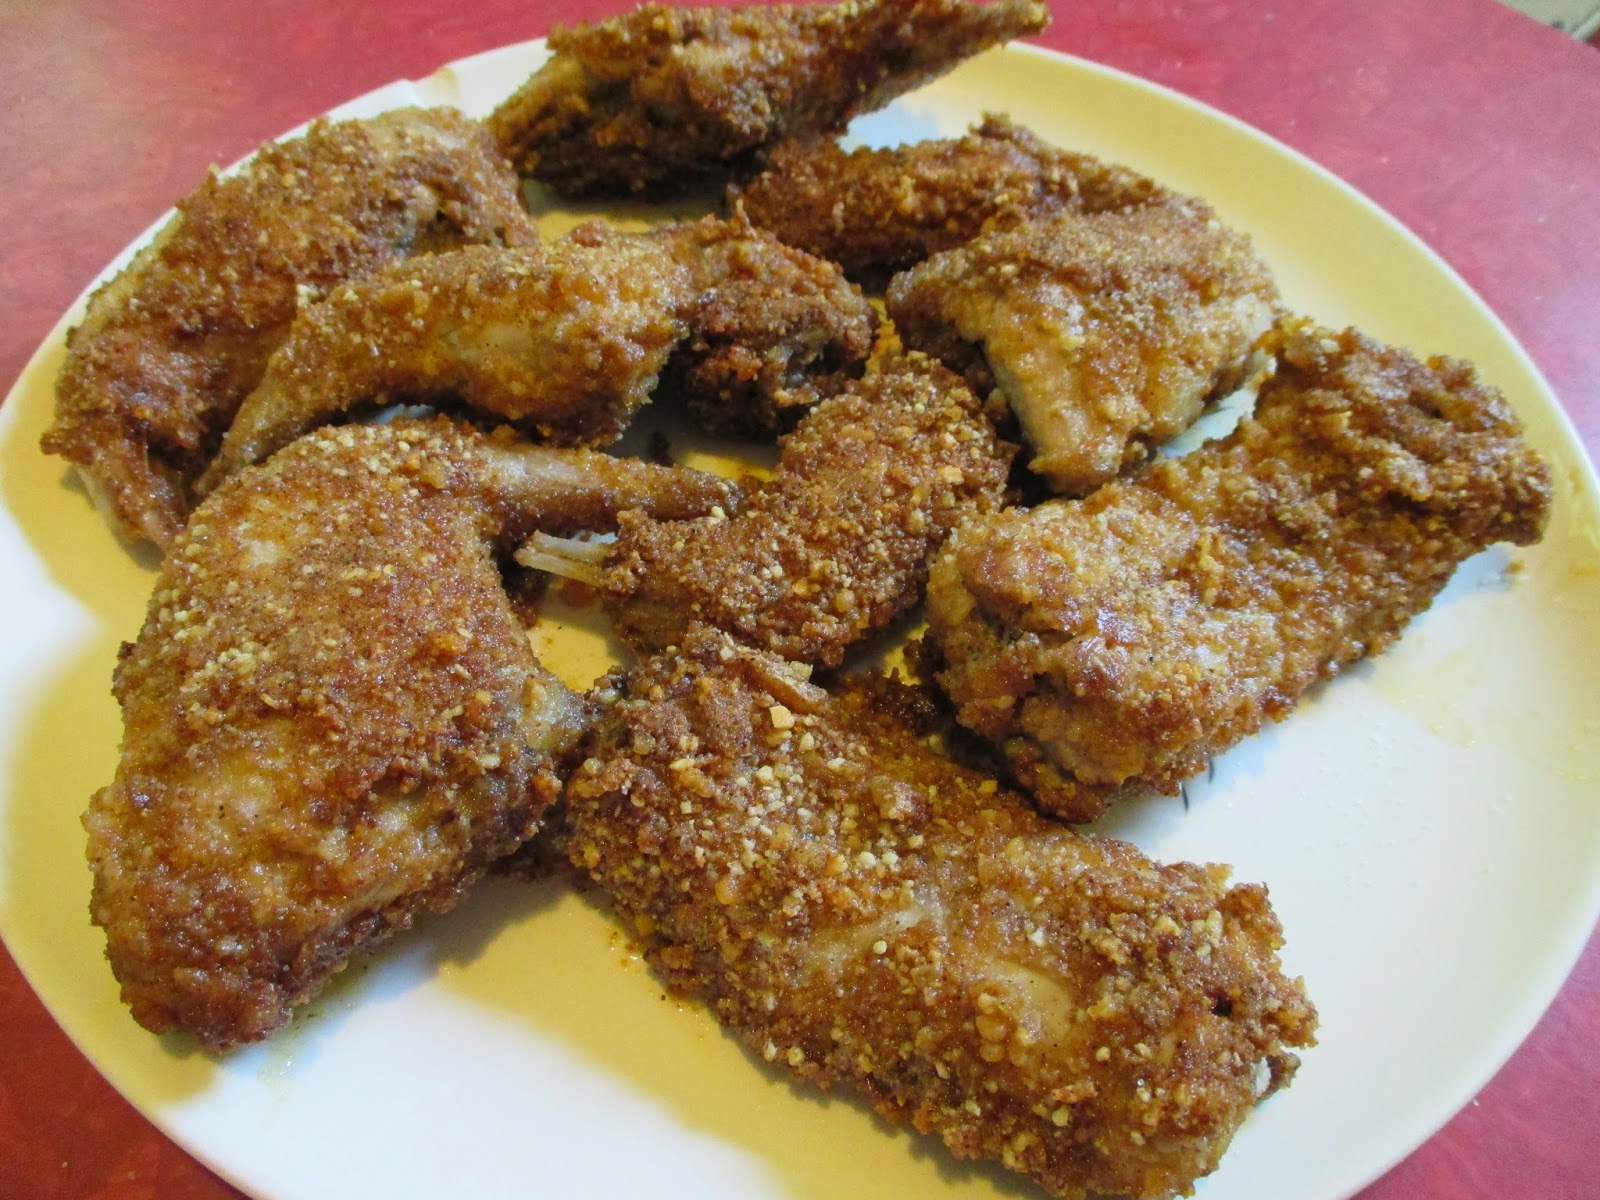
I have not eaten much fried chicken in my life, and I was joking that this meal is the closest thing I have ever had to KFC. (I did once eat KFC mashed potatoes at the end of a cross country bike trip - my sister and I had just arrived to the coast in Oregon, and were hungry for mashed potatoes. We got some from KFC and were sorely disappointed!) So My Charming Companion names these "MFS" instead. I don't know that it will become the next big restaurant chain - but these WERE super tasty. If you don't have squirrel handy (perhaps you do not have a road-kill acquiring charming companion like I do) - chicken will also work. Squirrel is tougher than chicken though, so it needs to be poached for a good 30-60 minutes first. If you haven't eaten squirrel, it's a darker meat. I have eaten goose only once, and I thought it was a bit goose like. But really it is just like chicken, but smaller.

This MFS also utilizes the new frying technique that My Charming Companion has been working on (initially for fish frying). Guess what works great? Parmesan cheese (the kind from a can at Cub foods) and ground up pork rinds. They turn out crisp, crunchy, and delicious. Also - there are actually no weird products in either the parmesan or the pork rinds. Who knew? The pork rinds are fried in their own pork fat (double check that in the ingredients, this may vary by brand) so you aren't getting some weird oils, and salt is the only other ingredient. It isn't a pastured or grass fed animal, but I guess I am not willing to make my own pork rinds just yet.

Minnesota Fried Squirrel (MFS)
1 squirrel per person (or chicken breasts or thighs)
Equal parts Parmesan cheese and ground pork rinds
1 egg, whisked
Bacon or pork belly fat for frying

1. If using squirrel, you'll need to poach it first to make it tender. Put squirrel pieces into pot and cover with water by about an inch. Depending on the size (age), you will need to boil for 30-60 minutes. You can test this by poking the meat with a fork. you want it to feel tender.

Cooked squirrel pieces
2. Prepare your parm/pork rind mix in a bowl. You'll need to grind the pork rinds in a coffee grinder or food processor to get a flour-like consistency. For two squirrels you will need about 1/4 c each of parm cheese and the powdered pork rinds.
3. Heat your pork fat in a cast iron - you'll need the pan to be filled about an inch on the bottom. You want this to be hot when you put in the meat - the fat should be smoking a bit.
4. Dip your pre-cooked squirrel or raw chicken pieces in the whisked egg, then coat with the fry mixture (turn it in the mix and make sure all sides are coated). Carefully lay in frying pan so as not to splatter yourself. Cook until crispy and browned on one side (about 4-6 minutes) and flip. If using pre-cooked squirrel, you do the same for side two, and then serve. If using raw chicken (or tender, aka young squirrel) then cover the pan with a lid, turn the heat to medium-low, and cook for 30-40 minutes. Once the chicken is done (you can  check with a thermometer), turn the heat up again and flip the meat over to re-crisp the top side.
5. Let meat rest for a couple of minutes to cool down enough to touch, then serve. We had these with some cauliflower mashed potatoes to complete the MFS meal. Yum!

Here is a fried sardine salad using the fry technique - yum!

9.10.2014

Chinese Dumplings (Sui Mai) Paleo-style

I'm pretty picky about what blogs I follow...I want them to be paleo, I want them to feature mostly food for meals (not desserts), and I don't really like when there is lots of promotional material. I also like when they feature foods from various cultural cuisines. Really, I have only a few staples that I check out regularly (i'm on the hunt for more). Studio Snacks is my recent find - I've mentioned the blog before, but this is my first mostly-true-to-recipe post. She seems to be on a quest to create some paleo dim sum options, this one being Sui Mai (stuffed zucchini). I haven't ever had dim sum, which will be my fate unless a gluten free dim sum place appears. But really, I found these delicious, so who needs it?!

I actually think I can do some more playing around with them. I made these twice - both times using zucchini instead of yellow squash because, well, the zucchini just keep growing. The first time I steamed the dumplings as directed, but found they were too watery for my taste. The second time I baked them in the oven, but then the meat texture wasn't as nice. I am not sure if this is a) due to baking, b) because I used a spoon to mix the pork/shrimp mixture and not my hands (maybe the fat from the pork didn't set well enough with the rest of the ingredients?), c) because I let the meat mixture sit out longer before stuffing the zucchini, or d) because the zucchini were larger and maybe too big, hence needing a longer cooking time and possibly over-cooking them.

Ultimately either cooking method worked, but the steaming meant watery dumplings, and the baking version had meat was a bit soft. Take 2 also included a trial of stuffing the meat mixture into mushrooms, but I didn't find that as tasty. The mushrooms were too strongly flavored, whereas the zucchini is more neutral. My Charming Companion (who was really excited about these because, unlike me, he has a long history of dim sum eating and was missing dumplings) also suggested trying to wrap these in steamed cabbage leaves, which I find intriguing and want to try.

Anyway - you can also just make this meat mixture, fry it up in mini patties, and eat dipped in some sauce. I did that with part of batch one and it was delicious.The meat gets a nice sear on it that way too!

Stuffed Zucchini "Dumplings"
3-4 medium zucchini
1/2 pound ground pork
5 large shrimp
6 shiitake mushrooms
1/2 inch of ginger
1/2 teaspoon fish sauce
1/2 teaspoon sea salt
1 teaspoon roasted sesame oil
1/2 teaspoon white pepper powder
1/4 teaspoon 5-spice powder (optional)

1. Shell/devein the shrimp; mince it, along with ginger and muchrooms. Mix together with the pork.
2. Add remaining ingredients and mix into pork mixture. Use your hands (just in case this contributed to better meat texture) to really blend the flavors. Put mixture in fridge while you prep the zucchini.
3. Cut zucchini into 1/2" thick slices. Using a spoon, score around each slice in a circle, then dig into the circle and scoop out the center. Imagine you are using a melon ball scoop - but it's a spoon.
4. Fill each ball with meat mixture (it will be super sticky - wetting your hands will help). If you are steaming, start the water boiling in your steamer; to bake, heat oven to 350. To steam: put sui mai into steamer and steam for 15 minutes, or until pork is cooked. To bake: bake for 15-20 minutes until pork is done.
5. Serve with dipping sauce below!

I first used a simple coconut aminos/fish sauce/sriracha to dip these in, but My Charming Companion was not having that. The recipe he devised is a bit more traditional, and was delicious.

Dipping Sauce
2 T coconut aminos
2 T rice wine vinegar (or white wine vinegar)
1 tsp grated fresh ginger
sprinkle of sesame seeds
splash of sesame oil

9.08.2014

Paleo Tabbouleh

This photo is with hemp seeds - but pepitas are just as good!
I was never a big tabbouleh fan - I'm not sure why really, except that it just seemed to be too much parsley and too grain-y. (Traditionally the salad is largely bulgher.) But this recipe is not that way it all - this version is all fresh veggies with just a bit of grain crunch - though in this case the "grain" is some chopped up pepitas.

The recipe I modeled this version from is actually a nutiva recipe - I order my coconut oil from them because it is super cheap to get in a 1 gallon bucket. Their original recipe uses hemp seeds (no pepitas), but hempseeds are expensive. I did try the recipe with hempseeds initially (see photo) only to realize that I could really use any number of chopped nuts/seeds. And it turns out I LOVE tabbouleh! At least this version. You could certainly add more pepitas - but I like them as a small part of the overall salad.

Garlic chive blossoms
I also used some garlic chive blossoms instead of onion. These are all over the garden at the Northside homestead - and they are not actually related to the garlic plant (good for my garlic allergy) - and are more like chives. The blossoms taste like mild green onion, but with fun texture. I've been putting them in just about any fresh salad thing because they are so plentiful and pretty. Also they grow like crazy - I am going to bring some down to my house so they can be there for late in the season fresh onion-ness.

Paleo Tabbouleh
Huge bunch parsley (I used flat leaf cuz that's whats in my garden)
1/2 c chopped pepitas (or hemp seeds)
2 c cucumber, diced
1 c tomato, diced (use a nice sweet variety)
1/4 c red onion or garlic chive blossoms, diced
1/4 c fresh lemon juice
6 T olive oil
1 tsp sea salt

1. Mix parsley, pepitas, cucumbers, tomatoes and onion/chives in a bowl.
2. In a small bowl mix lemon juice, salt, and olive oil. Pour over tabbouleh. Serve!

8.27.2014

Grain-free Carrot Muffins

I don't eat a lot of paleo baked goods - but for whatever reason this one has made it into my repeat repertoire. This is a recipe from my neighbor that I adapted just slightly - these muffins are just plain delicious; they are moist and dense, and are perfect with some morning tea.


Grain-Free Carrot Muffins makes 12
2 eggs, separated
1 more egg
1/4 c softened butter or ghee
1/4 cup thick coconut milk/cream
1/4 c honey (or less, or sub stevia)
2 1/2 c almond meal
1 tsp cinnamon
1 tsp baking soda
pinch salt
2 tsp lemon zest
1-2 c grated carrots
1/4 c raisins
1/4+ c walnuts
1/4 c unsweetened shredded coconut

1. Preheat oven to 300 degrees.
2. Beat egg whites until stiff. Add egg and yolks, ghee, honey, almond meal, cinnamon, baking soda, salt and lemon zest. Mix together. Add carrots, nuts, raisins and coconut.
3. Bake for 30-40 minutes. These are good warm out of the oven, or chilled. I kept the extras in the fridge in a covered container, and they easily last 1-2 weeks.

8.26.2014

Carrot-Sweet Potato Cakes (and hollandaise)


All the rain this spring created some beautiful, large carrots. I've been sort of holding back on picking them since the zucchini and green beans are first in order, but I picked a few this weekend to make these. I've made these latke-like cakes a few times over the past several months - but this was my first time making them with garden carrots. Yum! I decided to go all out and make hollandaise sauce too for a proper paleo eggs benedict. It turns out hollandaise isn't as hard to make as I imagined. I also didn't really realize that hollandaise is really just like a butter or ghee mayo, but with egg yolks instead of egg.


The original recipe for these fritters is spiced more sweet than savory, with cinnamon and ginger and nutmeg. I go more savory and just use salt and pepper for flavor because I find they make really good burger buns, or as a platform for an egg - they are sort of bread-like with the sweetness from the carrot/sweet potato. These cakes are similar to the root veggie latkes I posted some while back, but these don't include onions and are a little egg-ier. I find these ones simpler, and the extra eggs lend to a more bun/bread-like experience.

Carrot-Sweet Potato Cakes (makes 8 cakes)
1 cup sweet potato, shredded
2 cup carrots, shredded
4 teaspoons coconut flour
4 eggs
coconut oil for cooking
salt to taste at end

1. Mix shredded carrots and sweet potatoes in a large bowl. Add coconut flour and stir to coat the shreds evenly.
2. Beat eggs together and pour over carrot/sweet potatoes. Mix thoroughly. The mixture will be quite wet and shrink a bit.
3. Heat coconut oil in cast iron skillet or griddle on medium heat. When the oil is hot, spoon out (or use your fingers like I do), a heaping 1/4 cup's worth of "batter." Cook for 3-4 minutes on each side until browned and a bit crispy. As the cakes are cooking, sprinkle some salt on each one. (You could add salt to the mix too, but I find this causes the cakes to get more wet - better to salt at the end.)
4. These are ready to eat right off the griddle, or you can keep them in a warm oven if you are using them for burger buns or eggs benedict. I've had them at room temp too and they are still good.

For paleo eggs benedict top these cakes with some bacon, egg, and hollandaise sauce (see below). Yum.

Hollandaise (makes about 1 1/2 cups)
*This is how I made mine and it was delicious. There are lots of recipes out there with varying amounts of butter and egg yolk, but this one worked for me. It helps to have a cooking companion to help pour while you whisk.
2 sticks butter (lightly salted or unsalted)
3 T water
3 egg yolks
2 T fresh lemon juice
Warm water

1. Melt butter (or ghee) in a small saucepan. Simmer on low heat.
2. Create a double boiler using a small pot with water in it, and a larger metal mixing bowl on top. You want rounded edges in the metal mixing bowl since you are going to be whisking and you don't want egg caught somewhere. Heat water in the pot to boiling. When it is near boiling, put your egg yolks and water in the large mixing bowl (off of the steaming pot) and whisk together for 30 seconds until frothy.
3. When water in pot is boiling, put mixing bowl on top (this is your double boiler) and continue whisking. It will take a minute or two for the bowl to heat, and what you are going for is a very subtle cooking of the egg and water. This will take another minute or two (so 3-4 minutes total), and you are looking for the egg yolks to become pale and creamy. They will leave a trail, or tracks, behind them that hold for a few seconds. As soon as this happens, remove the eggs from the double boiler and turn the heat off under the pot. Whisk the eggs another 30 seconds or so to cool them a bit.
4. Slowly pour in the warm butter as you continue whisking (still off the double boiler). This will take several minutes - you are adding the butter slowly because you don't want to "break" the emulsification. Once the butter is added, add your lemon juice. I like a lemony hollandaise, so kept adding it until it tasted right to me. 1-3 T should be good. Also add salt to taste if you used unsalted butter.
5. You can rest your sauce on the double boiler pot until you are ready to serve - don't turn the heat on, it will be warm enough there to hold it. Mine sat at least 15 minutes - I'm sure it can sit longer if you whisk it occasionally.
6. If your hollandaise is too thick: I like a slightly thinner sauce. If yours is thicker than you like, whisk in warm water (again a little at a time) before serving (I just used the warm water from the double boiler pot). I added 2-3 T worth until it was the consistency I like.

This recipe makes plenty to serve 4 (8 carrot-sweet potato cakes and 8 eggs); I had extra left over. And I have been eating it up! It was delicious spread on left over chicken breast and to dip my carrot sticks in. You can also gently reheat this - again in a double boiler - to bring back to the warm, pourable texture. Cold it is more like a thick mayo, or a very soft and creamy butter.

Carrot-Sweet Potato cake as a burger "bun" with mayo.