We are a collection of Minneapolis folks cooking, preserving, and harvesting local, seasonal foods. This blog-share is meant to inspire greater culinary genius, as well as continued local food invention. What are YOU concocting in that kitchen of yours?
Showing posts with label peppers. Show all posts

10.11.2020

Fermented Salsa

To add to the ferments of the season: fermented salsa is now one of my favorites! How did I not know this before? I pretty much never do traditional canning, which means the bottom of my fridge is full of jars of things since I have to store the ferments there instead of a pantry. I seem to have enough room, and it means I get so much more good bacteria! (My freezer holds the remaining berries and tomatoes and sauces.)

I made my first batch of salsa about a month ago, and it is still tasting great in the fridge. The online recipe inspiring this one says that the salsa lasts a couple of months in the fridge. So, this is not a long-term ferment (like kraut that will last for 2 years), but more a shorter-term one (similar, in my experience, to cucumber pickles). 

You can use whatever combination of salsa ingredients you like - my version is below based on what was in my garden and following salt recommendation from the link above. It is a much more liquid-y ferment due to the tomatoes and lime juice, and it doesn't take long - a few days or so on the counter. *I used the food processor for my first batch for everything but the tomatoes, which resulted in a thinner/saucier salsa. The 2nd time I chopped by hand and I like the texture better because everything is more uniform in size and more chunky.

Finely chop the following for 1 quart plus another pint of salsa:

  • 2 pounds tomatoes
  • 2 jalapenos
  • 1 mild pepper
  • 3-6 cloves garlic (mine were really big so I just used 3)
  • juice of 2 limes
  • 1 T salt 
  • opt bunch of cilantro (I did not use because mine is mostly done in the garden)

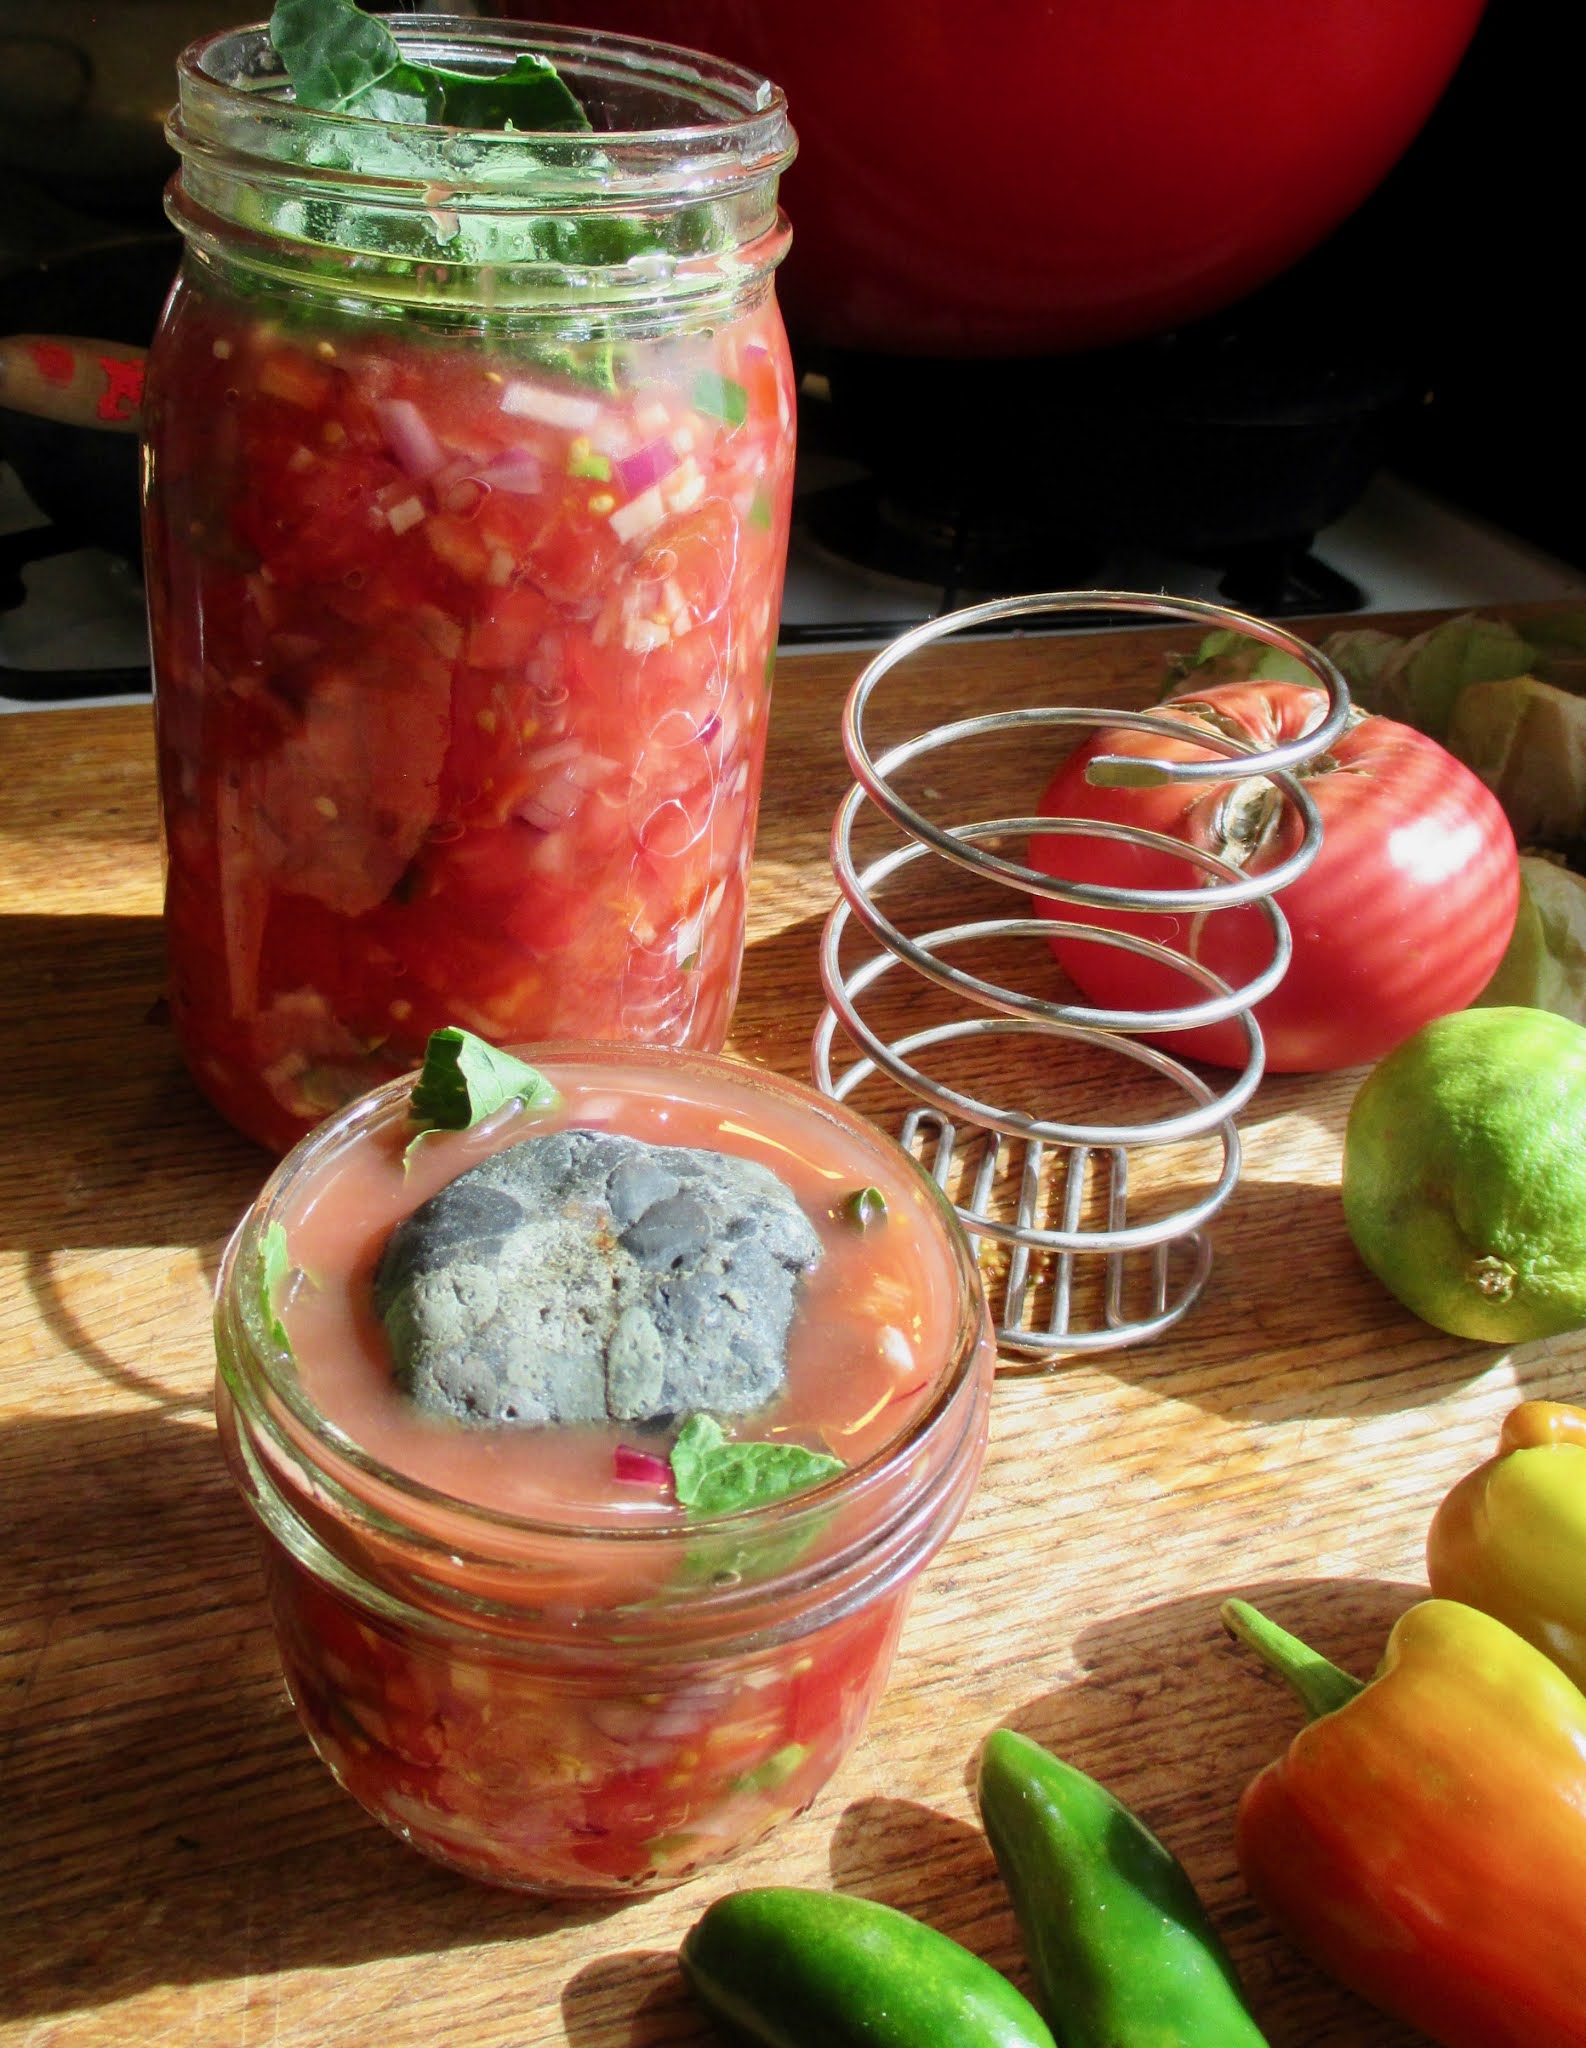
I topped mine off with a horseradish leaf (or you can use an oak leaf) to increase tanin and keep things crisper, which I then use as the top to keep the ingredients submerged under the liquid. I don't know if the tanins are helpful here, but I did it anyway (you could also use a collard leaf or half pepper or whatever). In the photo you can see that for the pint jar I use a rock on top of the leaf, and for the quart jar I used this coil spring fermentation product I got at fleet farm a month or so ago. It works, and presses the ingredients down extra firmly once the lid is on (see photo above where it is just red liquid in the top 1/4 of the jar).

Let sit out 3-4 days, until the taste is to your liking, depending on temperatures. The warmer it is, the shorter fermentation time needed. Store in the fridge for up to 2 months. 

I ate some on a taco salad, and attempted to make little kale tacos another night, which were really tasty and a total mess: young kale leafs wrapped around meat, avocado and salsa filling.

9.30.2020

Lacto Fermented Hot Pepper Relish

My friend gave me a jar of spicy fermented relish last fall, and it was the first time I realized I could make such a thing. It was so tasty I ate it within a week. I don't know what was in that one, but this one turned out nicely - medium spicy and tangy. At the moment I am also making fermented salsa, collard kimchi, pickled jalapenos (pictured) and spiced beets. Soon to come: fermented carrots and more standard kraut. So many plans, and hopefully enough jars to get me through since I hear there is a shortage all over town.

These ferments are quite forgiving and experimental. The main thing is you want to use fresh, crisp veggies to keep longer and maintain their goodness. Use whatever variety you have and like, for whatever degree of spiciness. Fit them into whatever jar will most closely hold the amount you made. For a relish recipe that has more exact amounts than I use below, check out this link. You also will want to do your best to keep vegetable matter submerged under the brine. This was tricky with this tiny chopped bits of peppers - I used a piece of kohlrabi leaf with moderate success (moderate because no mold matter formed, but I don't think that was any result of the leaf, which just stuck to the lid!) You could also use a cucumber, two crossed carrot sticks, a rock, a ziplock baggie with water, etc.

For the hot pepper relish:

I chopped jalapenos and a handful of other peppers from my garden - I had one banana pepper, and a handful of medium-spicy red peppers that look like mini bell peppers. I forget what they are called. I also chopped up some garlic cloves (I did all the chopping in the food processor) and then mixed everything together in a large bowl. I spooned it into a jar, then covered it with salt brine. (Mine was my typical brine of 1 quart of water to 3 T sea salt, though I used a little smoky salt in this batch for an extra thrill.) I left the jar out on the counter for 5 days, at which time the taste was to my liking. *My pint jar expressed A LOT of liquid over the course of 5 days. Like, a large pool was on my counter on morning 2. I also was trying out a jar lid that has an air escape thing, so maybe that encouraged more liquid expression?!

For the pickled jalapenos:

I sliced jalapenos whole, and topped them off with brine. I thought about putting a garlic clove in there, but didn't do it this first time. According to some website recipes, the pickled peppers will take several weeks - so they are still sitting, biding their time. I'll taste them after 10 days or so to see how they are faring, but so far they are looking good.

jalapenos, salsa, collard kimchi, beets...

10.20.2013

Oven Roasted Eggplant "Chips" with Onions and Peppers

I picked all the last tomatoes, zucchini, eggplant and peppers last night to keep them from the frost. I actually don't know if it did freeze last night, but it seems certain tonight, so I was ahead of the game. I ended up with lots of green tomatoes, and some mini-veggies: zucchini the size of my thumb, eggplants that fit entirely in my hand, etc. I was looking over my blog posts from a year ago, and at this time I was eating my last kabocha squash of the season (they were out at the co-ops by this time), which suggests to me that the whole gardening season really was 4-6 weeks behind this year. I only just pulled in all the winter squash so that they can finish "curing" in the house. The winter squash are still sort of a garden experiment, so I am hoping the curing helps them sweeten up some more.

My fave fall veggie of the last week or two is eggplant. I actually bought extra at the Midtown farmer's market last weekend (last market of the year) with the hopes of making my cousin's Georgian Eggplant Rolls (but with roasted red pepper instead of garlic). But I don't know if I'll make it because I keep eating the eggplants roasted in the oven, almost like a big chip or plank, chewy and crunchy and creamy at the same time. They are so good this way, especially with some roasted onion/peppers. Roasted tomato is also good (just toss in some thickly sliced tomato or tomato halves in the oven too).

This recipe is very loose. You can't go wrong really - just be careful not to totally char the eggplant. I gave amounts here, but really just use what you have and what you are hungry for! *I still am without camera, but here is a photo of what the eggplant should look like (these are slightly less charred pieces, so you want to go just a little longer to get them crunchy) when finished.

Roasted Eggplant "Chips"
2 med. Eggplant
1/2 c + Olive oil
Salt
1-2 peppers (red/orange is nice)
1 large onion

Turn oven to 400 degrees. Slice eggplant 1/4 to 1/3 inch thick. I do this lengthwise because I like the aesthetics of it. Pour many, many glugs of olive oil into a rimmed baking sheet or cake pan. I easily use close to 1/2 cup of olive oil just for the eggplant because it soaks it up. Let it! I used to feel sort of stingy about using olive oil or fats (pre-paleo living) and now that I am not, it is quite liberating to just pour a bunch of olive oil in the pan and let that eggplant luxuriate in it! Make sure to flip the eggplant slices so that both sides are covered in olive oil. Lay the eggplant in a single layer and sprinkle with some sea salt. Stick in the oven - bottom rack.

While the eggplant starts roasting, cut the onion and pepper into large wedges. The onion will separate of course, and that is just fine. Put both onions and peppers in a cake pan (they will not need to lay in a single layer, so they can cram in a bit) and pour some olive oil over the top again. You don't need as much here - a few glugs, and than give things a stir to coat and toss on a little salt. Stick these in the oven on the top rack.

After about 10-12 minutes, go flip the eggplant slices. They should be starting to brown/caramelize on the bottom. It's hard to get uniform pieces, so the thinner ones will be more browned than the thicker ones. They are all good. Stir the onions/peppers too. They should also be starting to char and brown just a bit. *If things are not getting a little char on them, you can also do a little broiler action here and stick each pan under the broiler for a few minutes. But it's not necessary.

After another 6-10 minutes, things should be approaching done. You want the thinner eggplant slices to be chip-like, and the thicker ones to be nice and golden with a firmer edge. The peppers and onions should be at a similar state of soft/charred.

I love eating the eggplant planks with my fingers (almost like bruschetta or a cracker) with a little onion and pepper on top. Yum! (They would probably also be good with smoked fish or pesto too...mmm!)

9.28.2013

Baked Veggies in Eggplant Sauce

The garden harvest continues.  I picked a few handfuls of bush beans even, and I thought those had pretty much stopped so haven't even been watering them. The continued warm weather may be extending the season a bit - even my winter squash sent out some new little squashes. I didn't take a picture, but they are so cute! I've been storing various things when I have time - here are some of my efforts:

Roasted tomatoes packed in olive oil
Pesto, pickles, and roasted tomatoes!

Last week I tried one more recipe from Nigel Slater's Tender - a cookbook that I give two thumbs up based on the handful of recipes I've tried, and because of the really useful information about more casual cooking with various veggies. For example, I had never thought to pair mint with eggplant - it didn't seem to go. But he recommends mint as eggplant's best herb pairing, and it is delicious. I've thrown it on roasted eggplant, or with a roasted veggie blend of eggplant, zucchini and tomatoes.

Not surprisingly, this recipe also makes use of mint. The recipe originally calls for yogurt, but I swapped in coconut milk with a good amount of lemon juice and it was great. I am very confident I did not make this dish as he would have - I cooked the veggies long (and cut them smaller) and they were very soft, and my sauce to "drizzle" over the top was stirred in and the whole thing became more of a stew-like affair. Regardless of my liberties, it was a really incredible flavor - not like any other I've had before, and very creamy tasting and so nice with all the fresh garden vegetables.

Baked Veggies with Eggplant Sauce from Tender
serves 4

Garden Veggies (cut smaller than recipe calls)
Sauce:
2 large eggplants
olive oil
scant 1/2 cup coconut milk 
3 T lemon juice
handful chopped mint leaves
salt and pepper

Veggies:
4 large tomatoes (or several smaller ones)
3 zucchini, quartered length wise
2 bell peppers, cored and thickly sliced
onion, peeled and cut in wedges
olive oil
1 tsp cumin
2 tsp hot sauce
handful pine nuts
handful raisins

1. Heat oven to 400 degrees. Cut eggplant in half lengthwise and score the flesh with several deep etches (helps the oil penetrate). Sprinkle with salt and set aside for 30 minutes.
2. Wipe off salt, place in baking dish, and pour a few glugs of olive oil over the top and bake until soft (cut side down). You should be able to crush the flesh with a fork. Mine baked about 45 minutes.
3. Meanwhile, put tomatoes, peppers, onions and zucchini in roasting pan. Toss with oil and salt and roast 45 min-1 hour. (Shoot for getting the veggies in about 15-20 minutes after the eggplant started to time things best.)
4. When eggplant is soft and cooled just enough to handle, scrape eggplant flesh from skin and mash with coconut milk-lemon and enough olive oil to make a paste that is thin enough to drizzle. *I had a hard time with this - my eggplant had cooled a lot, so maybe that is why. I just didn't want to add more olive oil than I had already, so mine was a bit thicker. Season with salt, pepper, and mint. If you are using coconut milk and it tastes weird, you need more lemon and more salt. It should not taste at all coconut-y.
5. Toward the end of cooking for the veggies, gently stir in cumin, hot sauce (I used sriracha), pine nuts, and raisins. Finish roasting.
6. Serve veggies drizzled with eggplant sauce (or in my case, just mix it all up in a bowl!! so good)

My version was not the most picturesque - but don't let that stop you! I used golden raisins, and there are so few, but they sneak a nice bit of sweet in there.

2.08.2013

Paleo Tuna Melt (in a pepper)

As I kid I used to love tuna: tuna salad, "tuna on toast" (which seems to be a midwestern concoction of cream of mushroom soup mixed with tuna heated up, poured over toast or shoestring potatoes. Kind of strange sounding now, but I loved it), and I especially loved tuna melts - something about the crunchy toast and warm tuna and salty olives. Yum.

Last summer, when I still had garden green peppers, I tried making tuna stuffed peppers as a version of a tuna melt. It turned out great - somehow the roasted pepper keeps that nice crisp feeling that is slightly toast like, while also being charred. Charred peppers as toast - who knew?!

I had one this week for dinner - it is super easy and fast, without any fussing. You know, one of those dinners I can make in 10 minutes and then eat it while watching Top Chef or whatever...it's one of those bachelor weeknight moments. 

Paleo Tuna Melt (for one)
1 Pepper (any color works)
1 can tuna
homemade mayo
mustard
olives
celery
onion
parsley
salt and pepper
Anything else you like in your tuna salad

1. Cut pepper in half, de-seed it, and put both halves (bottom side up) under the broiler for 5-7 minutes. You want them to blacken just a little.
2. While peppers are roasting, mix up your tuna salad however you like - I like to chop everything up small and use a good amount of mayo.
3. When peppers are starting to blacken, pull them out to stuff. They will be really hot, so I usually need to use oven mitts to hold them while I stuff them with the tuna mix.
4. Put the stuffed peppers back in the broiler, face up this time. Roast them for another 5-7 minutes until the tops brown. Eat!

8.29.2012

Coban Salad

I recently checked out a really lovely cookbook from the library: Bought, Borrowed, Stolen. The British author has re-created recipes from 20 different countries, with stunning photos and really aesthetically nice layout. The recipes I found myself most drawn to were ones from Turkey, Burma, and Morocco. I copied a few of them out, so they will find their way to the blogosphere once I get to making them. The one I've made a couple of times already is Turkish: Coban Salad. It uses veggies and herbs that are all plentiful right now, plus some olives and a light lemon juice and olive oil dressing. I substituted some things because of what I had in the garden or fridge (cherry tomatoes, italian parsely, banana peppers, etc) and it all tasted amazing.

Coban Salad
1 lb. 2 oz. good quality, ripe tomatoes, quartered, seeded, diced small
1 lg. green pepper, diced small
1 red onion, diced small
big handful flat leaf parsley, finely chopped
medium handful mint, finely chopped
2 1/2 oz. stoned olives, roughly chopped
juice of 1 lemon
3 oz. extra virgin olive oil
salt/pepper
(feta cheeze is optional to add here too, I left it out)

Mix all of the veggies, herbs and olives in a large bowl. Squeeze lemon juice over everything and drizzle the olive oil. Season with salt and pepper to taste.

9.27.2011

Cheesy grits with hominy

I have a habit of tasting something from the hot bar every time I go to the Seward for groceries...it's like the treat before I check out. A few weeks ago they had some cheesy grits with hominy that was SO good, I have been thinking about making it ever since. I have never made grits before, and it turns out there are quite a few different methods.

I primarily was in search of something that would satisfy my yearning for mac and cheese but without gluten, and I also really liked the hominy in the grits I had from the seward, so I wanted that too. I created a recipe based on a few different searches - and ended up cooking my own hominy too. The grits turned out really good independently, and stuffed in green peppers.

2 c. milk
2 c. water
1 c. grits/polenta
1 T. butter
2 c. cooked or canned hominy*
1 1/2 c. cheese (I used a raw cheddar)
salt and pepper

*The only raw hominy I found was actually from Native Harvest and the White Earth land Recovery Project, which is not cheap. It feels really good to support that project and the work there though, and I was excited to cook my own hominy. I did mine just like I would cook beans - in the slow cooker, after soaking overnight, with lots of water. I am hoping to make posole ometime soon with the rest because this hominy is totally gorgeous and huge. Yum.

Put the water, milk, and grits in a medium saucepan on medium heat. Stir frequently as it comes to a boil and starts to thicken. Once it starts boiling, let simmer (while stirring) for another 5-10 minutes until thick but still mildly soupy. Add sat and pepper to taste. Turn off the heat and stir in the hominy and the shredded cheese. I also stirred in two red banana peppers because they were fresh out of the garden.

From here you can fill bell pepper halves if you want to go that route, or pour the grits into a buttered casserole dish. Put either/both in the oven for about 40 minutes (until browned) at 350.

7.28.2011

If Peter Piper pickled a peck of peppers...

Then how many peppers did Peter Piper pickle?

Go ahead, say it three times fast. Then pickle your own peck of peppers.

My banana pepper plant has been going, err, bananas this summer. Lucky me, since I LOVE pickled banana peppers on my pizza. I used the very official-looking recipe from the University of Georgia National Center for Home Food Preservation. Then I went and modified it, thus probably ruining all of the very carefully calculated ratios of whatnots to whoozits. I added another mystery pepper (larger, greener), omitted the celery seed (didn't have it), and semi-accidentally turned the jar on its side in the hot water bath. If you're still interested in coming
over for pickled pepper and pepperoni pizzas with some pretty persnickety pals, let me know.

5.10.2011

Polenta stuffed peppers

How did today get to be over 80 degrees? I don't know. I do know that I had some peppers that were not going to last too long, and a recipe for stuffing them. So I opened the windows for the as-yet-to-arrive hail storm, and turned on the oven. This recipe would be perfect in the late summer when peppers are ready to pick and the corn is winding down. It is an easier stuffed pepper, is pretty fast, and the green olives in the polenta are amazing.

I found the recipe last weekend while in Iowa City perusing through Eren's cookbooks. This one is from Moosewood's Simple Suppers, which Eren reports is a top fave for easier weeknight recipes. Serves 4-6.

5 large peppers (green, red, orange, yellow)
1 1/2 T olive oil
salt
Polenta:
4 c. water
1/2 t. salt
1/4 t. red pepper flakes (I used chopped frozen jalepenos from last summer)
1 c. polenta cornmeal
1 1/2 c. corn kernels
1 T. butter or olive oil
1 1/2 grated sharp cheddar
1/2 c. chopped Spanish olives

Preheat oven to 450 degrees.
Cut peppers in half length-wise, remove seeds but keep stems. Brush with oil inside and out. Sprinkle with salt. Plave cut side up on an oiled sheet and roast 15 minutes.

In heavy pan, bring water, salt, and pepper to a boil. Add polenta in slow, steady stream while whisking. Cook on medium, stirring often, until thickened. Stir in butter, 1 c. of cheese, corn, and olives. Remove from heat.

Fill peppers with mix, sprinkle with remaining cheese. Put in oven 5-10 minutes. Moosewood recommends that you serve the peppers with black beans (1 16 oz. can) mixed with salsa (1 15 oz. jar) and cilantro (1/4 c).

1.19.2011

green chile sauce.

this was an attempt to recreate the chile cheese fries that m and i had when we went to santa fe a few years ago. i have to say that they turned out quite well. especially when paired with margaritas.

green chile sauce:
-4 peppers, i used a combination of anaheim and poblanos
-1 onion, diced
-1 clove garlic, minced
- 1 jalapeno, seeded and diced
-2 cups vegetable broth

roast the peppers whole over the flame of a gas stove until the skins are charred and blistered. put whole peppers in bowl and cover with plastic wrap. let sit for 10-15 minutes.

saute onion, garlic and jalapeno in a saucepan with olive oil.

peel skins off peppers and rinse. then, seed and dice the peppers and add to the onion/garlic/jalapeno mixture. add broth and let simmer for 20ish minutes. then blend until pureed but still chunky.

this is really good over homemade cheese fries (as pictured in that gloppy mess above) or on pretty much anything else...

11.06.2010

Baked Chiles Rellenos and Mesa Red Sauce

Can you handle yet another Rebar recipe? This one is amazing, though a little high maintenance with roasting the peppers...but so worth it. I had a bunch of poblano and banana peppers that I picked pre-frost last week, and have been wanting to make chilis rellenos for awhile. Maybe the fried version next! Rebar suggest serving these "in a pool of" mesa red sauce - which is a great sauce for all kinds of things. That recipe follows.

1 1/3 c. masa harina
1/2 c. hot water
6-8 chiles (Anaheim, Poblano, or Pasilla)
2 t. veggies oil
1 med. yam, peeled and diced
1 c. corn, fresh or frozen
2 jalepenos, seeded and diced
2 T. butter, softened
2 T. vegetable shortening (i used lard from the seward. yum.)
1/2 t. salt
1/2 t. baking powder
1/4 c. warm water
1 c. grated jack cheese
2 t. ancho chili powder
1/2 recipe mesa red sauce

1. Combine masa harina and water in a mixing bowl and mix at medium speed for 5 min. (i did this by hand and all was well.) Cover and let dough rest for one hour.
2. Pre-heat oven to 400 degrees. Place whole peppers on parchment lined baking sheet. Cut a slit along the length of each pepper and roast for 15-20 minutes until the skins blister. put in plastic bag or in bowl covered with plastic wrap for 10 minutes. Peel away skin (gently!) and try to keep chili as intact as possible. *For the record, I found this difficult. Rinse out the seeds and set aside to dry.
3. Reduce oven to 350 degrees. Heat ooil in skillet and saute yams for 5 min. Add corn and jalepenos, season with a pinch of salt, and saute for until veggies are tender. Transfer to a bowl and set aside to cool.
4. Return to masa dough and mix in butter and shortening - one spoonful at at time until well blended. In a separate small bowl, combine salt, baking powder, warm water and stir to dissolve. Mix in masa dough until well combined, then stir in veggies, cheese, and chili powder. Fill each chili until plump. Place chilis on a lined baking sheet and bake 20 minutes until the filling is golden brown and heated through. To serve, heat the masa sauce, spoon 1/4 c. on each plate/bowl and place a chili relleno on top. Garnish with cilantro, scallions, or chives.
*I had extra masa dough left and made masa cakes...they were still good.

Masa Red Sauce - yields 4 cups
2 T. vegetable oil
1/2 yellow onion, diced
6 garlic cloves, minced
4 T. masa harina
4 T. chili powder
1/2 t. cumin
1/4 t. cayenne
1 t. salt
1/2 t. cracked pepper
1 T. minced oregano
4 c. veggie stock (or water), heated
2 T. tomato paste
1 t. brown sugar

Heat veg. oil in a pan over medium-high heat and saute onions until translucent. Add garlic and cook 3 minutes. Sprinkle in masa harina, stir constantly as it cooks and turns golden. Add spices and oregano and stir 2 more minutes. Slowly whisk in warm stock and bring to a boil. Reduce to a simmer and whisk in the tomato paste and sugar. Simmer partially covered for 30 minutes, stirring regularly. Season to taste.
*This sauce is also good for enchiladas, huevos, eggs, etc.

9.02.2010

Tortilla soup

I am feeling un-inspired on the cooking front (who knew I would be ready for fall weather by now?!) so I went back to the ReBar cookbook. I am not quite yet ready for creamy food or I would try the delicious looking corn chowder. I'm a firm believer in cream soups...I just am waiting not so patiently for fall when I will use cream, cheese, and any other rich creamy substance in great abundance. This one is a little lighter - and I wish I had seen Gaybie's note to boil the corn cobs in the broth BEFORE I composted them. Alas. My sister and I tag-teamed this soup with some corn bread muffins that we put a bunch of basil in. Which was great, btw.

As I type this the wind blowing in from the windows is getting cooler and cooler. We must be on the brink of fall! Which means pies, greens, and squash. And it means I need to harvest and freeze before it's too late!

Serves 8 (or 4 if you have a good appetite!)
8 cups vegetable stock
2 T vegetable oil
2 yellow onions, finely diced
1 T salt
10 garlic cloves, minced
2 T. minced oregano
4 jalapeno peppers, seeded and minced
3 cups corn kernels (fresh or frozen)
2 large red peppers, seeded and finely diced
1/2 t. liquid smoke (I omitted this)
2 tsp chipotle puree (chipotle peppers in adobe sauce blended up)
4 corn tortillas
2 avocados, diced
1/2 bunch cilantro, stemmed
asiago cheese, shaved with a potato peeler
1 lime, cut into wedges (i forgot this part!)

1. Heat the stock and keep it warm on the back burner while preparing the soup. In a heavy-bottomed soup pot, heat oil over medium heat. Add onion and 1 t. salt and saute until translucent. Stir in garlic, oregano, half the jalapenos, and another t. salt: saute 5 minutes.
2. Pour the hot stock into the pot and bring to a gentle boil. Simmer 20 minutes. In the final 5 minutes, stir in the corn, peppers, liquid smoke, chipotle, and remaining jalapenos and salt. Simmer until corn is tender. Meanwhile prepare garnishes.
3. To prepare tortilla strips: slice each tortilla into long strips 1/4" thick. Toss with a light coating of oil and pinch of salt. Spread on a baking sheet and cook for 5 minutes at 350 degrees. Remove and let cool until ready to serve.
4. To serve, ladle broth into bowls and divide the avocado, cilantro leaves, tortilla strips, and asiago shavings among the servings. Serve immediately with a bowl of lime wedges on the side.