We are a collection of Minneapolis folks cooking, preserving, and harvesting local, seasonal foods. This blog-share is meant to inspire greater culinary genius, as well as continued local food invention. What are YOU concocting in that kitchen of yours?

8.02.2012

Cucumber Kimchi

A couple of months ago I ate at a new restaurant in the Global Market called The Left Handed Cook. Though not paleo, they do label/make GF versions of stuff on the menu - which I find eases my mind to trust that the food will in fact be GF. The food was amazing, and the pair of (assumed) owners exceptionally charming. I was particularly in love with their cucumber kimchi, which I set an intention to try and make when my cucumbers came in. Which is now!

I think that part of why I loved this dish is because traditionally there is a little sugar in there and it is a wee bit sweet. I did not add it, but you could definitely do that for a sweeter taste. Without, it is a crisp, light form of kimchi that is not quite as hot or meaty as the napa cabbage version. It also (apparently) tastes best shortly after the fermentation process is done. I guess the cukes lose their crunch the longer they refrigerate. The recipe I modifed is from a blog called Aeri's Kitchen. The recipe there is for a pretty large batch, so I quartered it and changed some things (like I don't eat garlic, and didn't have fish sauce). I also did not have the traditional korean red pepper spice, which apparently has a really distinct and slightly sweeter flavor than american red pepper powder/flakes. It may also be stronger, since mine was a little mild. All of the blogs recommend that you get the actual korean variety, but I had not done that. Alas. One other post with nice photos and a slightly different recipe (with radish in it) that is worth checking out: Beyond Kimchi.

Main stuff:
6 pickling cucumbers
1/4 c. sea salt
3 c. water
1 green onion

Sauce:
1/4 c. red pepper flakes
1/2 onion, minced (I did mine in the food processor to get it more liquid-like)
1 T. anchovy paste or minced anchovies
1/2 t. minced ginger
2 T. water
(2 t. honey, optional)

1. Cut off both ends of the cucumbers. Then cut an x in the cucumbers, lengthwise, all the way down to about half an inch from the bottom; you could also cut all the cukes in half to make mini ones - but still do the same x cut.

2. Bring 3 c. water to boil with salt. Pour over cukes in a large bowl and let soak for 50 minutes. (The boiling water helps the cukes stay crunchy.)
3. Rinse cukes once and drain in colander. Pat dry if you are inclined.

4. In a bowl, mix all of the sauce ingredients.
5. Chop green onion into 1/4" pieces; add to sauce and mix well.
6. Put on some latex gloves to stuff the cucumbers: gently pull apart the four pieces of the cuke and put some of the sauce in there, and rub the cuke surface with it. Eyeball your sauce amount and try to use it evenly between the 6 cucumbers.

7. Put your cucumbers in a large mouth quart jar (or lay them down in a glass dish, whatever you have) and sit out at room temp overnight to ferment and then refrigerate. Mine actually fermented almost 24 hours til they got a taste I liked, so see what works for you. These will continue fermenting a little longer in the fridge, but very slowly. *These do not get covered with brine! Every other fermentation recipe I have made requires brine to cover the mix, but I read a few recipes and none of them covered the cukes...these do continue to fill with some liquid as they sit though, so I like to set them upright so the filling does not come out.

These will last up to a month in the fridge, so say the blogs, and are best a couple of days after refrigeration. These are great as is, or I had some this morning with some other veggies (sweated zucchini and steamed greens) and topped with eggs, and it was super tasty. I think I will make them spicier next time - and actually get the right red pepper.

7.30.2012

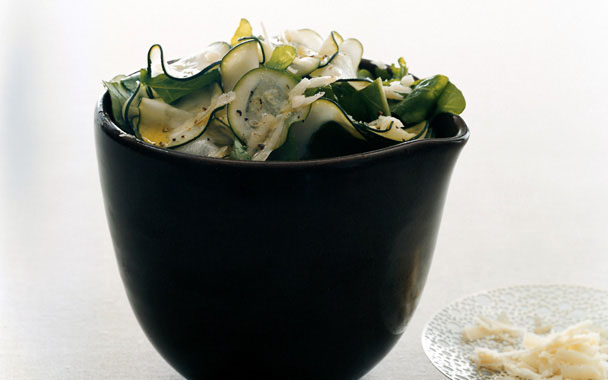
Zucchini Carpaccio Salad

The zucchini and I are hitting that very delicate stage where I have to make concerted efforts to eat them fairly often (daily?) lest they take over my fridge.  I seem to be able to consume the small ones with not so much problem, but inevitably a few grow big before I pick them and those ones are a little more challenging for me to figure out what to do with. And then I remembered a post I had come across in the Smitten Kitchen a couple of years ago for a salad that was primarily "sweated" zucchini slices. At that time I had made a (glutenous) zucchini galette that also utilized this "sweating" technique, and I remember it sort of altered the texture and flavor of the zucchini in a really nice way.

So. I had a family wedding/pot luck to go to this weekend, and three rather enormous zucchinis in the fridge. The recipe is really simple - just zucchini, arugula, lemon juice, olive oil, and Parmigiano-Reggiano, and though sweating the zucchini is a bit more labor intensive, the taste and texture make it worth it (you will need a thin slicer of some kind - I have an old mandolin that worked well). The salad turned out really amazing - simple and fresh and so perplexing in it's un-zucchini-like quality. *If you want to be dairy -free, I think this salad would also be good with nuts in place of the cheese. I also tried it again later with chicken on top (no cheese) and it was great.


Zucchini Carpaccio Salad
1 1/2 pound zucchini (about 3 large)
1 1/4 teaspoons salt
1/2 pound arugula, stems discarded and leaves cut into 1/2-inch-wide strips (6 cups)
1 ounce Parmigiano-Reggiano, coarsely grated (on large holes of a box grater; 1/2 cup)
3 tablespoons extra-virgin olive oil
Juice of one lemon
1/4 teaspoon black pepper

1. Cut zucchini crosswise into paper-thin slices with slicer. Toss zucchini slices with one teaspoon salt in a large colander set over a bowl and let drain 20 minutes. (I was making a bit extra and "gently stirred" the slices every so often to help the water drain through. I also let mine sit about 30 minutes.)
2. Drain zucchini slices, pressing gently on slices to extract any excess liquid. Pat zucchini slices dry with a kitchen towel. (This is the slightly laborious part. I laid out the slices on a towel on my cutting board, and then put another dish towel across the top and patted them dry. It took several rounds of this to get through all of the slices!)
3. Put arugula greens in a large bowl. Sprinkle with 1/4 cup Parmigiano-Reggiano and remaining 1/4 teaspoon salt. Drizzle 1 1/2 tablespoons of oil over greens and toss. Arrange zucchini slices over arugula greens, then drizzle with remaining oil, lemon juice and sprinkle with remaining 1/4 cup Parmigiano-Reggiano and pepper. (I sort of tossed this a bit more to mix the arugula and zucchini - but whatever looks best to you!)

7.27.2012

Paleo Camping Food 2

My light-weight camping while paleo eating was a success! And some meals were definite wins that I will make again. In addition to meals, one thing I had not realized was just how much energy I would need for portaging/paddling, particularly because of eating paleo and lower carb. I figured out early that by eating more fruit/sugar than usual, the Boink Phenomenon (feeling a sudden loss of all muscle mass and motivation to continue) can be eliminated.  So I ate more dried fruit and sugar - including beverages like Emergen-C, sun tea with sugar, dates and figs - on travel days than I thought I would.

Below are the meal hits of the trip; they utilize products listed in my earlier post: Paleo Camping Food. All of these things are shelf-stable and lighter weight for backpacking/canoeing.

My fave meal of the trip was Fish Chowder. This used the heavy cream powder, 1 slice of bacon per person, dried onions, dried peppers, dried celery, and a small bit of potatoes or sweet potatoes, along with the fish du jour (which in my case was either small mouth bass or pike). A big spoonful of ghee was added in at the end. Oh my god! This fish chowder was pretty much to die for at the end of the day. The bacon adds a smoky flavor, and the cream and ghee made this so delicious.

The cereal looked like this, minus the prunes. Yum!
Breakfast on travel days was Carrot and Sweet potato cereal (with maybe a little jerky for the road).  Soak the dried carrots and sweet potatoes overnight in plenty of water (these veggies expand, so play around with amounts and err on the low side at first) in some kind of sealed container. In the morning, add nutmeg, cinnamon, and powdered cream and it is like a sweet breakfast cereal. Coconut flakes and nuts would also be amazing on here. (Incidentally, while looking for the photo to post, I found a recipe for Sweet potato, carrot, and dried fruit casserole that sounds incredible.)

http://eatlivepaleo.files.wordpress.com/2012/03/coconut-flour-dusted-cod.png
No more flour than in this photo!
Fried fish was excellent with a very light coating of coconut flour: you need very little flour because it absorbs so much more than regular flour. I put on too much one time and it soaked up all the oil and didn't fry as well. So just toss a little bit (as in a Tablespoon for a decent size fish) in a bowl, add the fish fillets, and stir so they are all lightly dusted. Fry in coconut oil.


Of the dried veggies from Harmony House's variety pack, I recommend the cabbage, carrots, sweet potatoes, onions and celery (for flavor), tomato powder (for chili), and mixed peppers. The broccoli and sliced mushrooms were also good. The peas and corn took way too long to cook and thus were basically inedible. The potatoes were fun in chowder because I usually don't eat them, but I found I liked the sweet potatoes better. The veggies hydrated pretty fast, and though they didn't taste like large bite-fulls, they did add bulk and flavor. They also take up a lot of space, even though you don't need many because they expand a lot. So if space is an issue, be choosy! My favorite stand alone veggie was the dried cabbage (cooked) with bacon.

Dried burger, aka hamburger gravel
The other win of the food supply was homemade jerky and homemade dried venison burger. Both were made by My Charming Companion, but I plan to participate in the jerky making next time around. I will share a how-to then, but really, the taste of homemade jerky is phenomenal, and the main technique is to marinate it in braggs and a little pepper, then cut the meat with the grain while it is half frozen. The dried burger is not difficult, you just need to get all of the fat out so that it is shelf stable (venison or really lean beef work best). There is a good link here with directions - and this stuff tastes exactly like regular burger and is really light weight. I mixed it with a variety of the aforementioned veggies, bacon (for smokiness), and ghee and spices to make chili or a vegetable/meat stew-y sort of thing.

A few other notes about other meals/food: the OvaEasy eggs were amazing, I give them a 10 and ended up eating them almost every day (if not for breakfast, for dinner). The coconut manna was also good, though I ate it more as a snack than I used it in soup. I would bring it again because it made really good curry (with a curry sauce pouch from local Asian grocery: United Noodles), which was a welcome change in flavors.

7.18.2012

Crispy Paleo Pancakes

Crispy Cakes

I've been looking for some ways to spice up my diet, since I tend to eat the same things day after day.  I have been experimenting with different pancake recipes, and this one is very simple and can be customized in all kinds of ways to suit your preferences.

For those of you who are avoiding wheat and other flours, nut butter is a great alternative.  It can be used in place of flour to make pancakes, cakes, brownies, and a host of other baked goods.  Nut flour is also a good option.  In a few weeks when I can start eating nut flour I will try out some recipes.

Ingredients:
1 Tbsp nut butter- cashew or almond both work well
1 egg
1 tsp baking soda
1 Tbsp butter, ghee, or coconut oil
dash of sea salt
1 Tbsp honey (optional)

Mix all the ingredients together in a bowl- a fork works well for breaking up the nut butter, which can be sticky.  Heat butter, ghee, or coconut oil in a pan and cook away.  Be careful not to burn the cakes, they don't bubble up like regular pancakes, so keep an eye on them.  To make the pancakes crispy put them in the oven or toaster oven on 350 for a few minutes.

Now comes the fun part- figuring out what delightful things to put on top of these crispy cakes.  I top mine with some rhubarb compote I whipped up, which is just rhubarb cooked down with a little water, lemon juice, and a few drops of stevia for sweetness.  You could also top them with maple syrup, honey, fruit, yogurt or something savory such as cheese, meat, roasted veggies, or anything you would put on a cracker.

Jane