We are a collection of Minneapolis folks cooking, preserving, and harvesting local, seasonal foods. This blog-share is meant to inspire greater culinary genius, as well as continued local food invention. What are YOU concocting in that kitchen of yours?

10.03.2014

Paleo Sushi

Last weekend I bought some wild coho salmon from the Seward because it was on sale, and in deciding how to prepare it, My Charming Companion was urging sashimi. Which then created a desire for some sushi rolls to go with. The amazing thing was I had all my fave sushi ingredients in the cupboard and fridge - even some pickled ginger - so impromptu sushi dinner it was. In my pre-paleo days I ate homemade sushi pretty often. I had looked at various paleo sushi options online over the last few years, never seeing anything I was excited about. But Studio Snacks had a version recently that included a one-egg omelette-like layer in lieu of rice that I found intriguing. So that is what I tried - it turned out amazing! And was actually much easier than traditional rice sushi because the egg is way less fussier than the rice. This would work for all kinds of sushi rolls, but here are the two I made.

Paleo California Roll
Nori sheets
cucumber, sliced lengthwise
carrots, sliced lengthwise
homemade mayo (opt)
1 egg per sushi roll
coconut aminos
avocado, sliced
sesame seeds (opt)

Paleo Salmon Roll
Thin slice of quality raw salmon
1 egg per sushi roll
coconut aminos
homemade mayo (opt)
cucumber, sliced lengthwise
sesame oil
toasted sesame seeds (opt)


1. Prep all veggies/fish - slice them and have them ready to lay in roll.
2. Make egg "sheets":To prepare them you will need one egg per roll. Ideally you want a pan that is 8-9" wide that is either a well oiled cast iron, or a non-stick pan. Heat the pan on med, with just a bit of coconut oil on the bottom (I replenished the coconut oil for each egg sheet). While pan is heating, mix one egg with a splash of coconut aminos. When pan is hot, pour egg into pan and swish around so that the egg layer covers the entire pan. You want the heat setting so that it cooks the egg pretty quickly, but not immediately. I tried two techniques next: either flip the egg to cook the other side (this takes about 10 seconds since it will be mostly cooked through), or just cook it all the way on side one. Either method works - just be somewhat careful because the egg sheet is quite thin, and you want it mostly intact to lay on the nori paper.
3. Assemble rolls: Lay one sheet of nori down. Spread a thin layer of mayo (if using) along bottom half of the nori. Lay your egg "sheet" on top - it should cover much of the nori. Then make one layer of your veggies/fish. Experiment with how much to fill. Roll up, using a bit of water to "seal" the nori to itself. (Studio Snacks has some photos about how this looks step by step.)
*One note is that because the egg sheets are round they will inherently have a less tight roll at the ends. You could cut the sheets into squares, or just trim one part of the circle and place it on the edges of the roll to make this more even. I just used the egg as is and had slightly uneven ends!
4. Slice sushi rolls. If you made the raw salmon ones, drizzle some toasted sesame oil over the top. Sprinkle rolls with toasted sesame seeds if you want, and serve with coconut aminos, wasabi, and pickled ginger.

The photo shows the full spread, including the sashimi of salmon with ginger (beautifully cut and arranged by My Charming Companion). Another endeavor I hope to try is to pickle my own ginger, maybe with a little honey. I found a couple of fermented versions, so I'll post that when I get around to trying it.


10.01.2014

Sicilian Dried Zucchini

I stumbled upon this dried zucchini recipe at Hunter, Angler, Gardener, Cook recently, and decided it would be worth testing out since I am always on the hunt for new ways to consume zucchini. (My fave way of eating zucchini lately is actually the Zucchini Noodle Bowl I posted a month or two ago - it's become a staple breakfast for me. Zucchini makes fantastic Asian soup noodles - I can eat this several mornings a week it is so good!)

I actually made this Zucchini recipe a couple of weeks ago, and am finally posting now as the weather is turning and the zucchini is waning. If you have any left, this is a nice way to use up a lot. It tastes delicious, and is texturally really different than you would expect. It's really dense and almost meaty - like vegetarian pepperoni (they are a bit salty too from the salt sweating). The recipe takes a bit of time...salting slices and dehydrating, but is somewhat novel - I wished I had dinner guests to share the dish with!

Post dehydrator zucchini - see how they are a little pepperoni like?!
I'm just going to send this recipe directly to his blog post because he includes lots of helpful tips. He gives an option for drying the zucchini in the hot summer air (he's in Northern California), but here in MN we are blessed with humidity, and that means air drying would definitely not be an option. You have to use a dehydrator here. I followed his directions and sliced my zucchini, then laid it out on trays with salt; I waited 30 minutes then patted the slices dry. I actually think you can easily just salt slices and put them in a colander for 30 minutes, swirl them around a bit, and pat dry. I've done this to "sweat" zucchini before and it works fine - using less space and salt. It also took closer to 4 hours in my dehydrator - though that may have been because I had a couple of trays of cherry tomatoes in there too.

The final cooking with mint, lemon, and chili pepper was delicious. Worth a summer day's experiment for sure!

9.29.2014

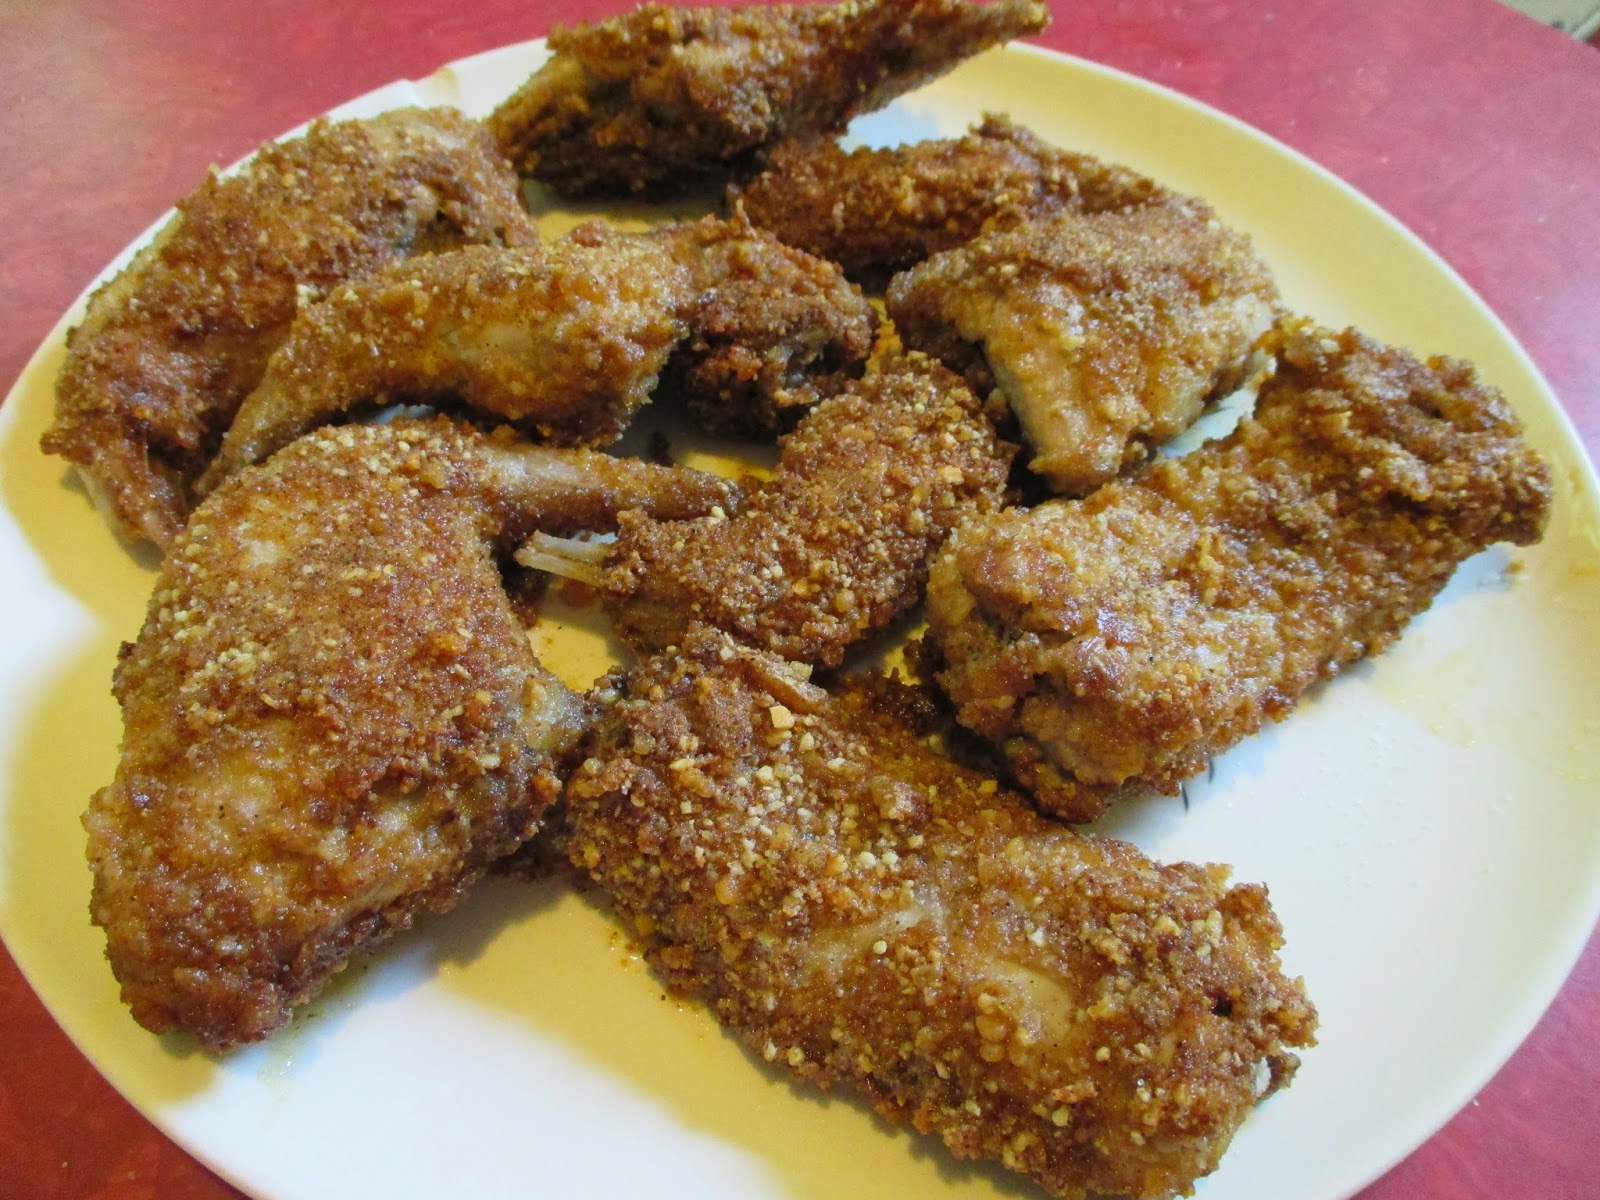
Minnesota Fried Squirrel - Grain free


I have not eaten much fried chicken in my life, and I was joking that this meal is the closest thing I have ever had to KFC. (I did once eat KFC mashed potatoes at the end of a cross country bike trip - my sister and I had just arrived to the coast in Oregon, and were hungry for mashed potatoes. We got some from KFC and were sorely disappointed!) So My Charming Companion names these "MFS" instead. I don't know that it will become the next big restaurant chain - but these WERE super tasty. If you don't have squirrel handy (perhaps you do not have a road-kill acquiring charming companion like I do) - chicken will also work. Squirrel is tougher than chicken though, so it needs to be poached for a good 30-60 minutes first. If you haven't eaten squirrel, it's a darker meat. I have eaten goose only once, and I thought it was a bit goose like. But really it is just like chicken, but smaller.

This MFS also utilizes the new frying technique that My Charming Companion has been working on (initially for fish frying). Guess what works great? Parmesan cheese (the kind from a can at Cub foods) and ground up pork rinds. They turn out crisp, crunchy, and delicious. Also - there are actually no weird products in either the parmesan or the pork rinds. Who knew? The pork rinds are fried in their own pork fat (double check that in the ingredients, this may vary by brand) so you aren't getting some weird oils, and salt is the only other ingredient. It isn't a pastured or grass fed animal, but I guess I am not willing to make my own pork rinds just yet.

Minnesota Fried Squirrel (MFS)
1 squirrel per person (or chicken breasts or thighs)
Equal parts Parmesan cheese and ground pork rinds
1 egg, whisked
Bacon or pork belly fat for frying

1. If using squirrel, you'll need to poach it first to make it tender. Put squirrel pieces into pot and cover with water by about an inch. Depending on the size (age), you will need to boil for 30-60 minutes. You can test this by poking the meat with a fork. you want it to feel tender.

Cooked squirrel pieces
2. Prepare your parm/pork rind mix in a bowl. You'll need to grind the pork rinds in a coffee grinder or food processor to get a flour-like consistency. For two squirrels you will need about 1/4 c each of parm cheese and the powdered pork rinds.
3. Heat your pork fat in a cast iron - you'll need the pan to be filled about an inch on the bottom. You want this to be hot when you put in the meat - the fat should be smoking a bit.
4. Dip your pre-cooked squirrel or raw chicken pieces in the whisked egg, then coat with the fry mixture (turn it in the mix and make sure all sides are coated). Carefully lay in frying pan so as not to splatter yourself. Cook until crispy and browned on one side (about 4-6 minutes) and flip. If using pre-cooked squirrel, you do the same for side two, and then serve. If using raw chicken (or tender, aka young squirrel) then cover the pan with a lid, turn the heat to medium-low, and cook for 30-40 minutes. Once the chicken is done (you can  check with a thermometer), turn the heat up again and flip the meat over to re-crisp the top side.
5. Let meat rest for a couple of minutes to cool down enough to touch, then serve. We had these with some cauliflower mashed potatoes to complete the MFS meal. Yum!

Here is a fried sardine salad using the fry technique - yum!

9.26.2014

Lobster Mushroom Chowder

I just returned from a week long Boundary Waters trip - one of the highlights of which included eating lots of wild mushrooms! On last year's fall trip, My Charming Companion and I regretted not bringing a mushroom guide with us because there were so many mushrooms everywhere in the north woods. This year My Charming Companion did a bunch of research and made a handy cheat sheet.

Definitely not a beanie baby
Boletes lined most of the portages we crossed, and though I didn't get any photos, they are a delicious, buttery mushroom. The lobsters were the most spectacular though. I had only just heard of their existence on a portage; a young guy doing some wolf research with the forest service was seeming quite depressed because after 2 weeks they had yet to find any wolves, and his group was down to the lackluster meal options. My Charming Companion was showing him boletes, because the only mushroom the wolfer knew of prior to that were lobster mushrooms. I had never heard of them, and didn't ask any more. Later that afternoon upon arriving at our campsite, I was visiting the latrine when I looked over and saw what appeared to be a bright red beanie baby lying in the woods. If something is called a lobster mushroom, I thought - than this must be it!

One lobster lead to several more - the easiest mushroom hunt ever because nothing else is that color in the woods. We didn't see any more of these anywhere else on the trip, so somehow this site on clearwater lake was a lobster mushroom hotbed. They were delicious! Apparently these mushrooms are actually a mold that grows over the mushroom. It's the prettiest mold I've ever seen, but is why the shapes vary A LOT. Some are like shells, others are more bulbous. And they have a slight seafood scent when raw and cooking. They taste really nice, and are quite firm. They hold their shape well. We ate them once sauteed in some ghee with eggs, and again in a chowder (while Clearwater lake was bountiful in lobster mushrooms, it was bereft of fish - so what would otherwise have been a fish chowder, was a "lobster" chowder instead - ha).


If you ever come across these, a simple butter/ghee saute would be great. They can cook awhile, and they will turn the butter an orangey color. To prep: trim away any dirt areas, and slice in nice large slices. Some of them had brown spots - or lines really - I'm guessing it was the inner mushroom, or that they were older. I cut those parts out because we had so many and I wasn't sure about it, but upon some research at home, it seems fine to eat that too.


For our chowder, we started sauteing the mushrooms (in ghee) first since we had to do it in two batches (due to limited cooking vessels). Meanwhile we chopped up a few slices of bacon and cooked them, than added dehydrated onions, peppers, celery, and a few potatoes along with a bunch of water to hydrate everything. The hydration takes a good 15 minutes or so, and we added the mushrooms once they had softened and been sauteed a bit - there were too many mushrooms to fit in our largest pot, so we had a bit of overflow! Then we added some salt, pepper, and cajun seasoning and simmered everything another 10-15 minutes. We stirred up a bit of cream powder, and mixed that in at the end. It was delicious!


9.10.2014

Chinese Dumplings (Sui Mai) Paleo-style

I'm pretty picky about what blogs I follow...I want them to be paleo, I want them to feature mostly food for meals (not desserts), and I don't really like when there is lots of promotional material. I also like when they feature foods from various cultural cuisines. Really, I have only a few staples that I check out regularly (i'm on the hunt for more). Studio Snacks is my recent find - I've mentioned the blog before, but this is my first mostly-true-to-recipe post. She seems to be on a quest to create some paleo dim sum options, this one being Sui Mai (stuffed zucchini). I haven't ever had dim sum, which will be my fate unless a gluten free dim sum place appears. But really, I found these delicious, so who needs it?!

I actually think I can do some more playing around with them. I made these twice - both times using zucchini instead of yellow squash because, well, the zucchini just keep growing. The first time I steamed the dumplings as directed, but found they were too watery for my taste. The second time I baked them in the oven, but then the meat texture wasn't as nice. I am not sure if this is a) due to baking, b) because I used a spoon to mix the pork/shrimp mixture and not my hands (maybe the fat from the pork didn't set well enough with the rest of the ingredients?), c) because I let the meat mixture sit out longer before stuffing the zucchini, or d) because the zucchini were larger and maybe too big, hence needing a longer cooking time and possibly over-cooking them.

Ultimately either cooking method worked, but the steaming meant watery dumplings, and the baking version had meat was a bit soft. Take 2 also included a trial of stuffing the meat mixture into mushrooms, but I didn't find that as tasty. The mushrooms were too strongly flavored, whereas the zucchini is more neutral. My Charming Companion (who was really excited about these because, unlike me, he has a long history of dim sum eating and was missing dumplings) also suggested trying to wrap these in steamed cabbage leaves, which I find intriguing and want to try.

Anyway - you can also just make this meat mixture, fry it up in mini patties, and eat dipped in some sauce. I did that with part of batch one and it was delicious.The meat gets a nice sear on it that way too!

Stuffed Zucchini "Dumplings"
3-4 medium zucchini
1/2 pound ground pork
5 large shrimp
6 shiitake mushrooms
1/2 inch of ginger
1/2 teaspoon fish sauce
1/2 teaspoon sea salt
1 teaspoon roasted sesame oil
1/2 teaspoon white pepper powder
1/4 teaspoon 5-spice powder (optional)

1. Shell/devein the shrimp; mince it, along with ginger and muchrooms. Mix together with the pork.
2. Add remaining ingredients and mix into pork mixture. Use your hands (just in case this contributed to better meat texture) to really blend the flavors. Put mixture in fridge while you prep the zucchini.
3. Cut zucchini into 1/2" thick slices. Using a spoon, score around each slice in a circle, then dig into the circle and scoop out the center. Imagine you are using a melon ball scoop - but it's a spoon.
4. Fill each ball with meat mixture (it will be super sticky - wetting your hands will help). If you are steaming, start the water boiling in your steamer; to bake, heat oven to 350. To steam: put sui mai into steamer and steam for 15 minutes, or until pork is cooked. To bake: bake for 15-20 minutes until pork is done.
5. Serve with dipping sauce below!

I first used a simple coconut aminos/fish sauce/sriracha to dip these in, but My Charming Companion was not having that. The recipe he devised is a bit more traditional, and was delicious.

Dipping Sauce
2 T coconut aminos
2 T rice wine vinegar (or white wine vinegar)
1 tsp grated fresh ginger
sprinkle of sesame seeds
splash of sesame oil

9.08.2014

Paleo Tabbouleh

This photo is with hemp seeds - but pepitas are just as good!
I was never a big tabbouleh fan - I'm not sure why really, except that it just seemed to be too much parsley and too grain-y. (Traditionally the salad is largely bulgher.) But this recipe is not that way it all - this version is all fresh veggies with just a bit of grain crunch - though in this case the "grain" is some chopped up pepitas.

The recipe I modeled this version from is actually a nutiva recipe - I order my coconut oil from them because it is super cheap to get in a 1 gallon bucket. Their original recipe uses hemp seeds (no pepitas), but hempseeds are expensive. I did try the recipe with hempseeds initially (see photo) only to realize that I could really use any number of chopped nuts/seeds. And it turns out I LOVE tabbouleh! At least this version. You could certainly add more pepitas - but I like them as a small part of the overall salad.

Garlic chive blossoms
I also used some garlic chive blossoms instead of onion. These are all over the garden at the Northside homestead - and they are not actually related to the garlic plant (good for my garlic allergy) - and are more like chives. The blossoms taste like mild green onion, but with fun texture. I've been putting them in just about any fresh salad thing because they are so plentiful and pretty. Also they grow like crazy - I am going to bring some down to my house so they can be there for late in the season fresh onion-ness.

Paleo Tabbouleh
Huge bunch parsley (I used flat leaf cuz that's whats in my garden)
1/2 c chopped pepitas (or hemp seeds)
2 c cucumber, diced
1 c tomato, diced (use a nice sweet variety)
1/4 c red onion or garlic chive blossoms, diced
1/4 c fresh lemon juice
6 T olive oil
1 tsp sea salt

1. Mix parsley, pepitas, cucumbers, tomatoes and onion/chives in a bowl.
2. In a small bowl mix lemon juice, salt, and olive oil. Pour over tabbouleh. Serve!

8.27.2014

Grain-free Carrot Muffins

I don't eat a lot of paleo baked goods - but for whatever reason this one has made it into my repeat repertoire. This is a recipe from my neighbor that I adapted just slightly - these muffins are just plain delicious; they are moist and dense, and are perfect with some morning tea.


Grain-Free Carrot Muffins makes 12
2 eggs, separated
1 more egg
1/4 c softened butter or ghee
1/4 cup thick coconut milk/cream
1/4 c honey (or less, or sub stevia)
2 1/2 c almond meal
1 tsp cinnamon
1 tsp baking soda
pinch salt
2 tsp lemon zest
1-2 c grated carrots
1/4 c raisins
1/4+ c walnuts
1/4 c unsweetened shredded coconut

1. Preheat oven to 300 degrees.
2. Beat egg whites until stiff. Add egg and yolks, ghee, honey, almond meal, cinnamon, baking soda, salt and lemon zest. Mix together. Add carrots, nuts, raisins and coconut.
3. Bake for 30-40 minutes. These are good warm out of the oven, or chilled. I kept the extras in the fridge in a covered container, and they easily last 1-2 weeks.